Introduction
In this release we introduce two major improvements of Oxygen HIG that significantly expand the opportunities of inclusion editing at quality control (QC) stage: automatic glue detection and manual voxel QC tools.
Automatic glue detection is the part of autoplotting (its latest stage). The algorithm makes an attempt to select and remove glue automatically. After this the operator has to confirm or reject the result of removing glue.
Manual voxel QC tools give an opportunity for flexible manual modification of autoplotted inclusions in real time. In voxel QC tools mode you will be able to split combined inclusions by plane, delete wrong parts of inclusion, tune shape of each inclusion (like it was done by postprocessing) in real time, merge several (or all) inclusions in a one to perform the operation with group of inclusions, cut subsurface layer inclusions.
Please, note that these program improvements require NVIDIA video card with video memory not less than 3Gb. Basic hardware configuration that is used for autoplotting will be suitable.
Also we have fixed minor bugs and accelerated autoplotting algorithm in case when you use 2 GPUs instead of one.
Automatic glue detection
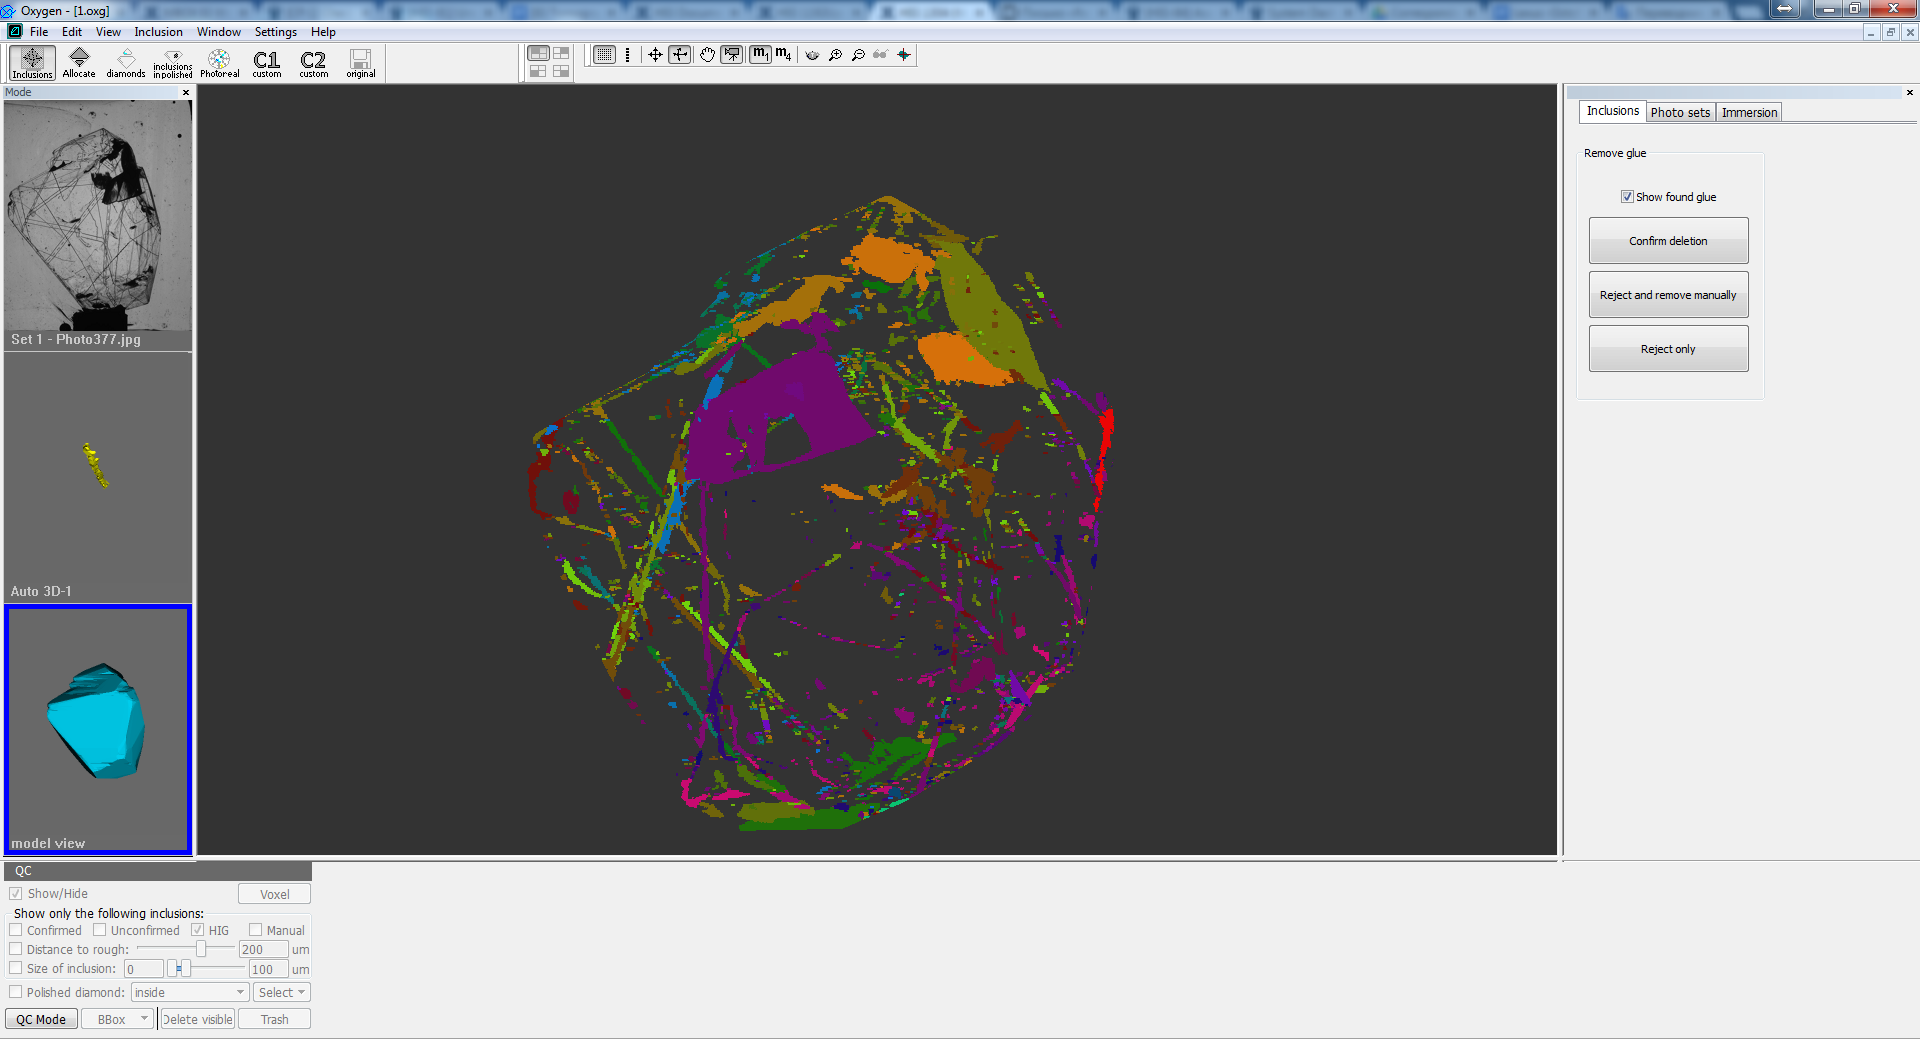
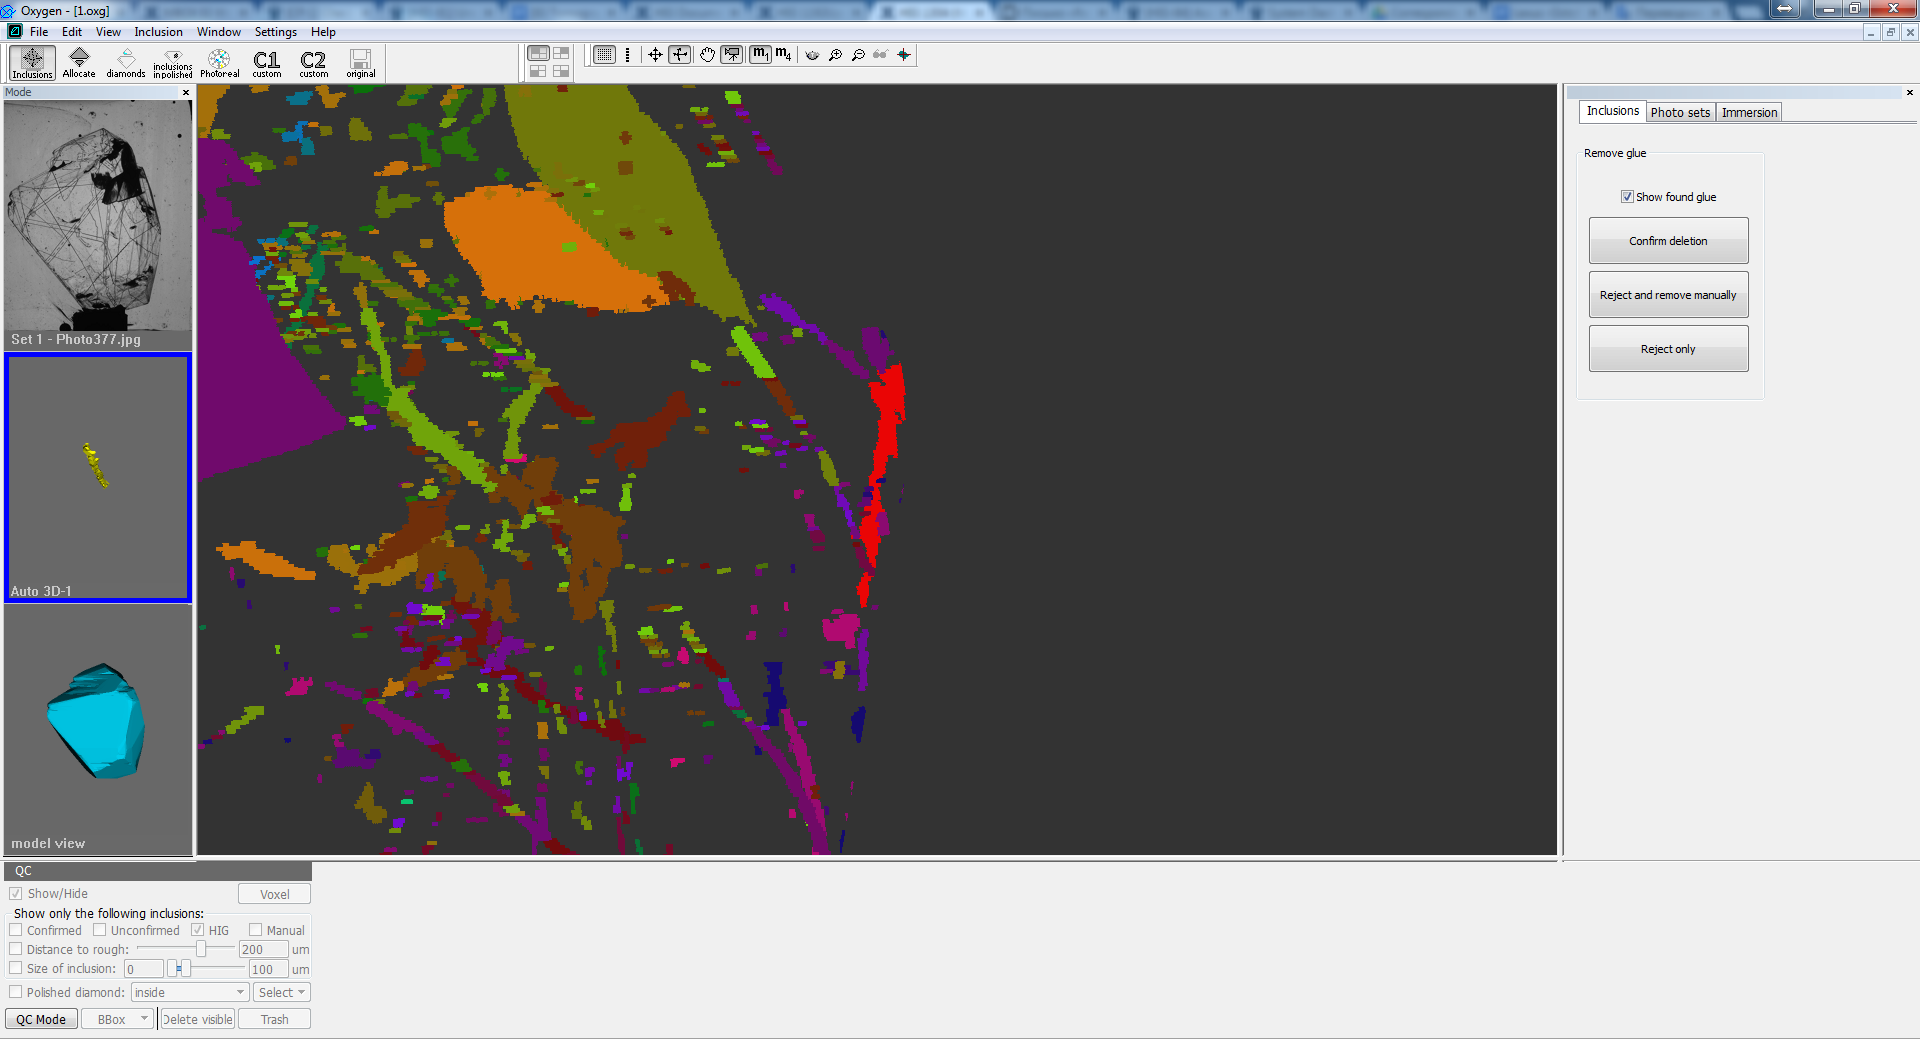
Glue removal is a mandatory part of QC, and we hope that automatical glue detection module will help to do this. Automatic glue detection is launched at the latest stage of autoplotting (you will see the progress bar "Detecting glue"). If the glue detection was successful, you will see the automatic glue confirmation panel instead of classical inclusion panel:
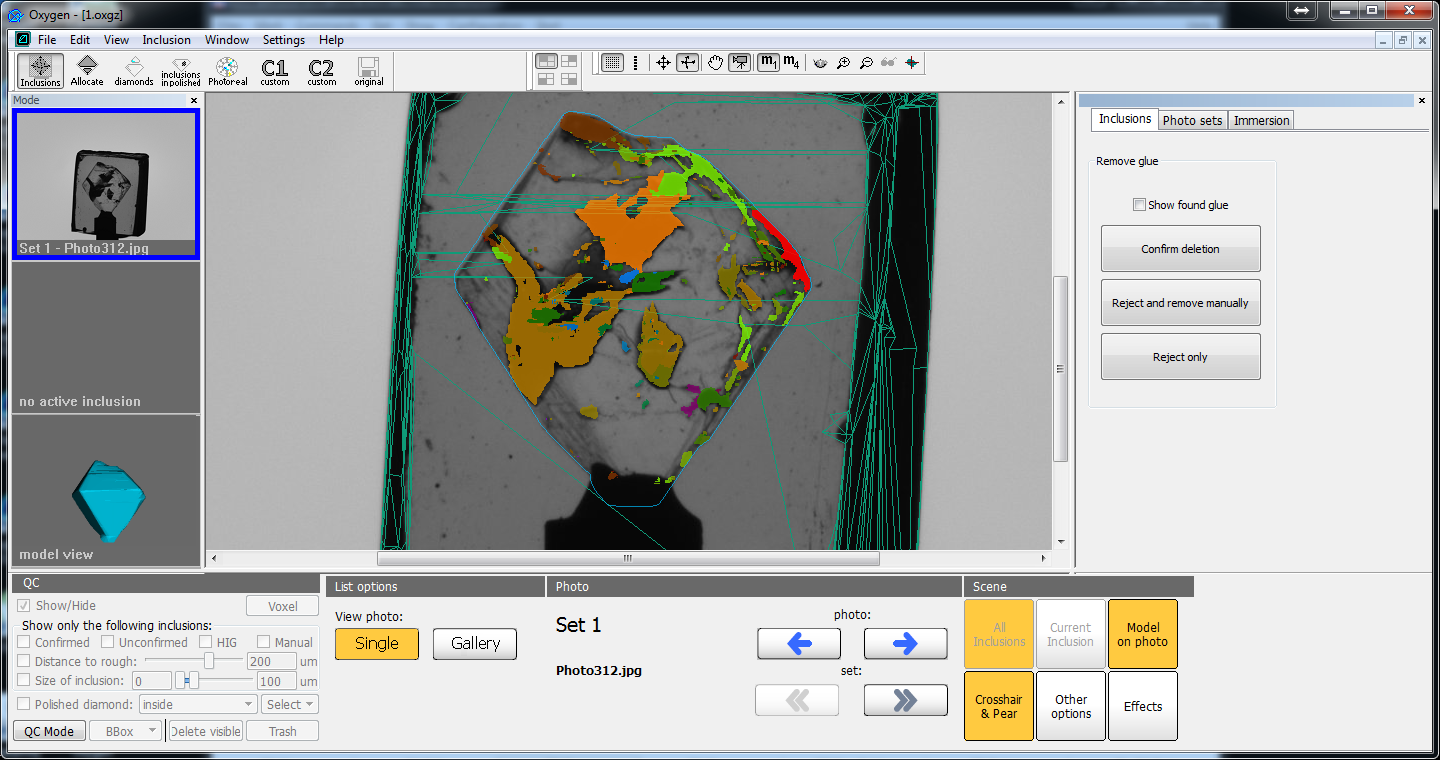
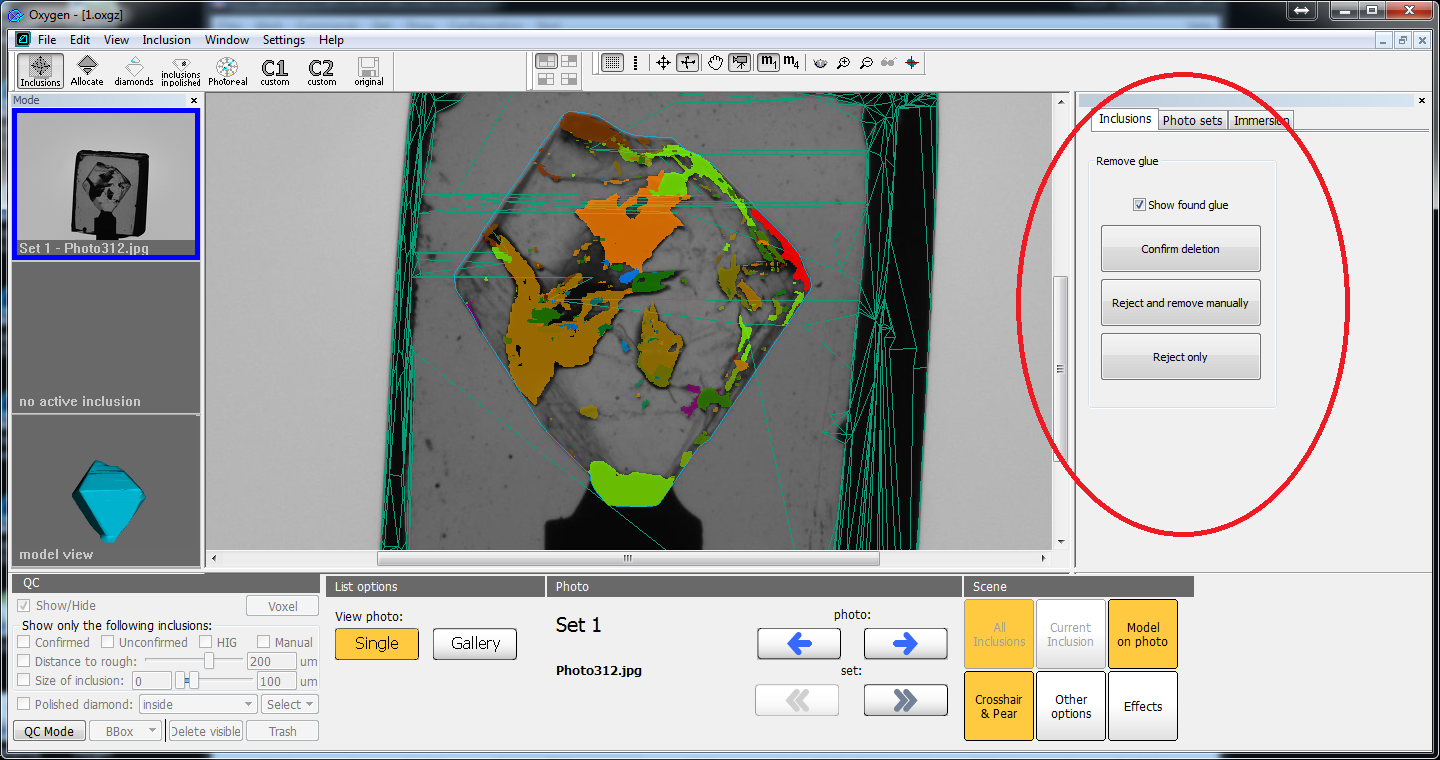
Switching the checkbox "Show found glue" you may enable/disable the glue component that was detected and removed. Switching this checkbox (and watching at glue reprojections on different photos) you have to decide if the result is right. If it is right, hit the button "Confirm deletion". After this the program will be switched into voxel QC mode. To get more information about this mode, please refer the chapter "Manual voxel QC tools". If the result of automatic glue detector was wrong you will have two opportunities:
- Reject the result and remove the glue (or edit other inclusions) in voxel QC mode. If so, hit the button "Reject and remove manually".
- Simply reject the result without switching to voxel QC mode. Using this option you may get the result equivalent to usual results of autoplotting (in previous version of program). If you want only to reject the result of glue detector, hit the button "Reject only".
If you notice some strange results of glue autodetection or the autodetection takes too much time (normally it takes no longer than half a minute), please send us such samples (oxg and HIG photos).
NOTE: How to turn off automatic glue detector (use this instruction in critical cases)
If you notice critical problems in automatic glue detector (for example, if you have no opportunity to save the result of autoplotting) or the autodetection takes too much time, you also may turn off automatic glue detector. To do this, rename the file ig-custom-settings_turn_off_glue_detection.xml to ig-custom-settings.xml and relaunch autoplotting. After these changes the autoplotting program will skip the automatic glue detection stage.
Please, use this instruction only in critical situation, because we need your feedback about this module.
Manual voxel QC tools
Introduction and basic concepts
Voxel QC mode is a special QC mode where the most of useful operations (like inclusion cutting and easy inclusion shape tuning) may be done in real time. The voxel QC mode operates with inclusions in a special voxel format that differs from classical polygonal format (in classical 'Inclusions' panel). Convertion between these two formats is time consuming. That is why to save your time try to launch voxel QC mode once and tune all inclusions at once rather than launch voxel QC tools many times to modificate inclusions one-by-one (that is not prohibitted, but it is not recommended).
Classical manual inclusion editing operations (like adding contour) do not work in voxel QC mode as well as voxel tools cannot be applicable in classical (not in voxel) QC mode. We expect that at this moment voxel QC tools will solve all possible QC problems, except creation of new inclusion (you may create it only using classical manual QC tools). That is why we recommend to apply voxel QC tools first for splitting inclusions and tuning their shape and then apply classical manual QC tools if it is necessary.
In voxel QC mode you may split combined inclusions by plane, delete wrong parts of inclusion, tune shape of each inclusion (like it was done by postprocessing) in real time, merge several (or all) inclusions in a one to apply the operation to a group of inclusions, cut subsurface layer inclusions.
The new smart inclusion shape tuning in voxel QC mode works similar to postprocessing algorithms (Sensitive, Moderate, etc.) but it is more flexible:
- It works in real time
- You may modificate inclusion shape not only for all inclusions at once but also for one selected inclusion or group of inclusions
- You may adjust the shape by slider instead of brute-forcing of all possible postprocessing algorithms
Due to these facts, from this moment postprocessing algorithms are obsolete and you cannot use them in a usual way in this version of program. To learn how to emulate postprocessing algorithms in voxel QC mode, please, refer chapter "Practically important cases".
In chapter "Launching voxel QC tools" we describe all the possible ways to launch voxel QC tools. In chapter "Main operations" all possible voxel QC operations are described, and in "Practically important cases" we describe important combinations of operations valuable for QC process.
Launching voxel QC tools
There are two possible ways to launch voxel QC tools:
- From automatic glue detection panel, hitting buttons "Confirm deletion" or "Reject and remove manually"
- From QC panel
The first way has been already described in chapter "Automatic glue detection". Here we will describe the second way:
- Enable voxel QC mode by clicking the button "QC mode" on QC panel:

2. Select inclusions for which you want to apply voxel QC tools. In simple case you may select all HIG inclusions, by checking the option HIG inclusions:
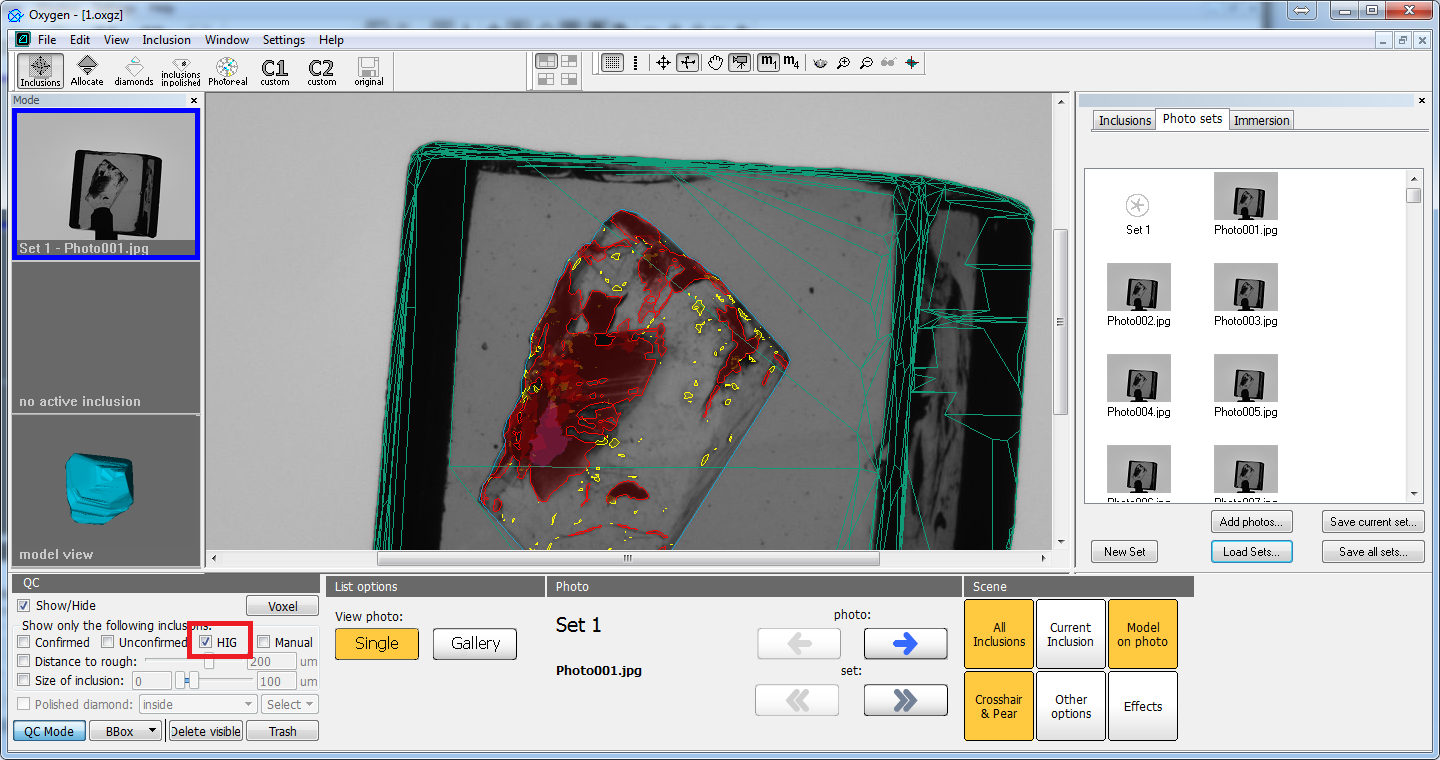
3. Click on "Voxel" button to launch voxel QC mode:
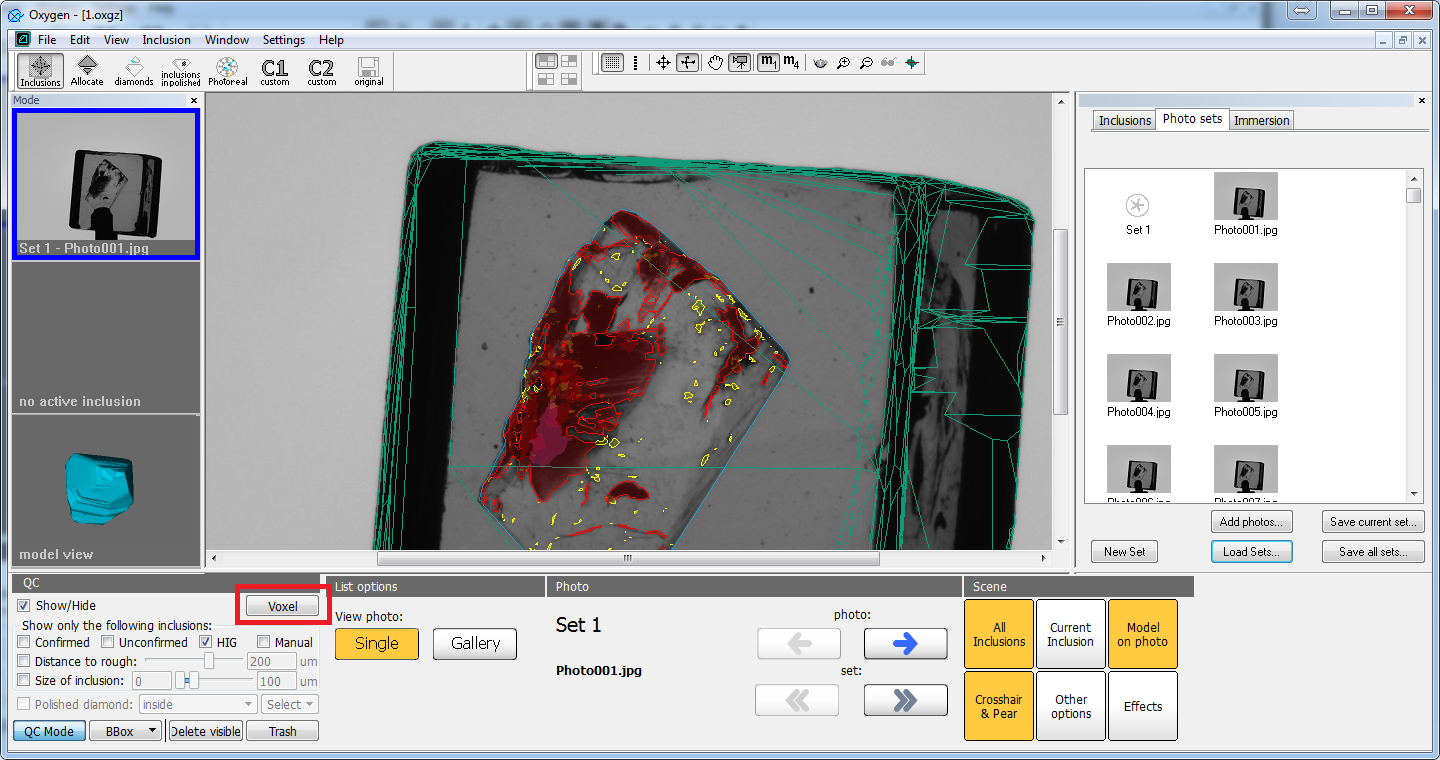
If the launch was successful, you will see the manual voxel QC panel instead of classical 'Inclusion' panel:

Launching voxel QC tools from oxgz file
You may launch voxel QC tools for oxg/oxgz files loaded from disk. So you may postpone QC stage and perform it later (not immediately after autoplotting). To do this save the results of autoplotting to oxgz file. Saving to oxg file is not recommended because the size of file will be more than 250 Mb. Then later you may open this file in Oxygen, load HIG photos and launch voxel QC tools through QC panel.
Important notes:
- You may launch voxel QC tools only for oxgz files, saved after autoplotting by this version of software. Oxg/oxgz files saved by previous versions of the program do not contain additional information needed for voxel QC tools.
- Do not forget to load HIG photos before launching QC tools.
Main operations
In this chapter we will describe the main functionality of voxel QC tools.
Voxel inclusion visualization
The program supports the similar visualization modes for voxel inclusions that are available for polygonal ones:
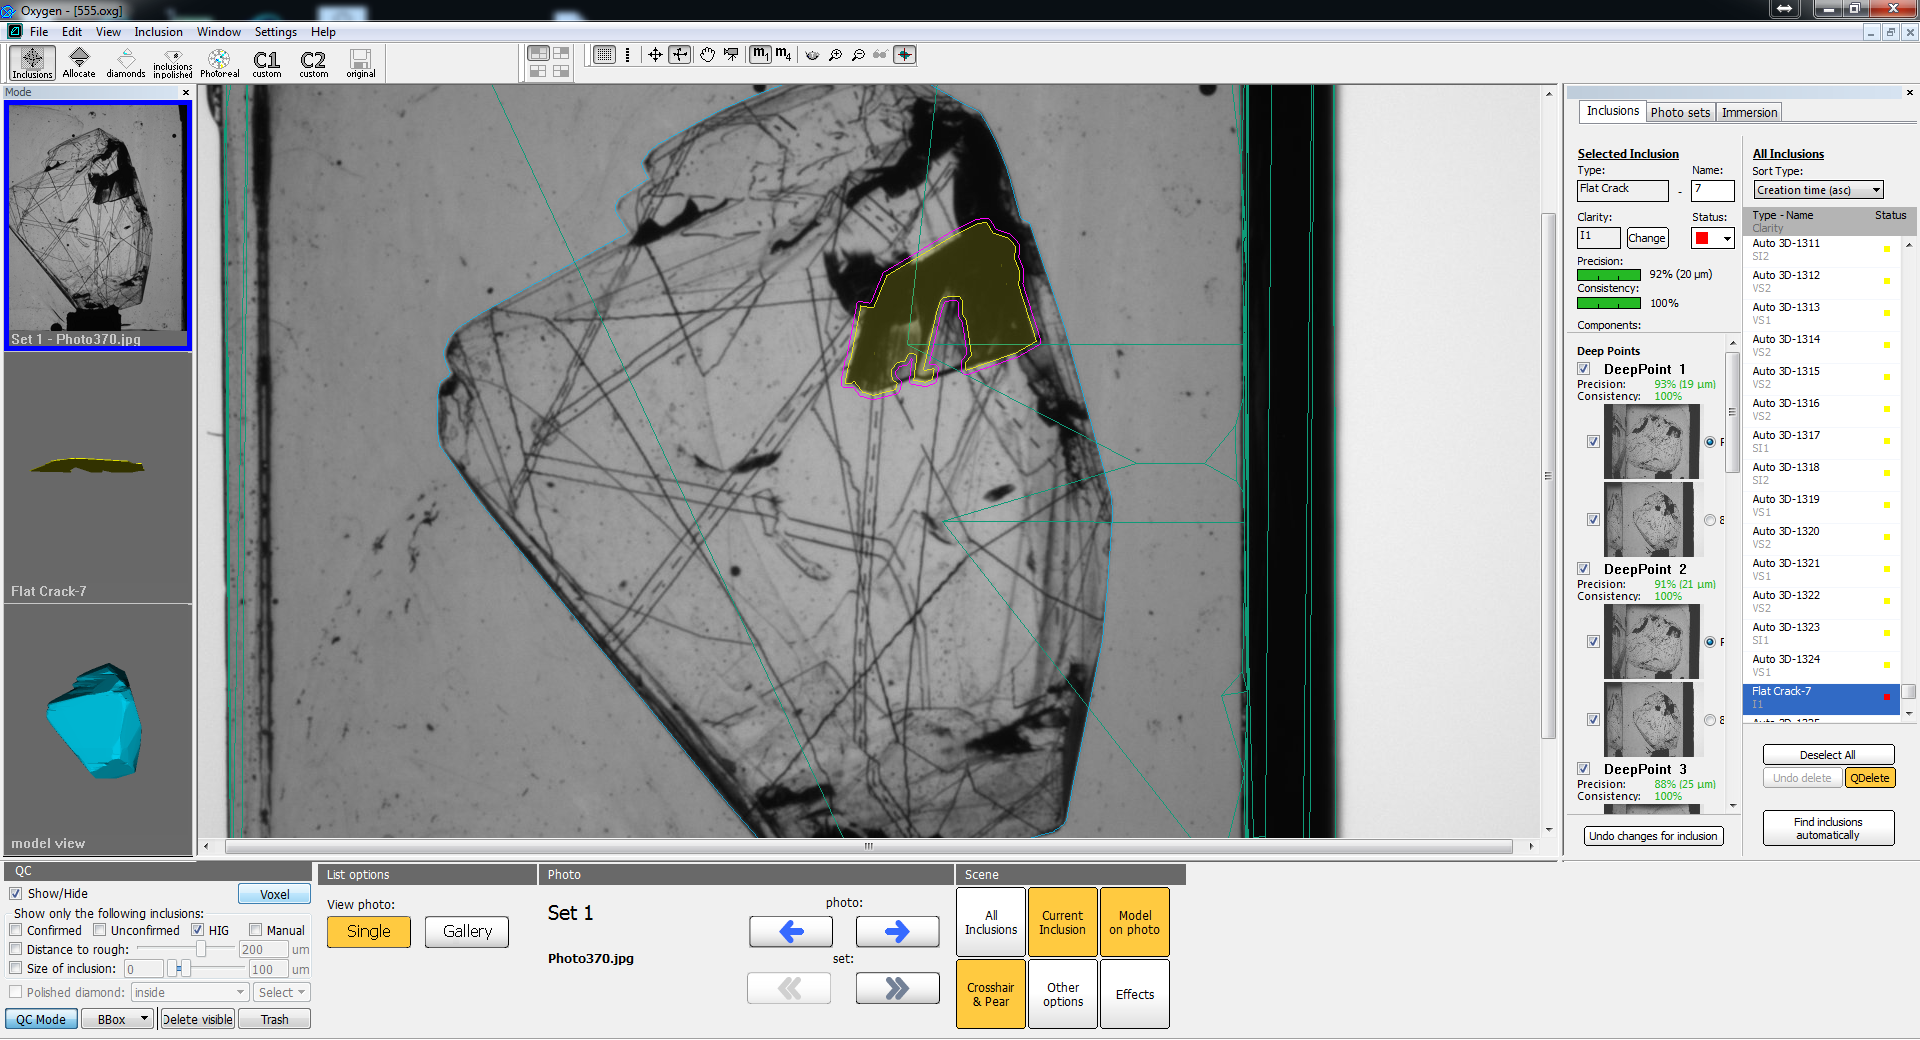
- Photo view, when reprojections are above HIG photo, in both mono and stereo modes. The semantics of "All inclusions", "Current inclusion", "Model on photo", "Crosshair & Pear" buttons is the same as for polygonal inclusions:

- Model view, where voxel inclusions are reprojected without refraction, in mono and stereo modes. The main difference from polygonal inclusion mode is that stone and cube models are not rendered:
- Active inclusion view is equavalent to model view, but it focuses on current selected inclusion. You may select current inclusion by mouse in any view or select them in voxel inclusion list (see chapter Voxel inclusion list):
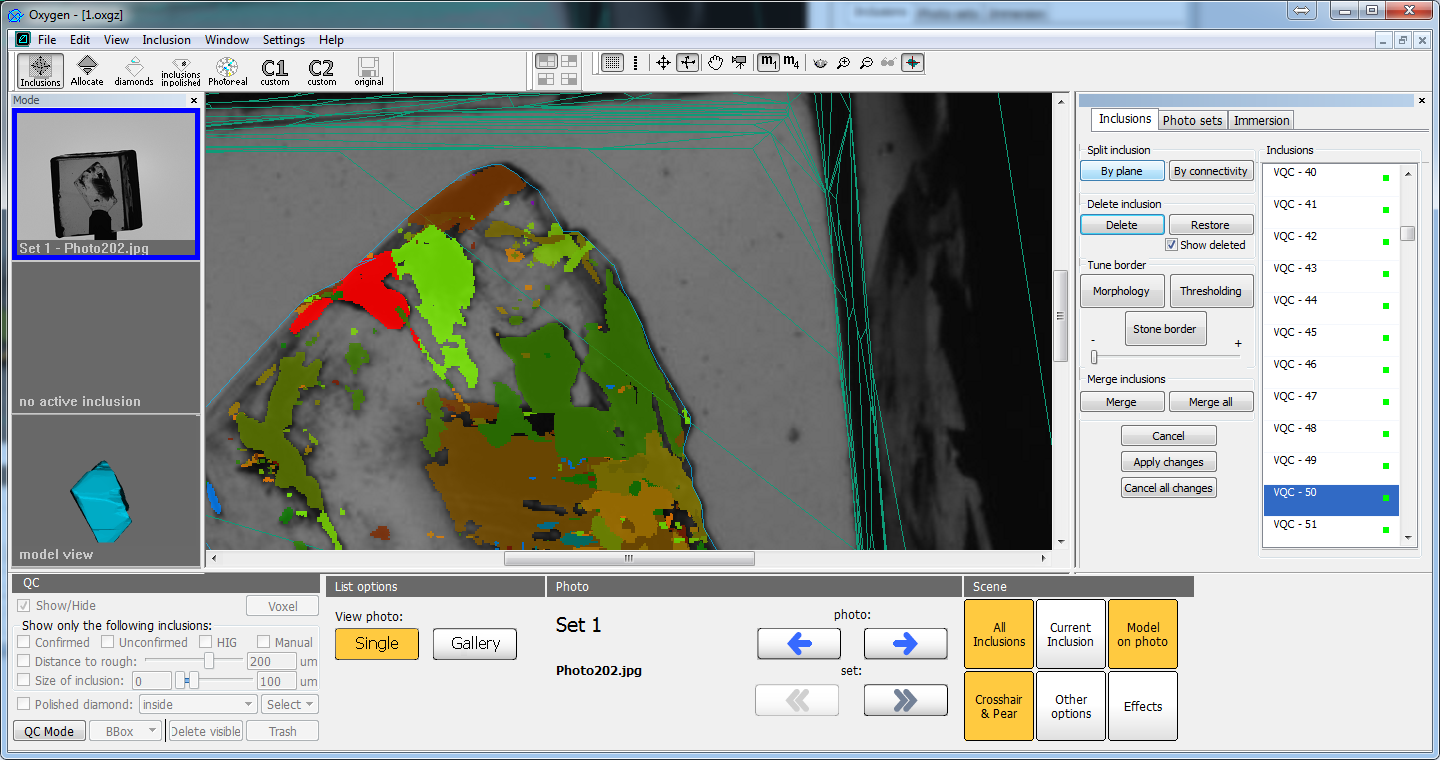
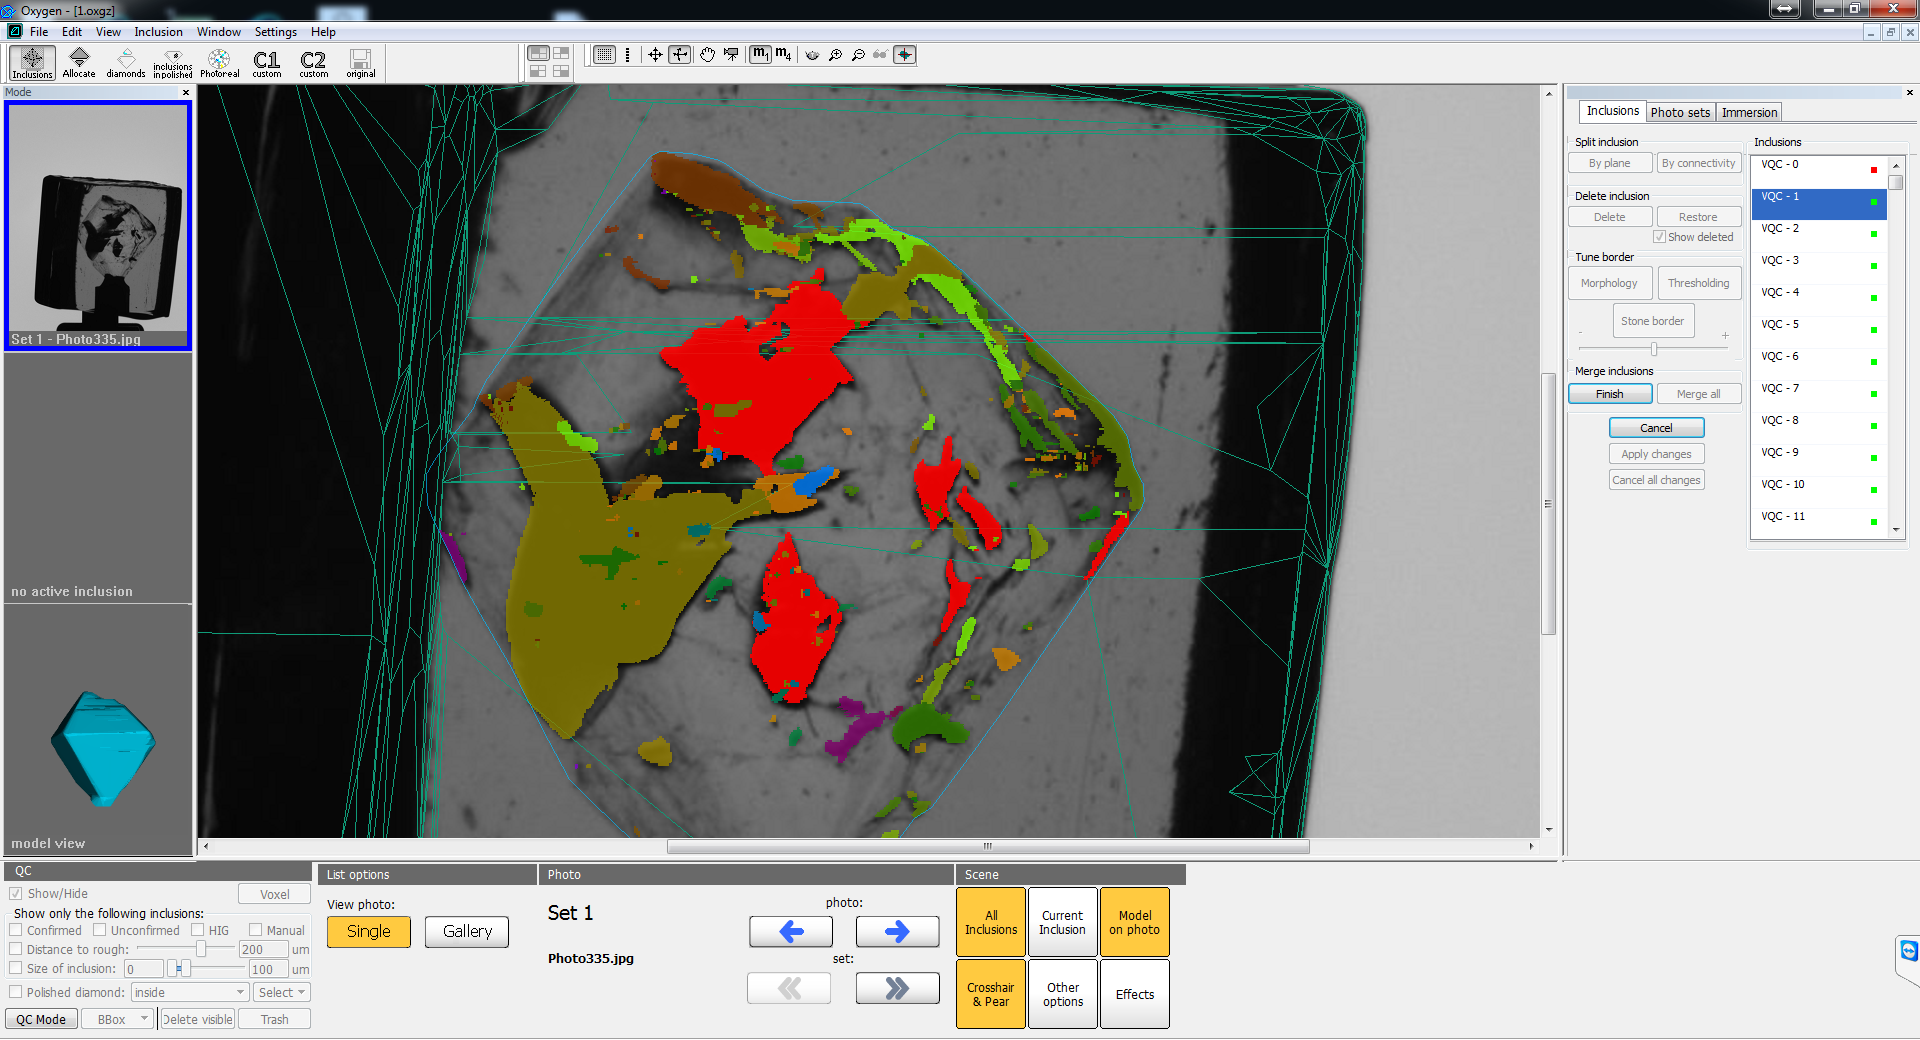
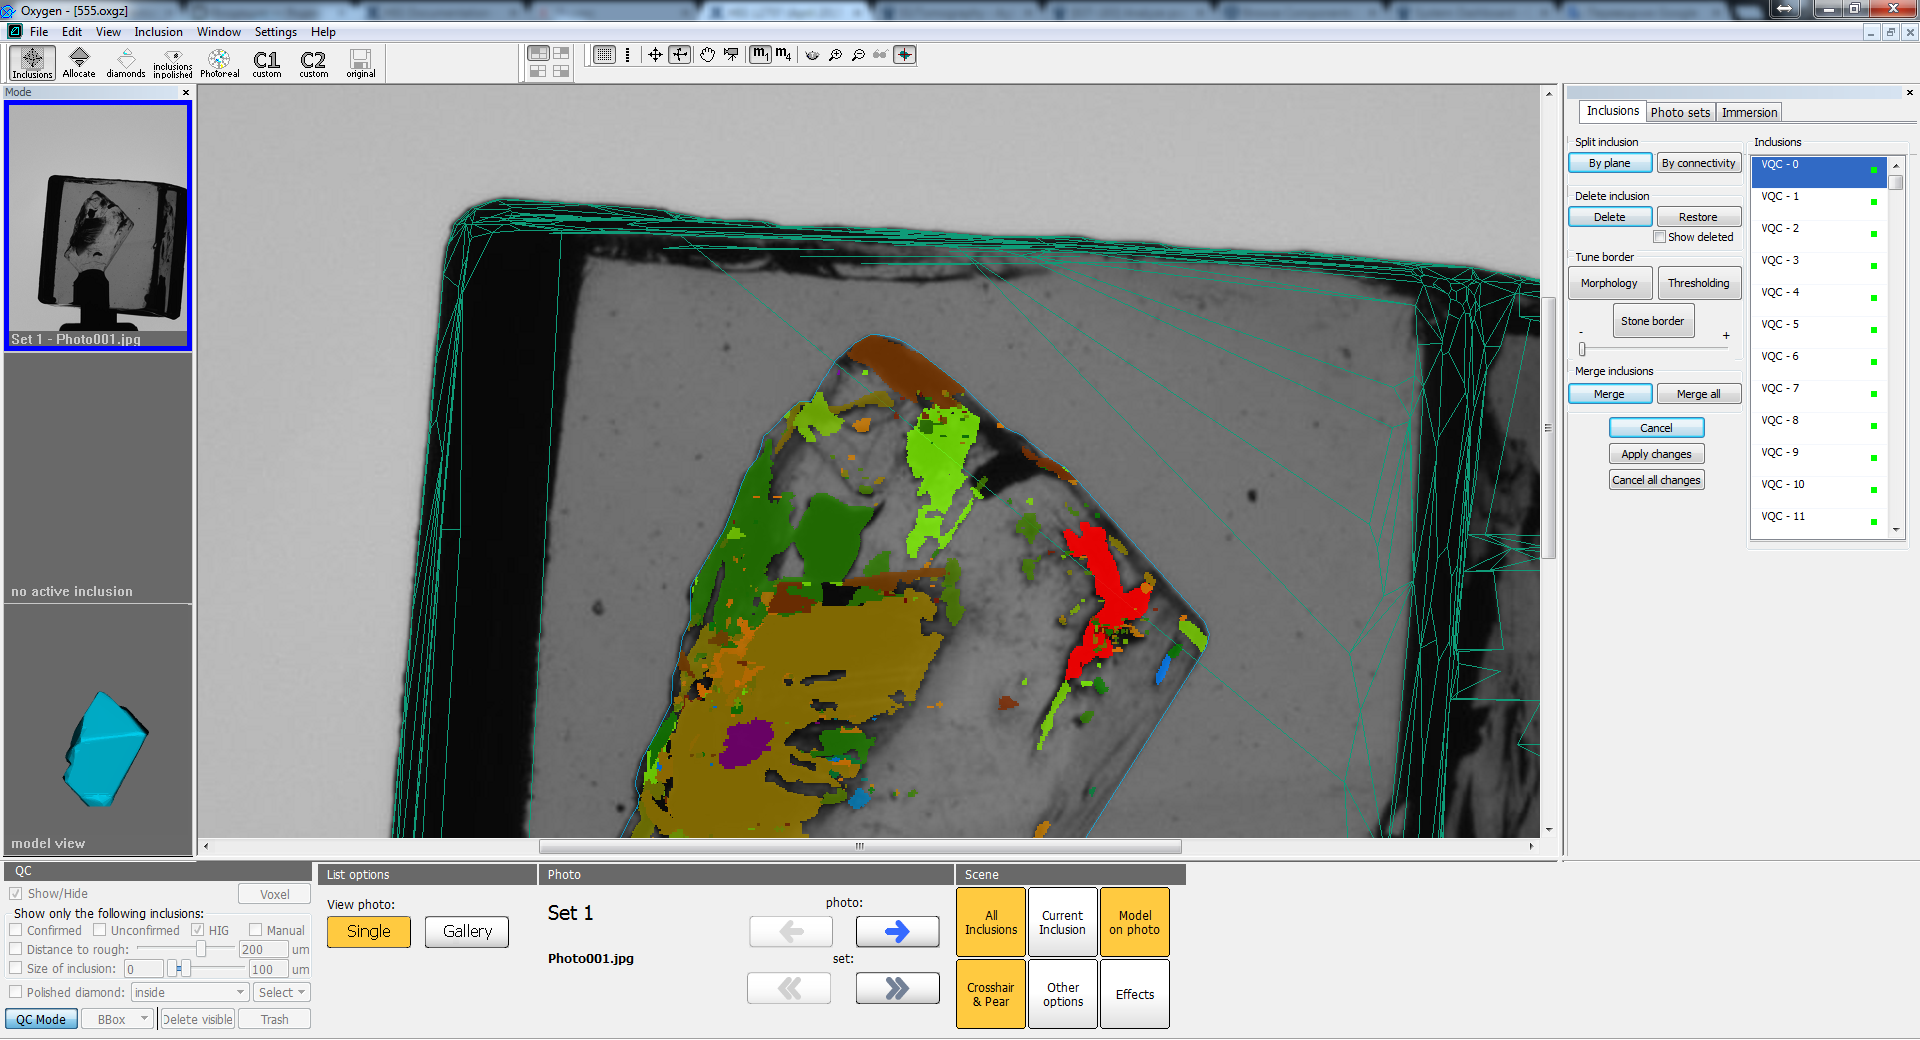
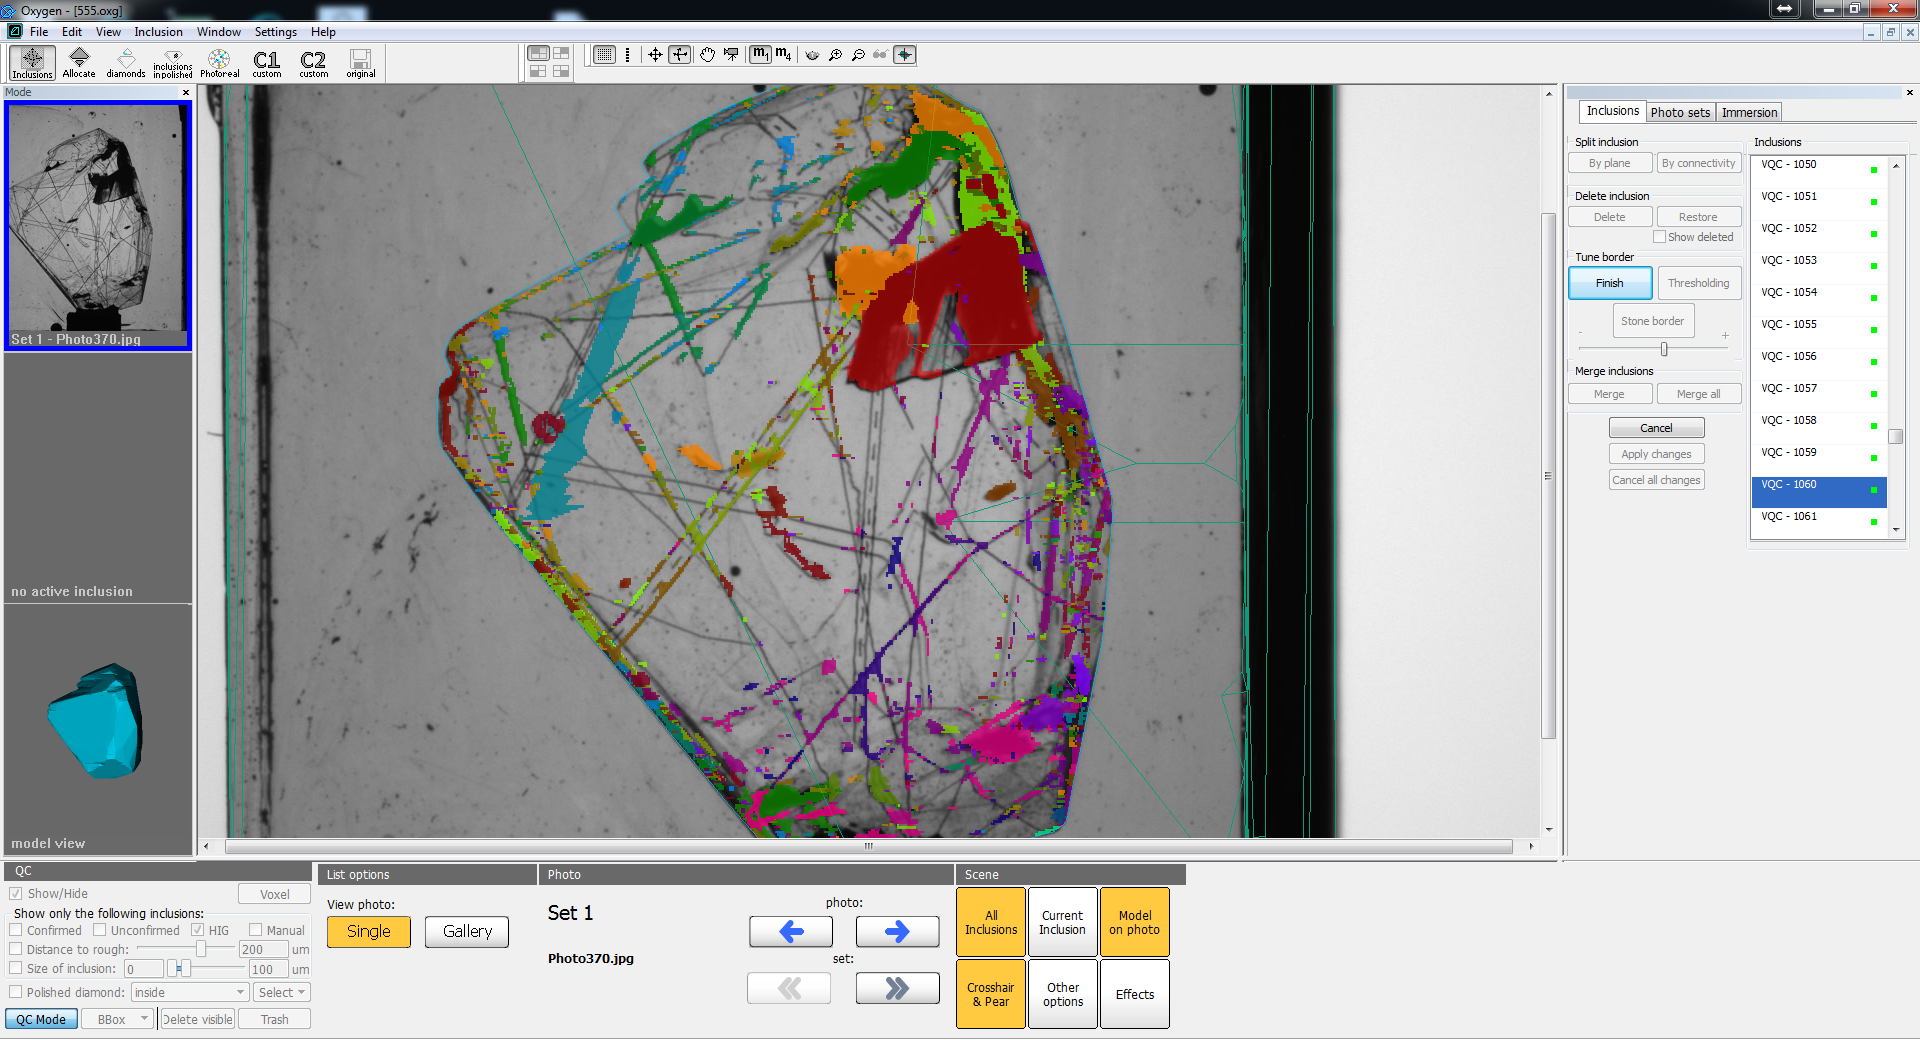
Voxel inclusion list
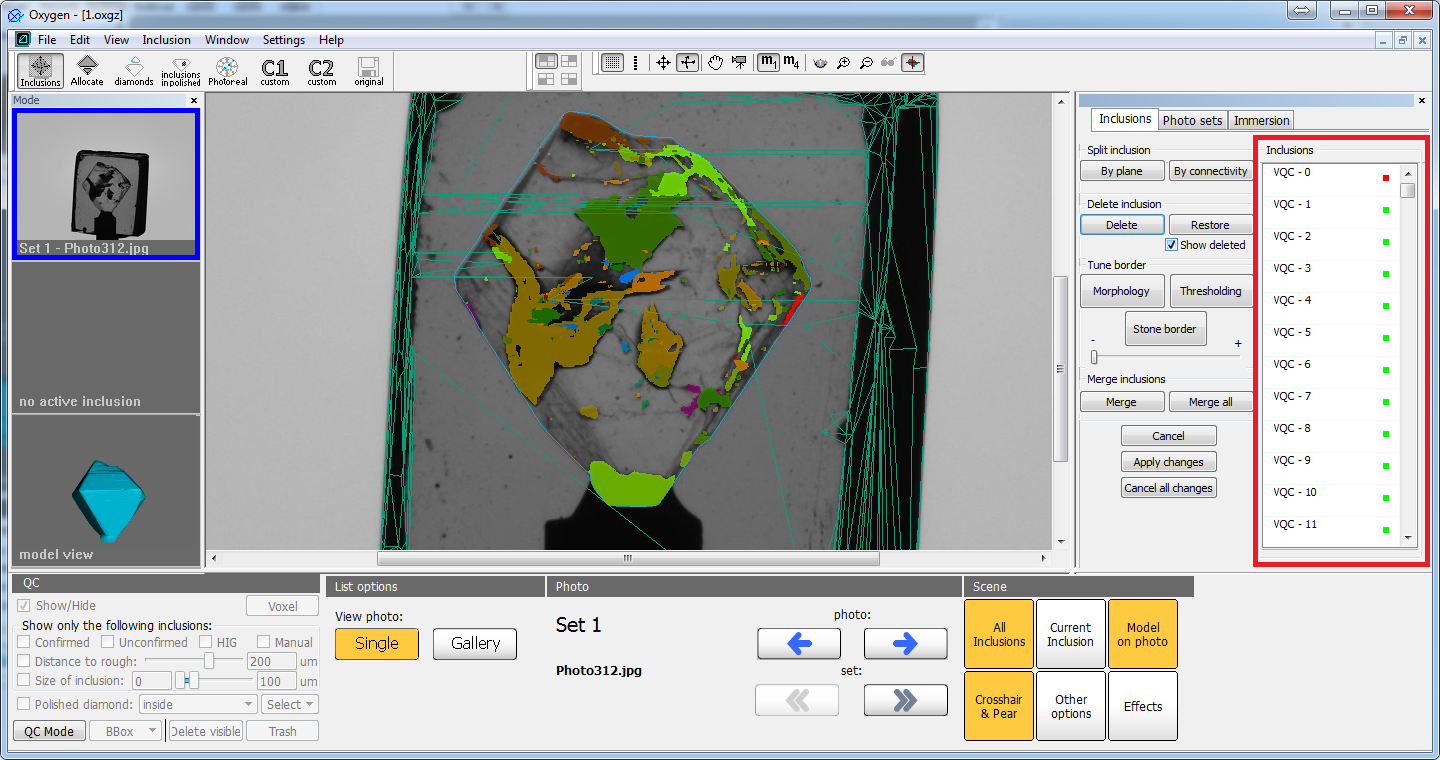
On the picture above you can see the voxel inclusion panel. It is used for comfortable navigation and selection of voxel inclusions. Voxel inclusions differ from classical inclusions in 'Inclusion' panel - they have another format, another applicable operations and their IDs do not correspond to IDs of classical inclusions.
Using this panel you may select inclusion by its ID. In main window voxel inclusions are colored in different colors to distinguish different inclusions from each other. The current selected inclusion is highlighted by red color.
You may select inclusions not only using voxel inclusion list, but also clicking on them in the main view (before that inclusion selection tool must be enabled). In general, selection of voxel inclusions is similar to selection of inclusions in classical QC mode.
Voxel inclusions may have red and green quad labels in the list. Red label means that this inclusion was already deleted. You can see it if "Show deleted" mode was enabled (read about this in chapter "Inclusion deletion/restoration"). Otherwise, voxel inclusion has green label.
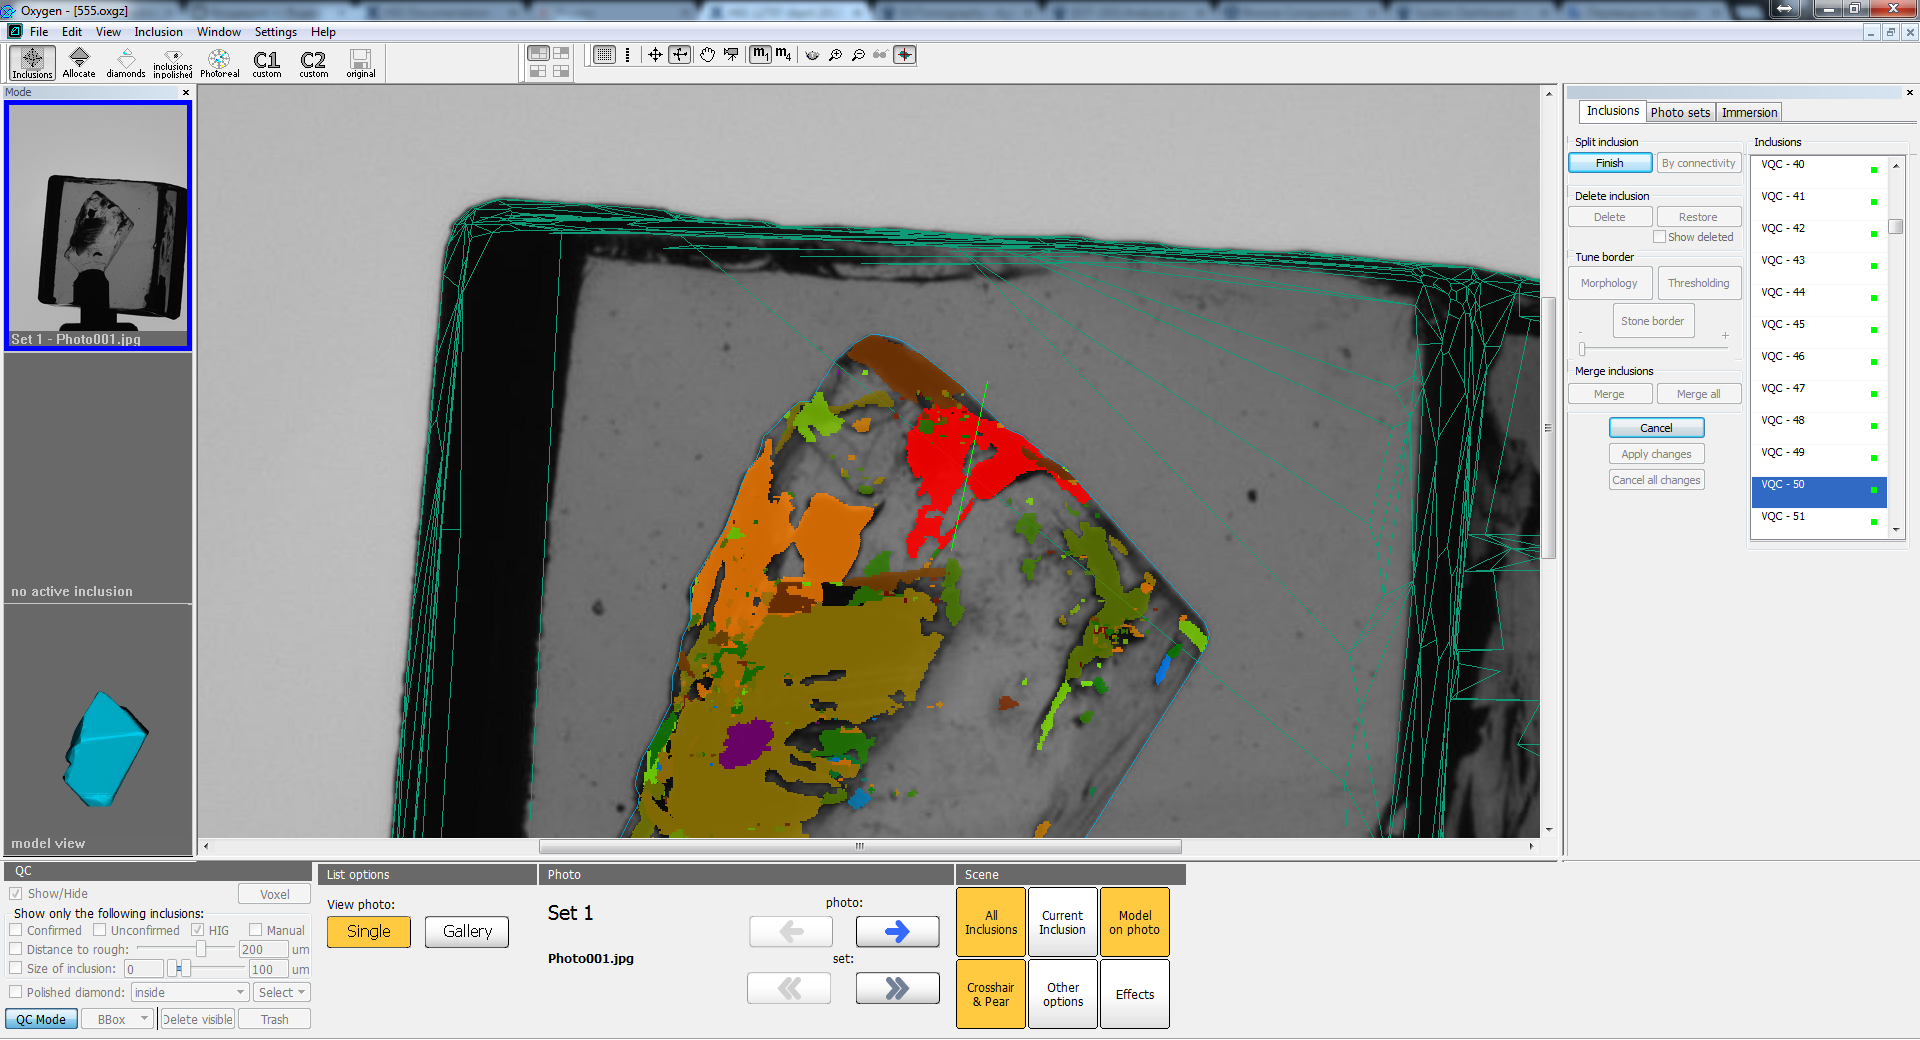
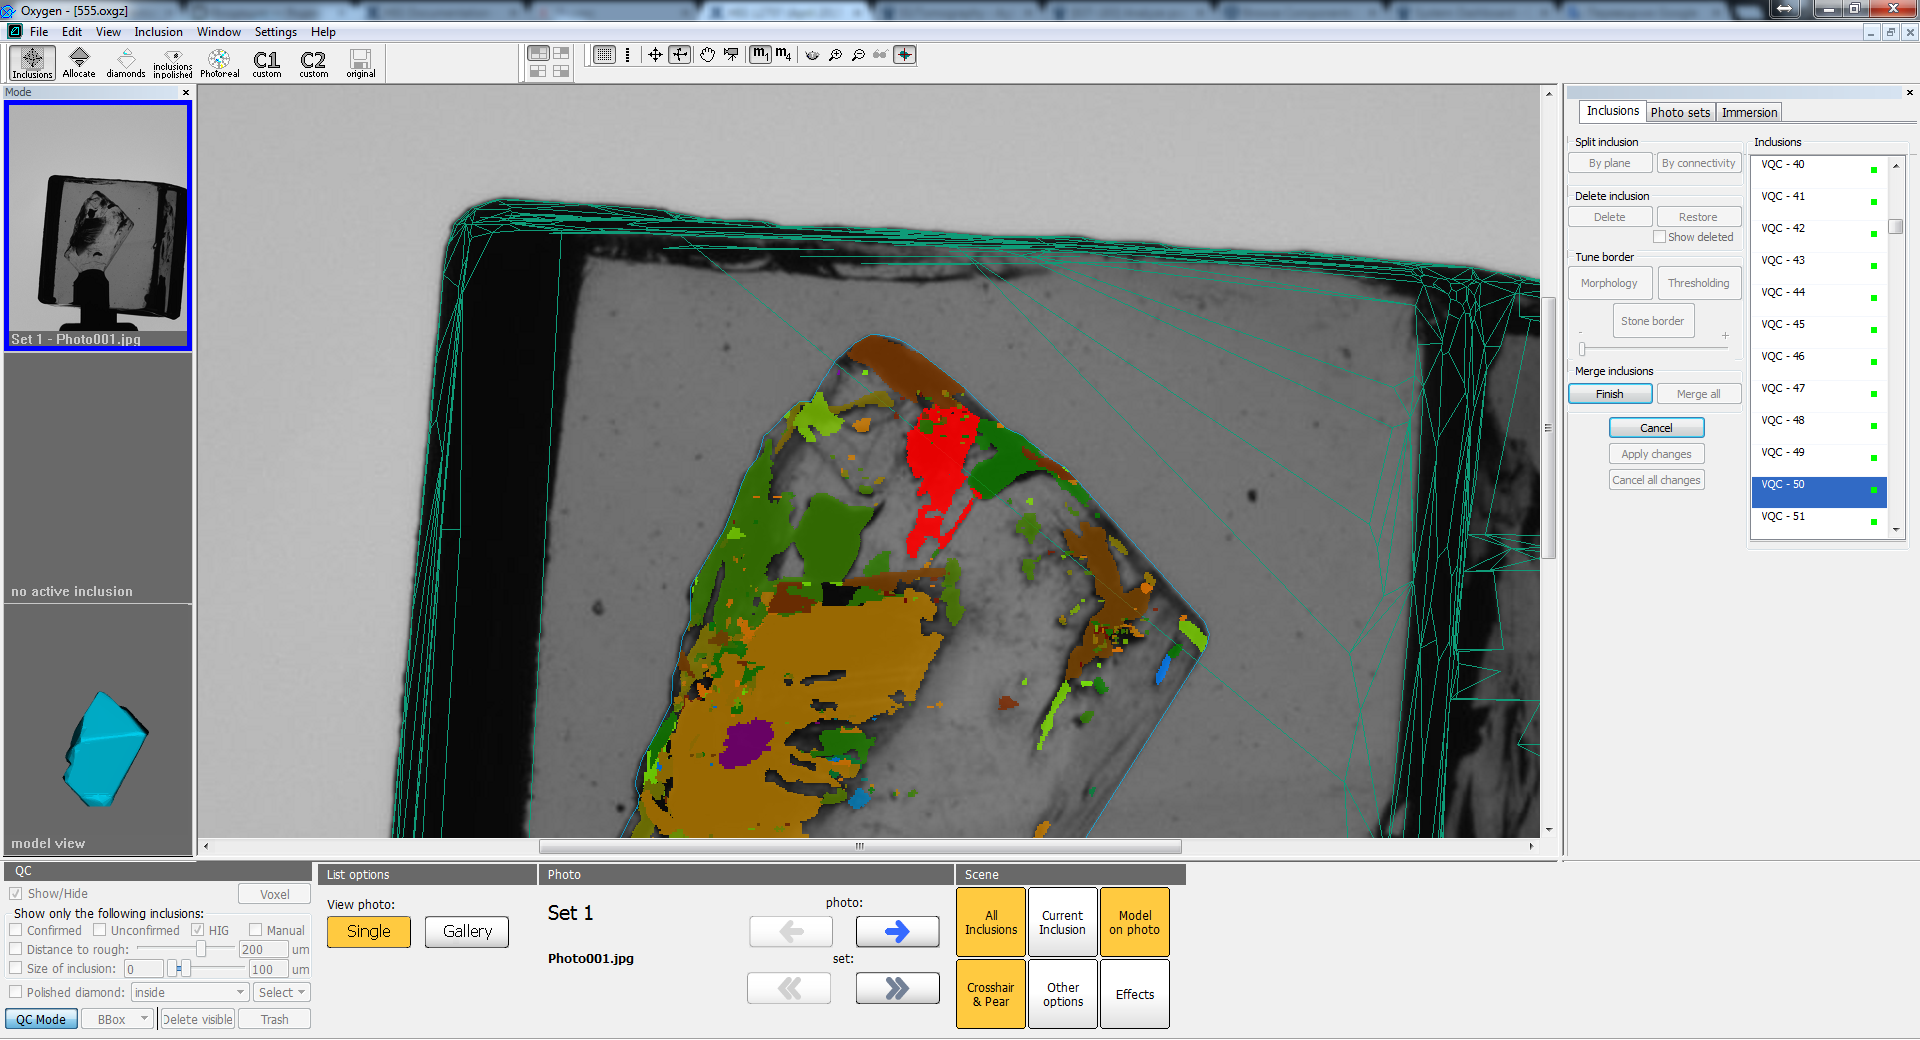
Split voxel inclusion by plane
Often it is very important to split a concrete inclusion by plane. To do this:
- Select an inclusion by clicking on it in main view or its ID in inclusion list
- Click on "By plane" button in "Split inclusion" group box
- By two clicks of mouse you have to draw a green line for splitting inclusion. This line will be a projection of plane (from current point of view). So you have to choose the most suitable point of view (photo or 3d camera position) to draw the splitting line:
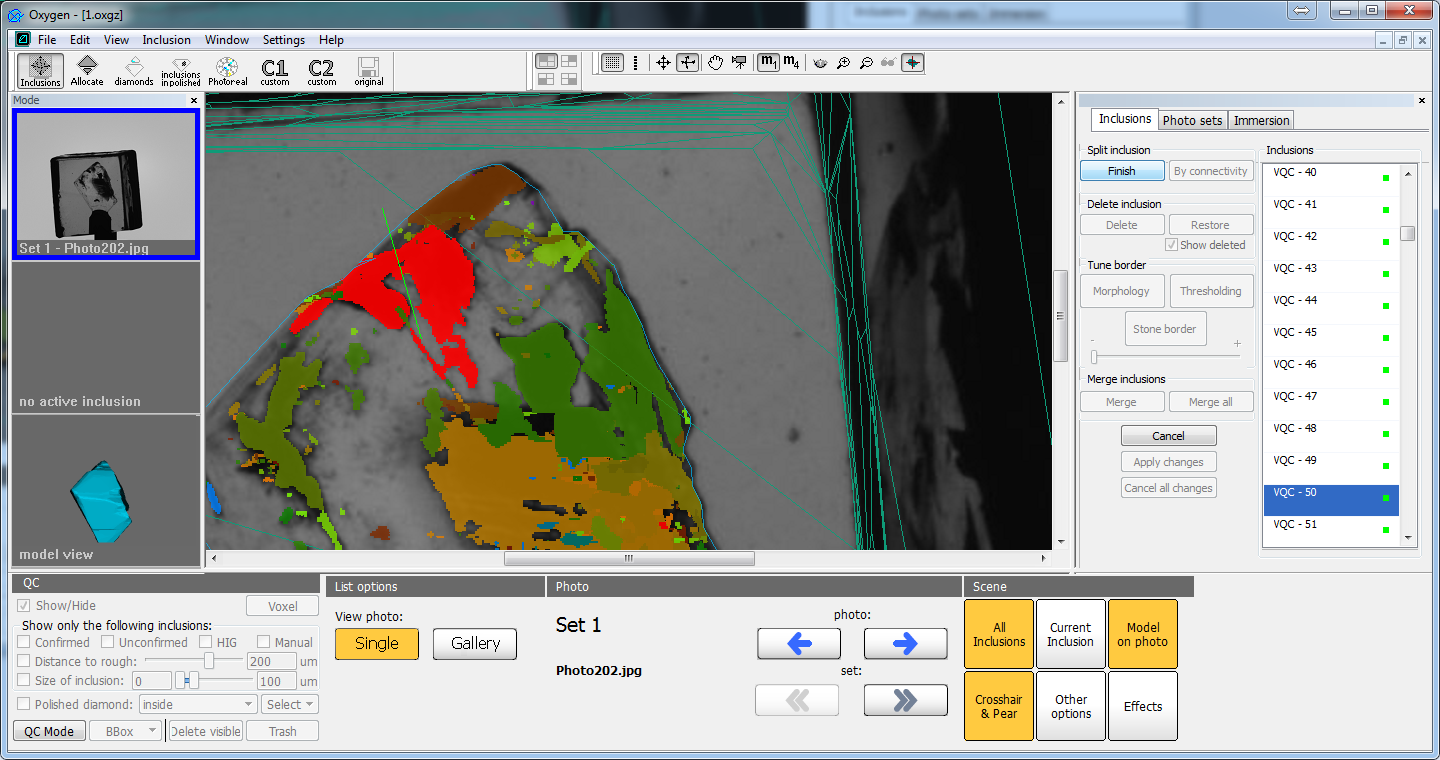
- Click "Finish" button. You will see splitted inclusions:
- If you have made a mistake drawing the line or want to reject operation press "Cancel". You may cancel operation before you clicked "Finish", after this operation you may only apply the invert operation of merge operation - see chapter "Inclusion merging".
Inclusion deletion / restoration
If you want to delete some inclusion, select it and press "Delete" button in "Delete inclusion" group box. The selected inclusion will disappear in main view and in voxel inclusion list.
If you want to restore inclusion, you have to:
- Check "Show deleted" checkbox. Then all deleted inclusions will be shown in main view and in voxel inclusion list.
- Select inclusion you want to restore (in voxel inclusion list it will be marked with a red label).
- Press "Restore" button to restore this inclusion.
Click "Show deleted" checkbox to disable showing deleted inclusions.
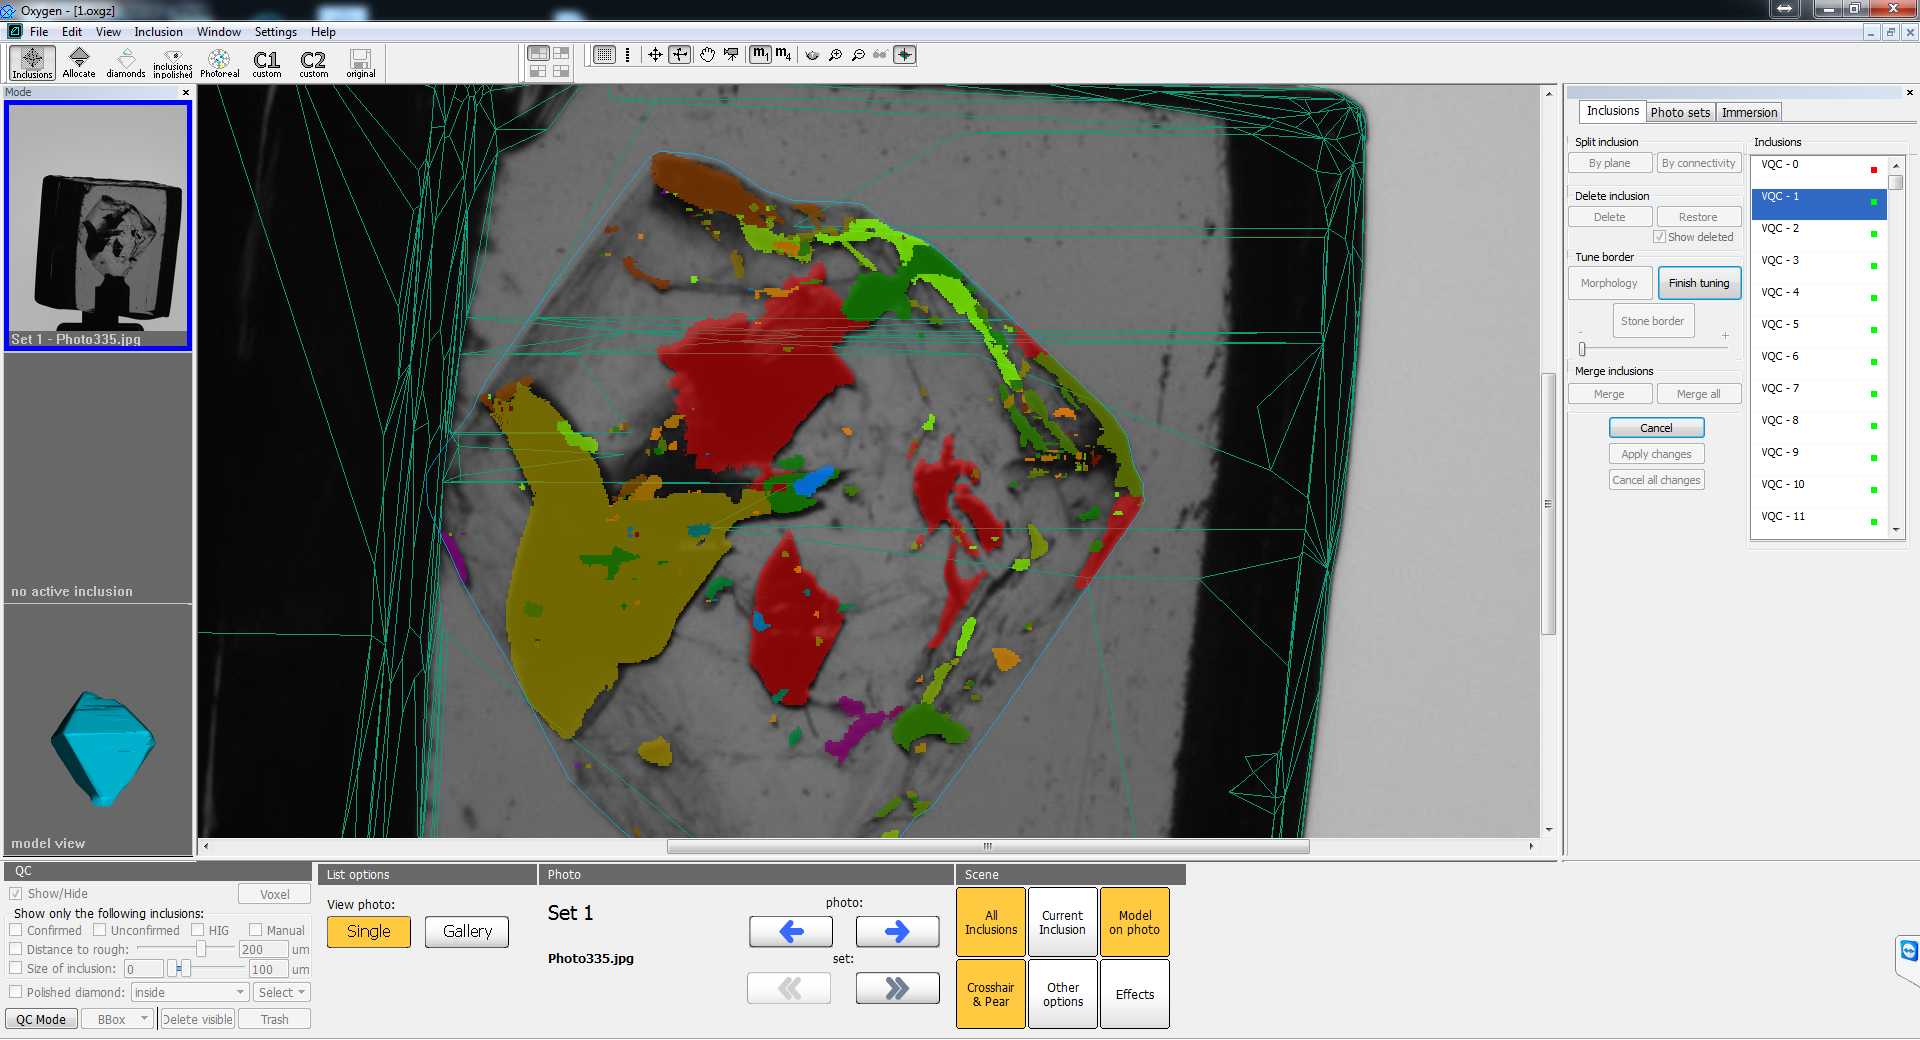
Inclusion shape tuning - thresholding
Thresholding tool is a real time equivalent of postprocessing algorithms that may be applied to arbitrary inclusion. You may adjust the inclusion stickout/cut in real-time moving a special slider.
To adjust inclusion shape using this tool you have to:
- Select inclusion. If you want to apply the tool to a group of inclusions (or all inclusions like in postprocessing algoritms), you have to merge them before application the algorithm - see "Inclusion merging".
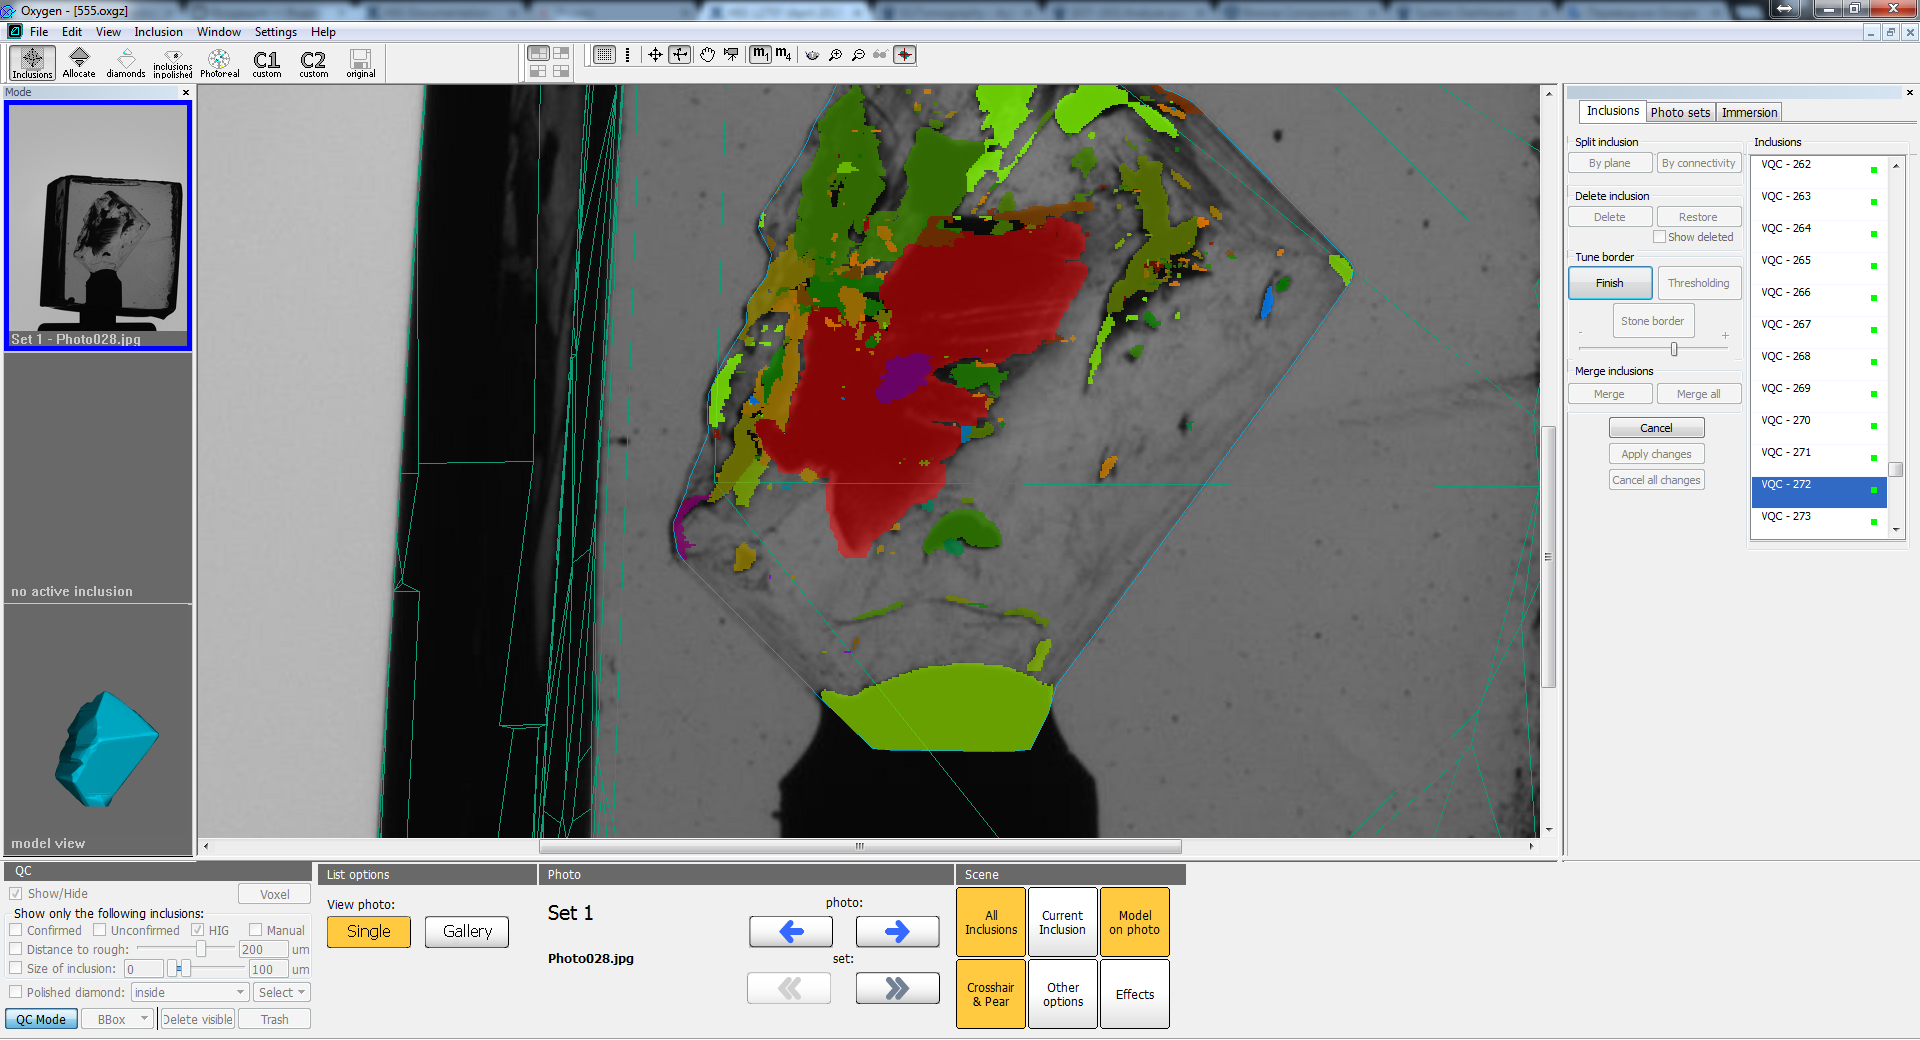
- Press the button "Thresholding" in "Tune border" group box. After this the selected inclusion will be highlighted in half-transparent red color:
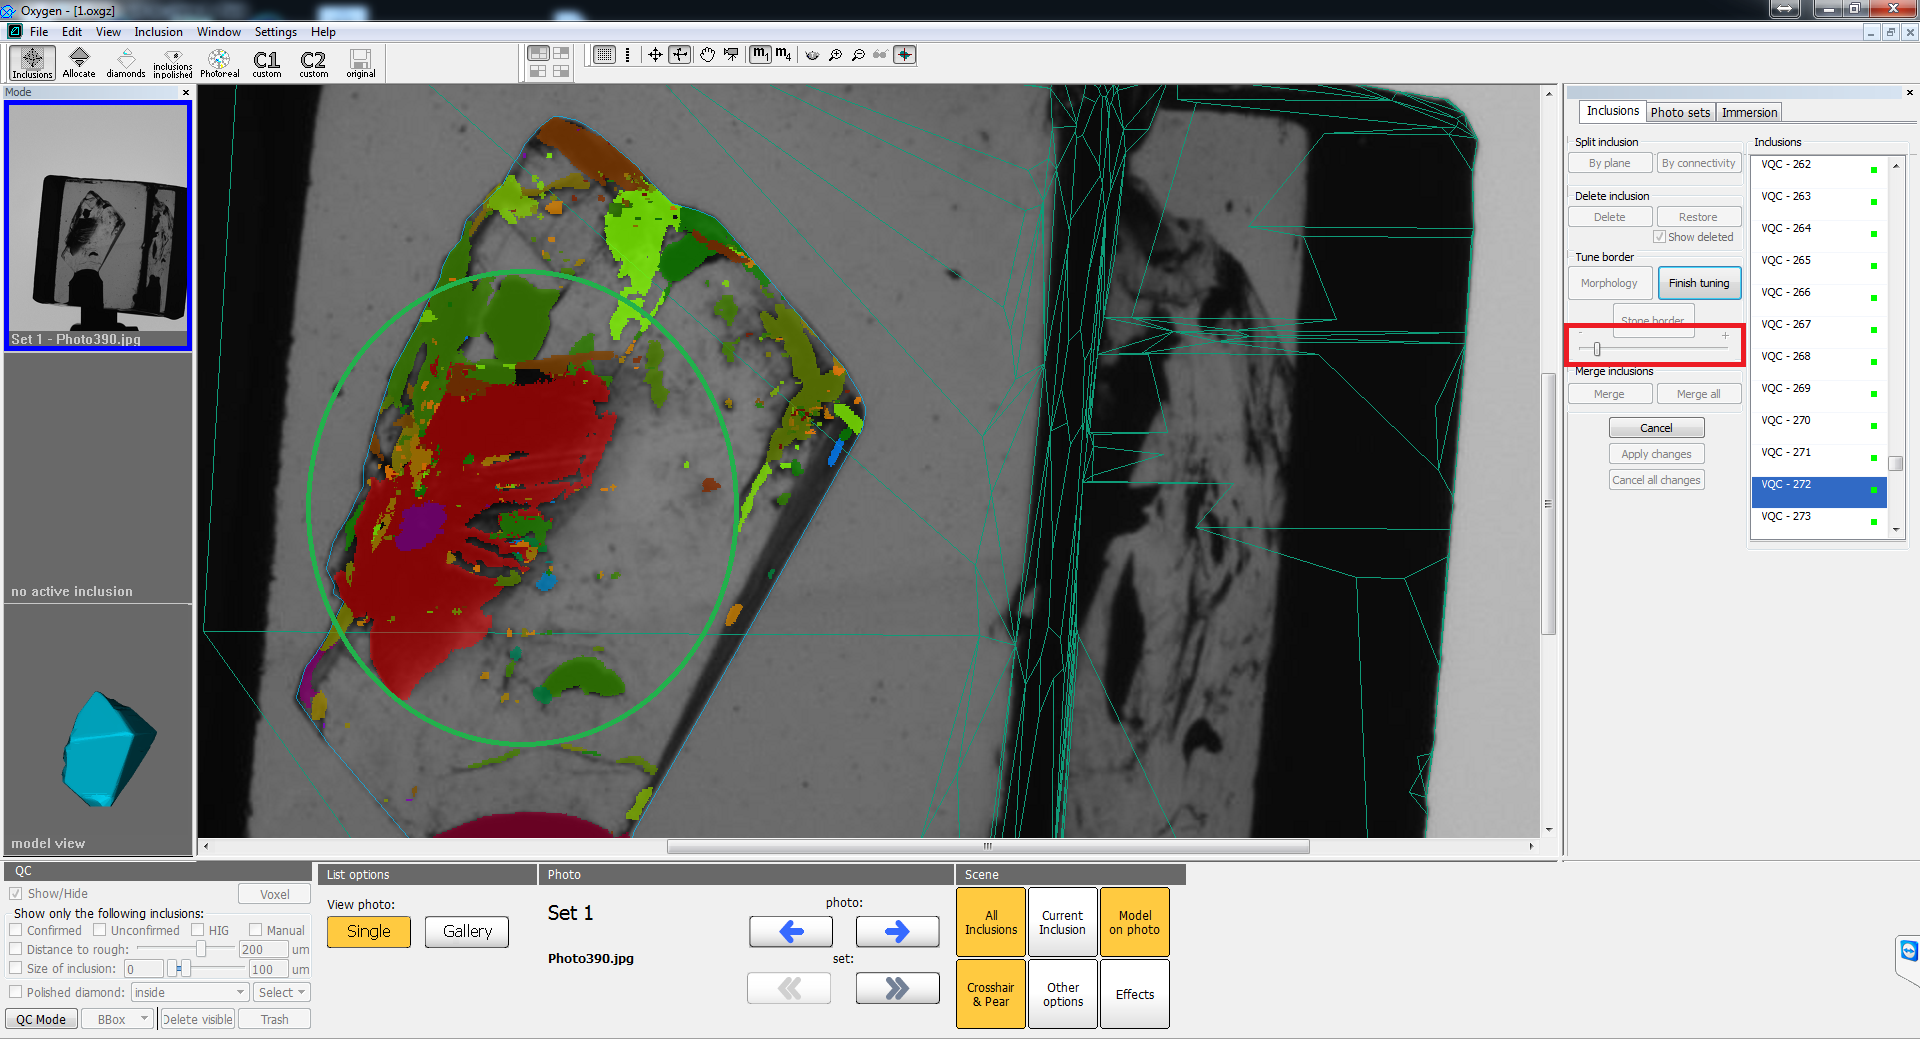
- Moving the slider (see it on the picture above) we may adjust the stickout of the inclusion. On this image you can see that moving slider to the right will reduce inclusion volume:

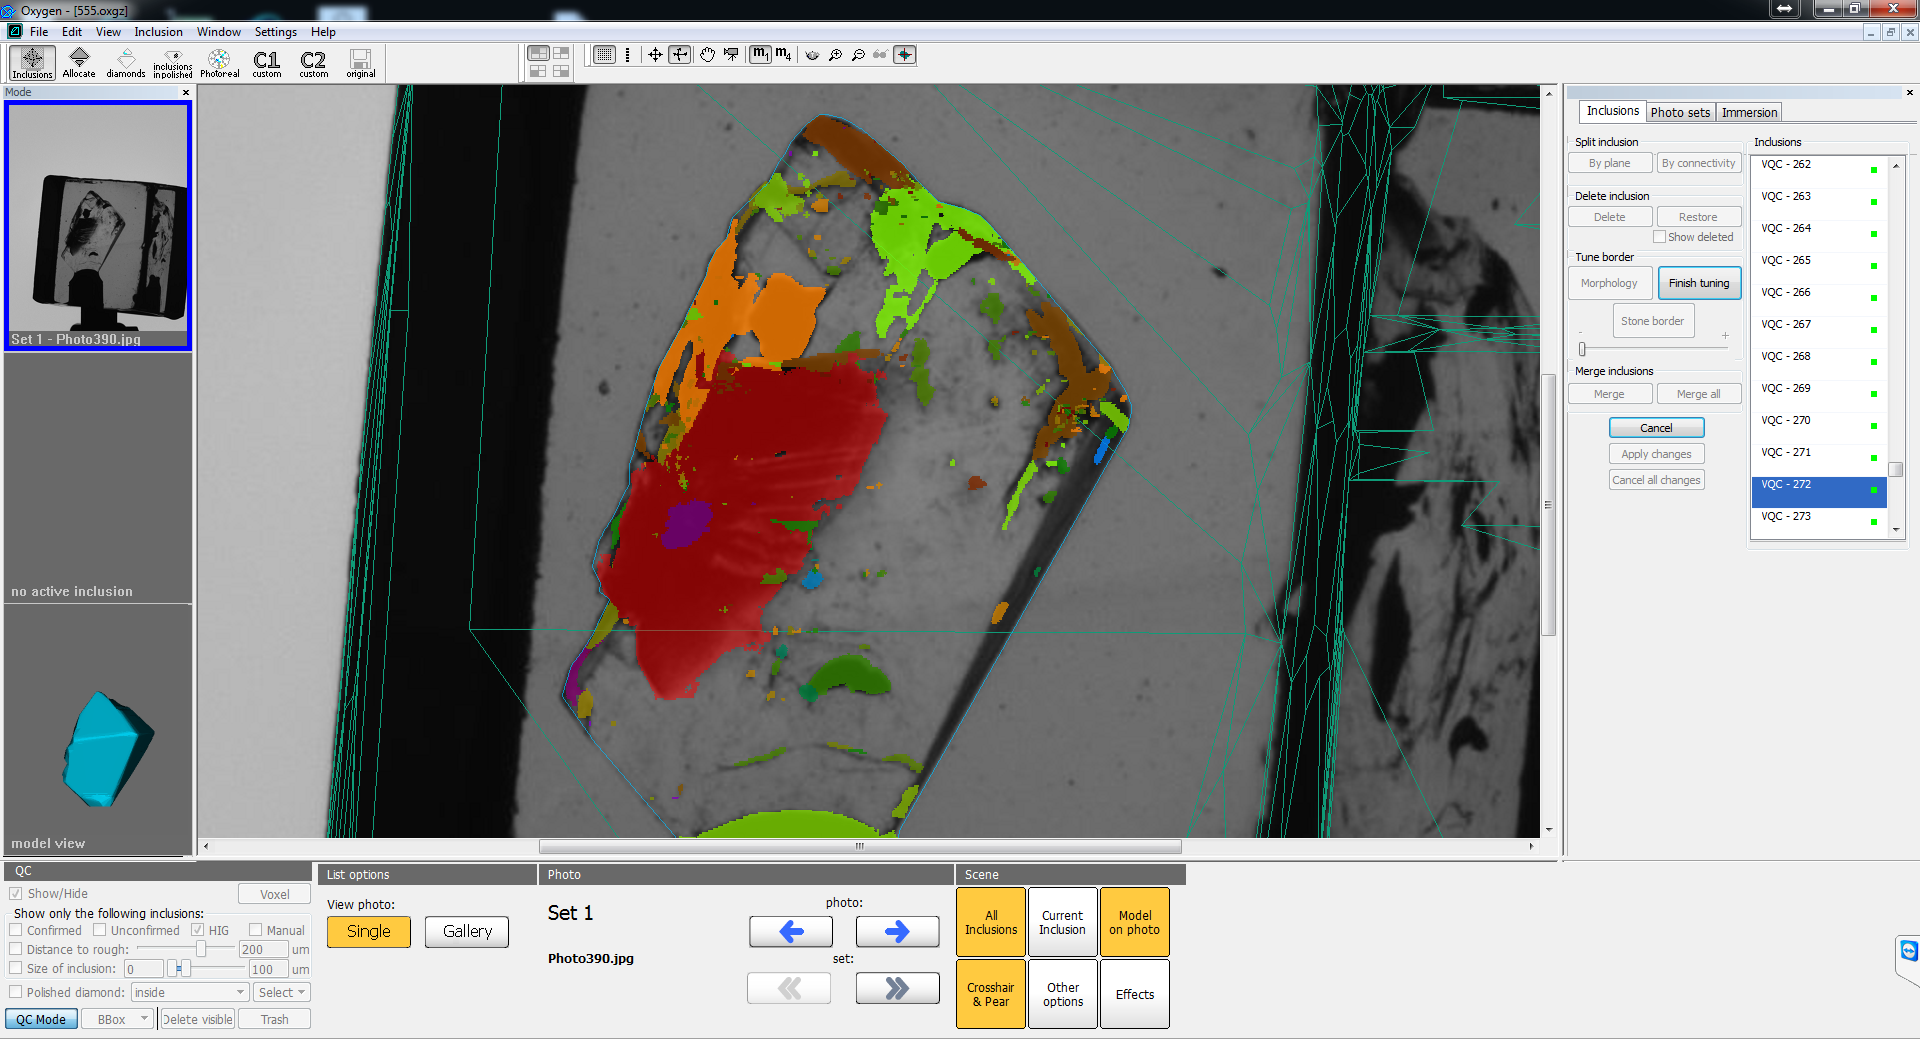
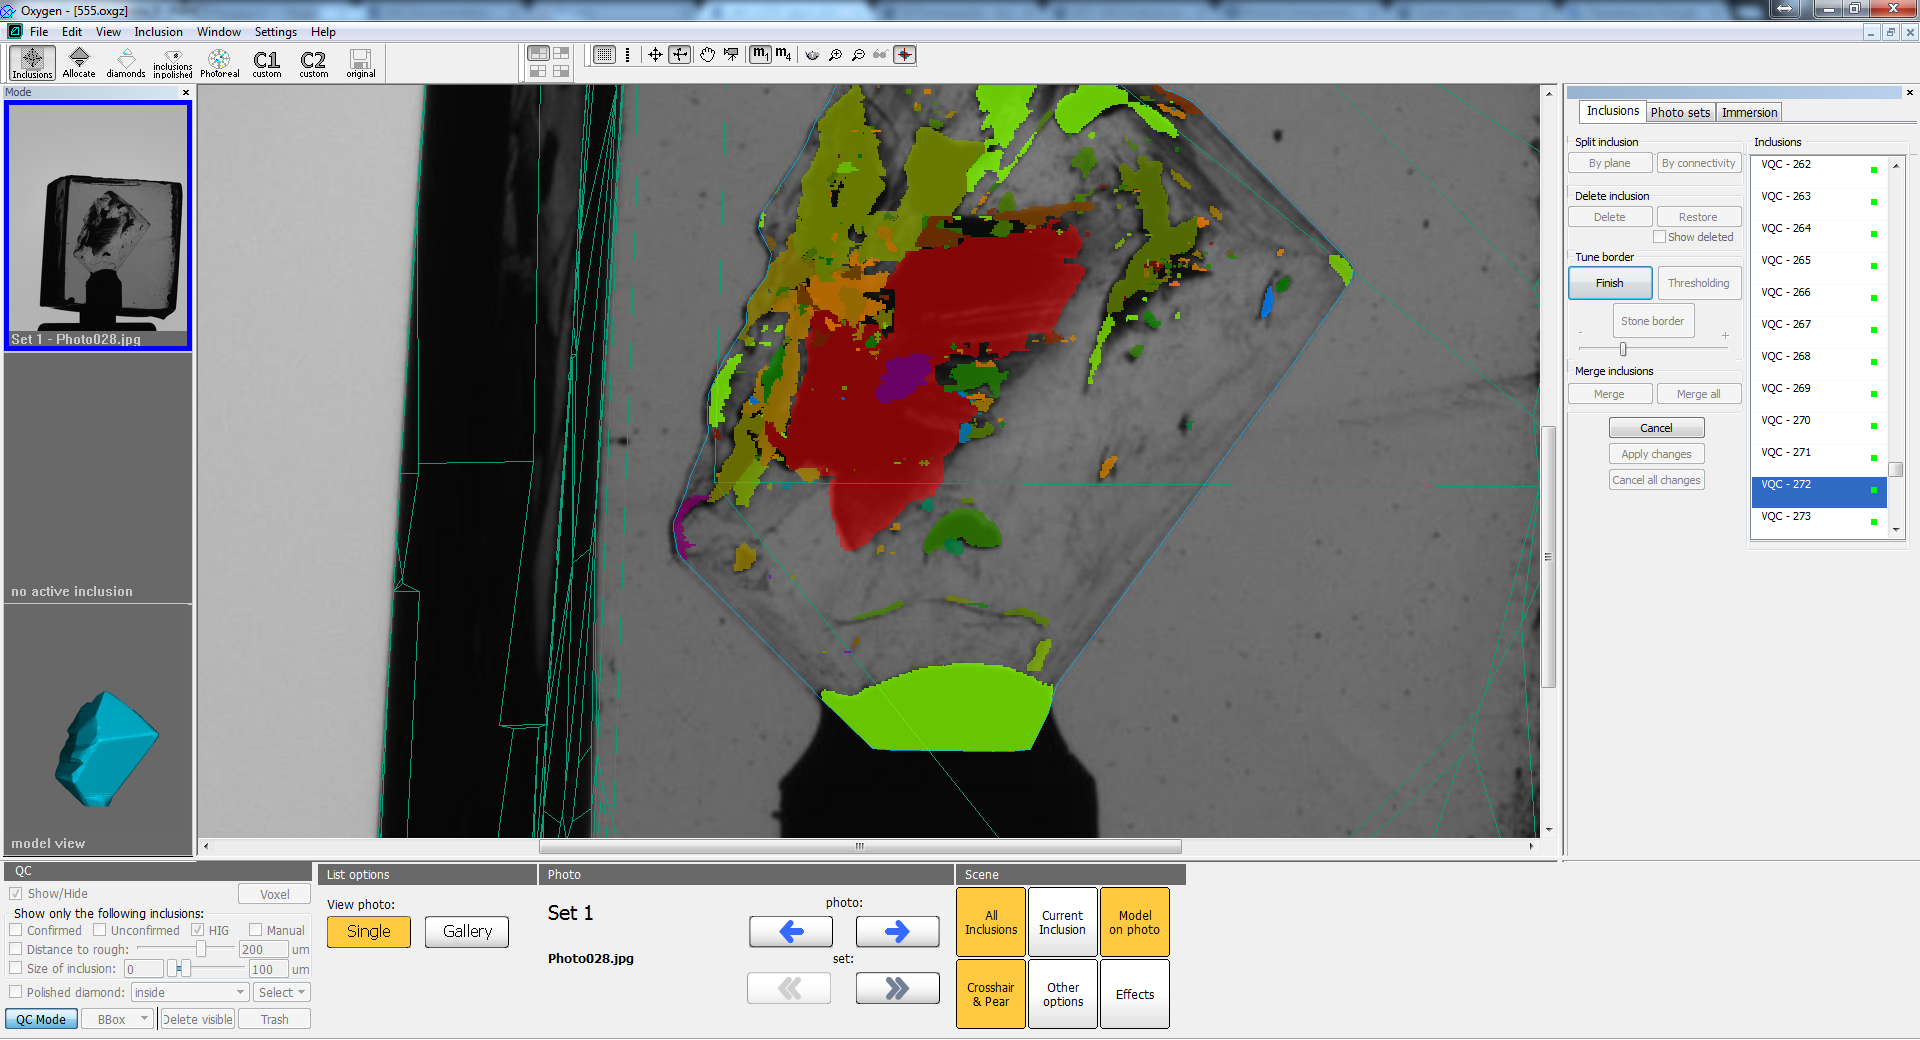
On this image you can see that moving slider to the left will increase inclusion volume:

- Click "Finish tuning" to apply changes or "Cancel" to reject them
This tool is one of the main inclusion shape tuning tools. It is very useful for adjusting shape of non-transparent and half-transparent inclusions. The border of inclusion projection after application of this tool in most cases will correspond to the borders of inclusion on photo.
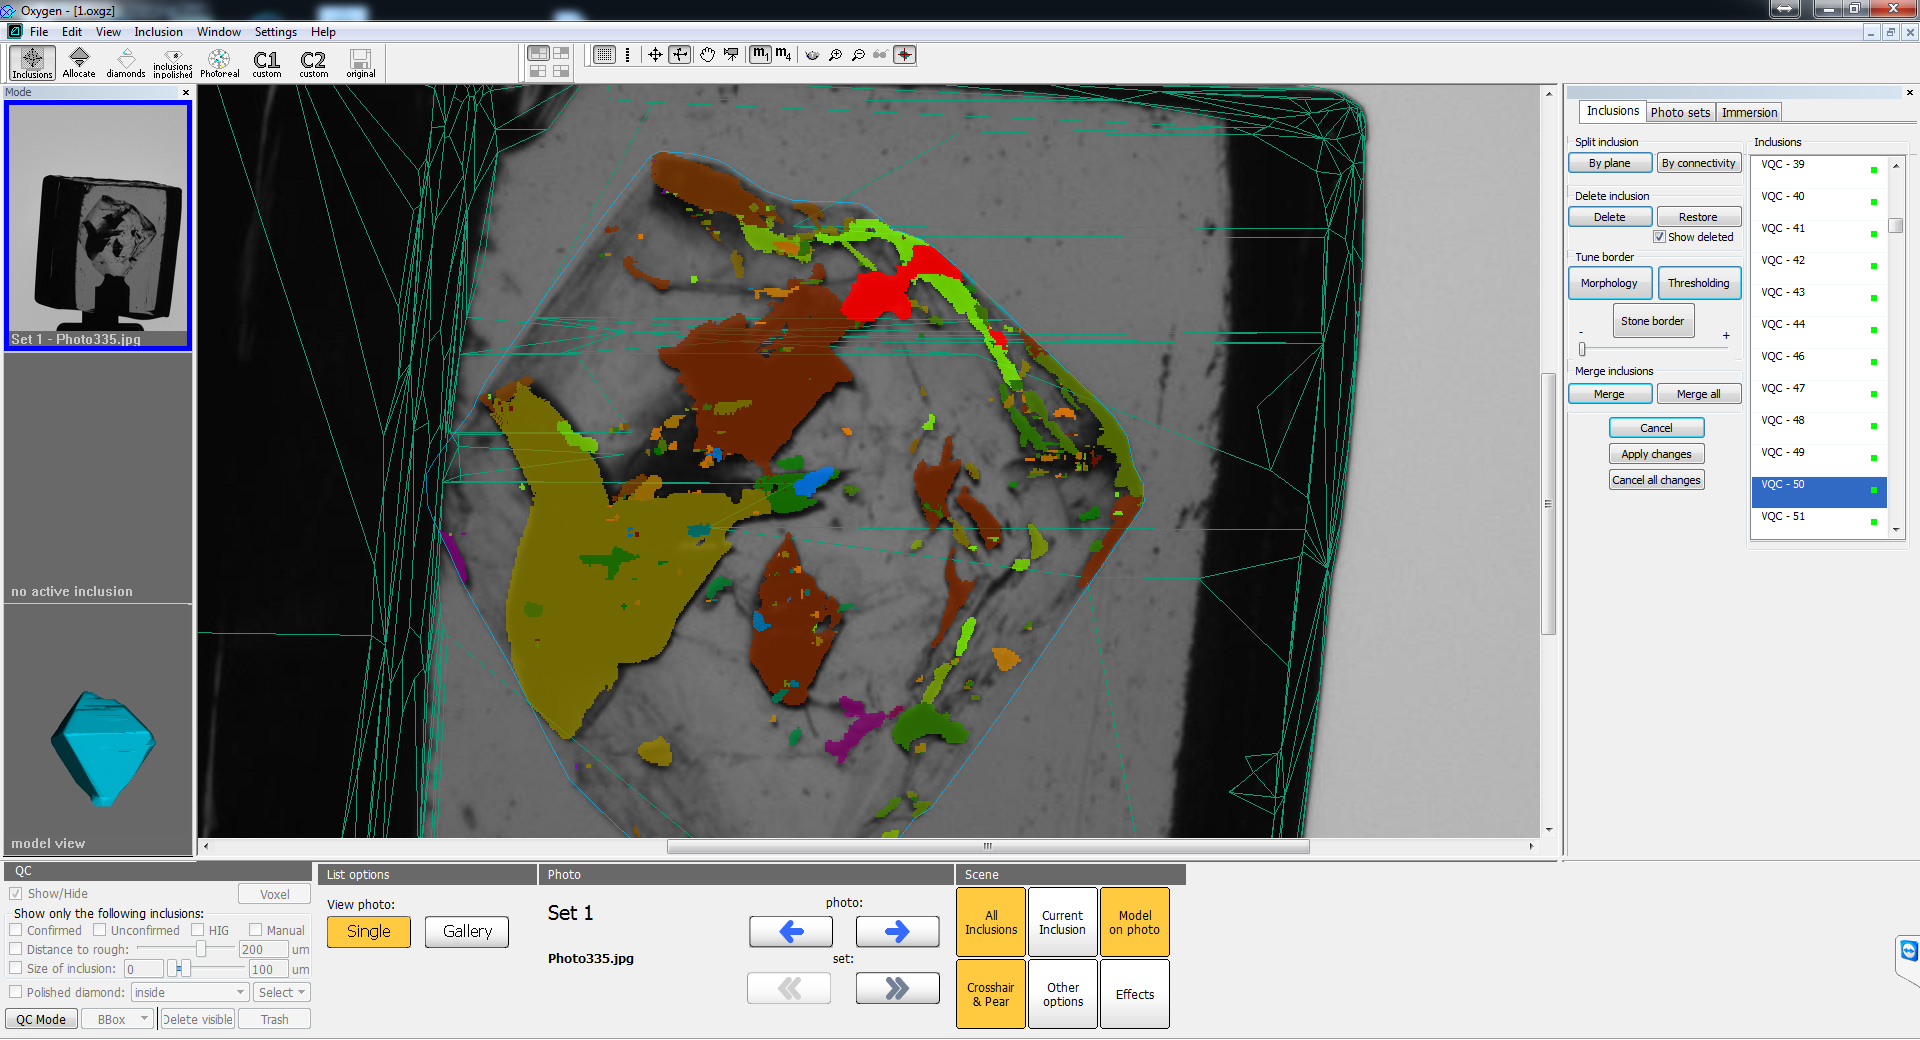
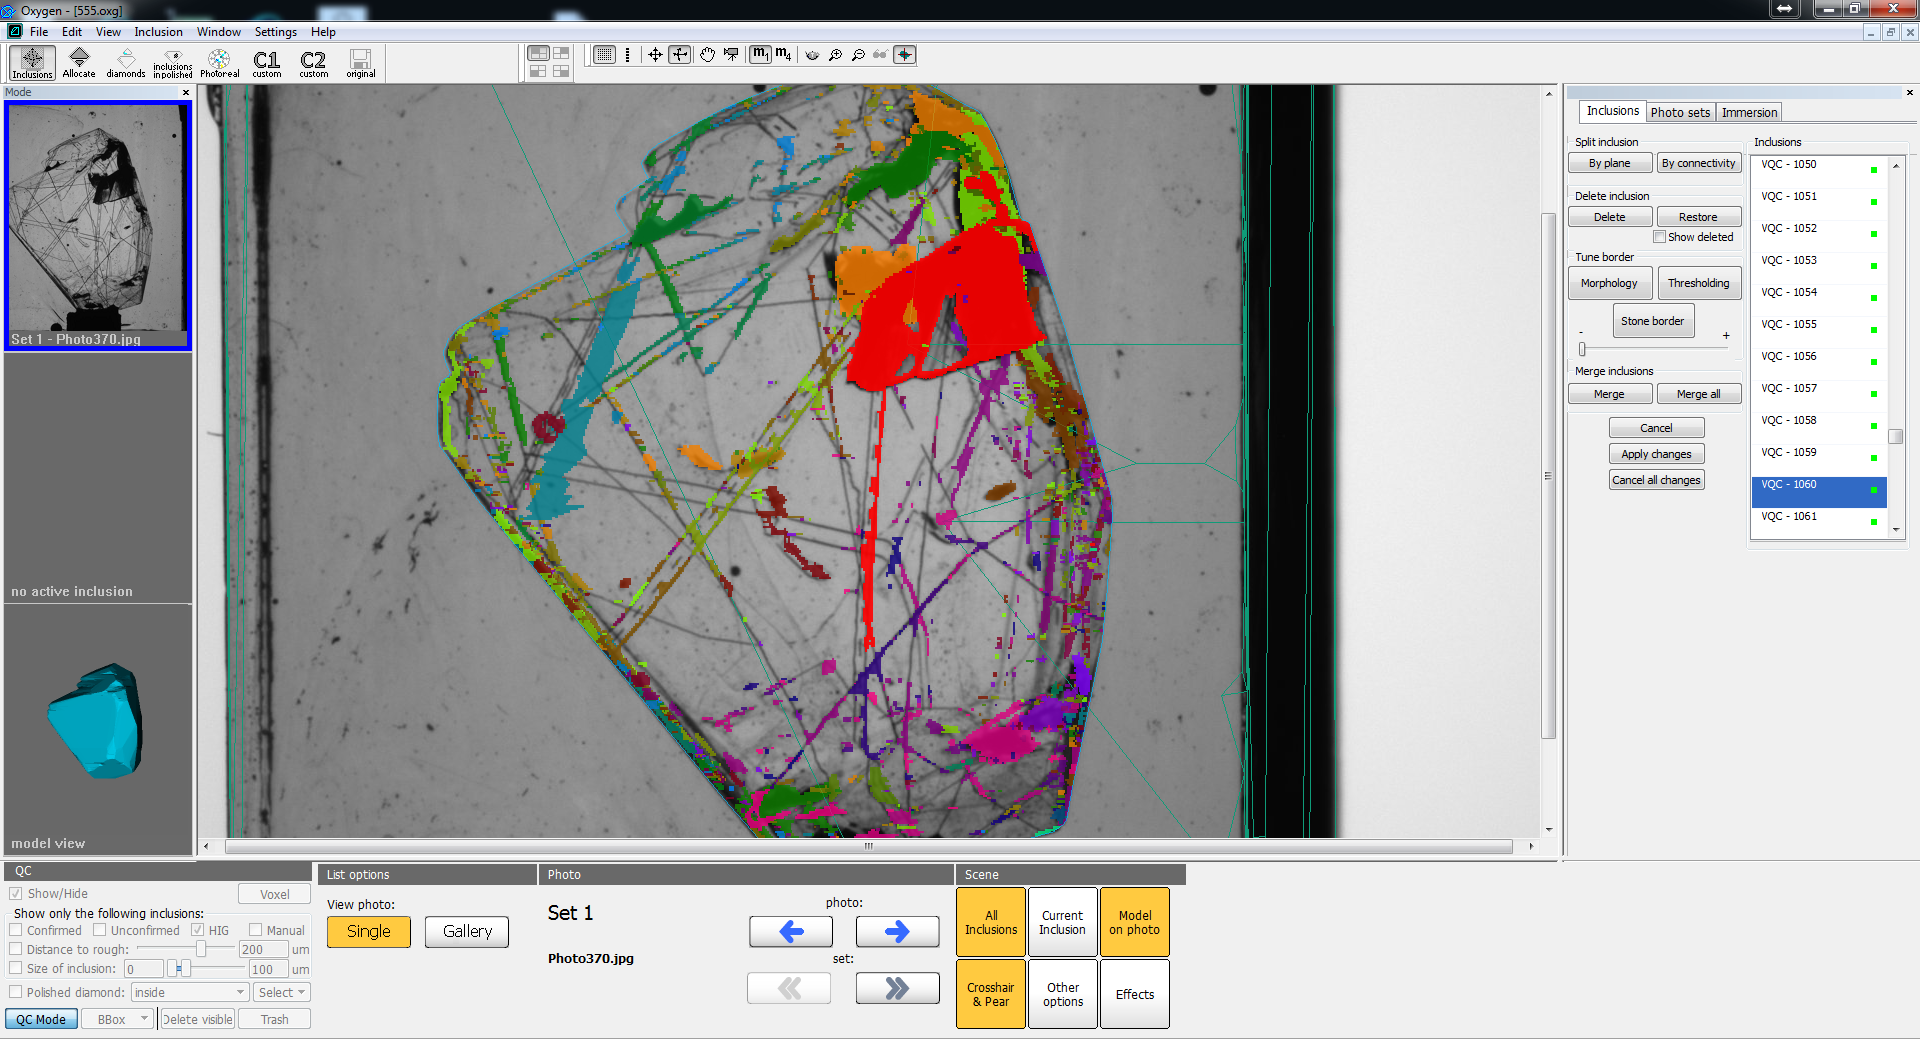
Inclusion shape tuning - morphology
This tool resembles the thresholding voxel QC tool (see "Inclusion shape tuning - thresholding"). To use this tool you have to:
- Select inclusion. If you want to apply the tool to a group of inclusions (or all inclusions like in postprocessing algoritms), you have to merge them before application the algorithm - see "Inclusion merging".
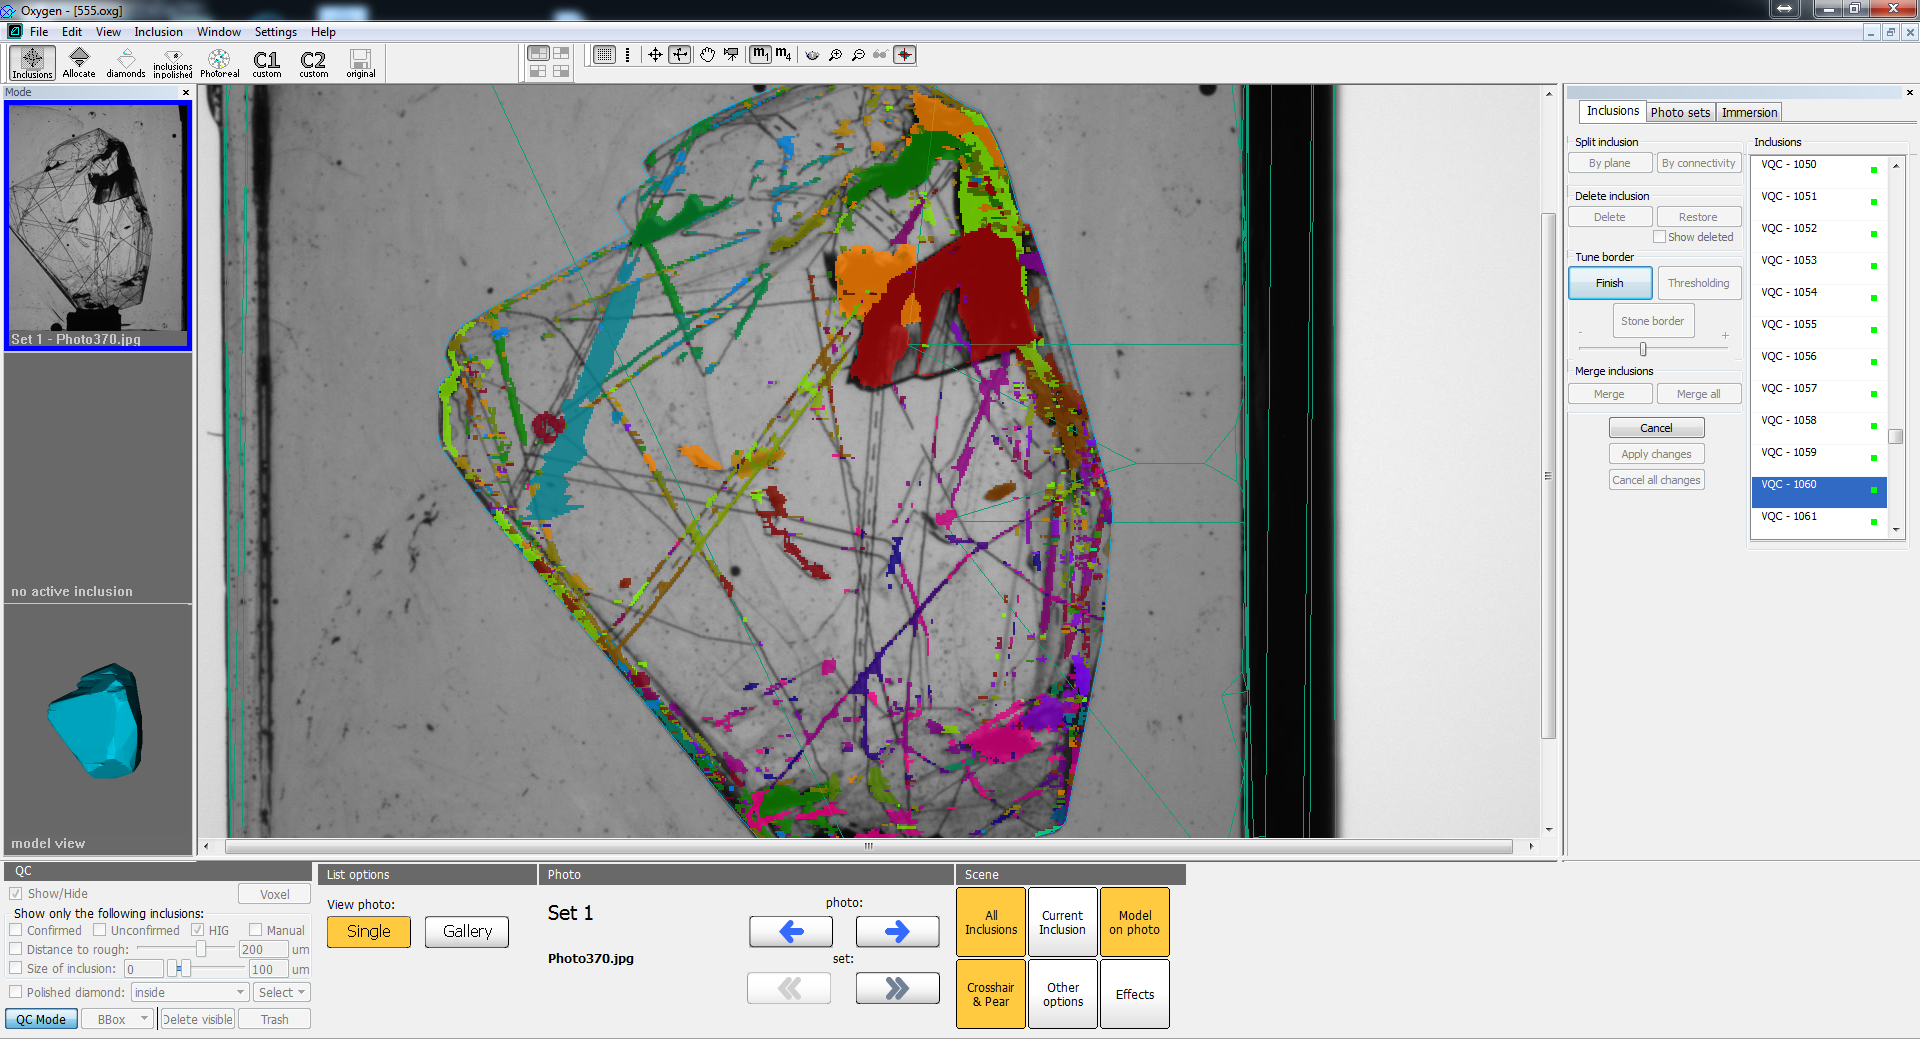
- Press the button "Morphology" in "Tune border" group box. After this the selected inclusion will be highlighted in half-transparent red color.
- Moving the slider we may adjust the stickout of the inclusion. Moving slider to the left will reduce inclusion volume. Moving slider to the right will increase inclusion volume.
- Click "Finish tuning" to apply changes or "Cancel" to reject them
So the main idea of the tool is similar to the thresholding voxel QC tool - it can adjust the inclusion stickout. The difference is in the shape of the resulting border of inclusion. Morphology doesn't take into account the transparency of the inclusion and can increase inclusion volume to the area, where you cannot see anything resembling inclusion. On the contrary, the thresholding tool cannot increase inclusion volume to transparent area. Also morphology increases inclusion volume uniformly in all directions, as for thresholding tool - the increase depends on inclusion transparency.
You can see the results of thresholding (top picture) and morphology (bottom picture) - see half-transparent red area:
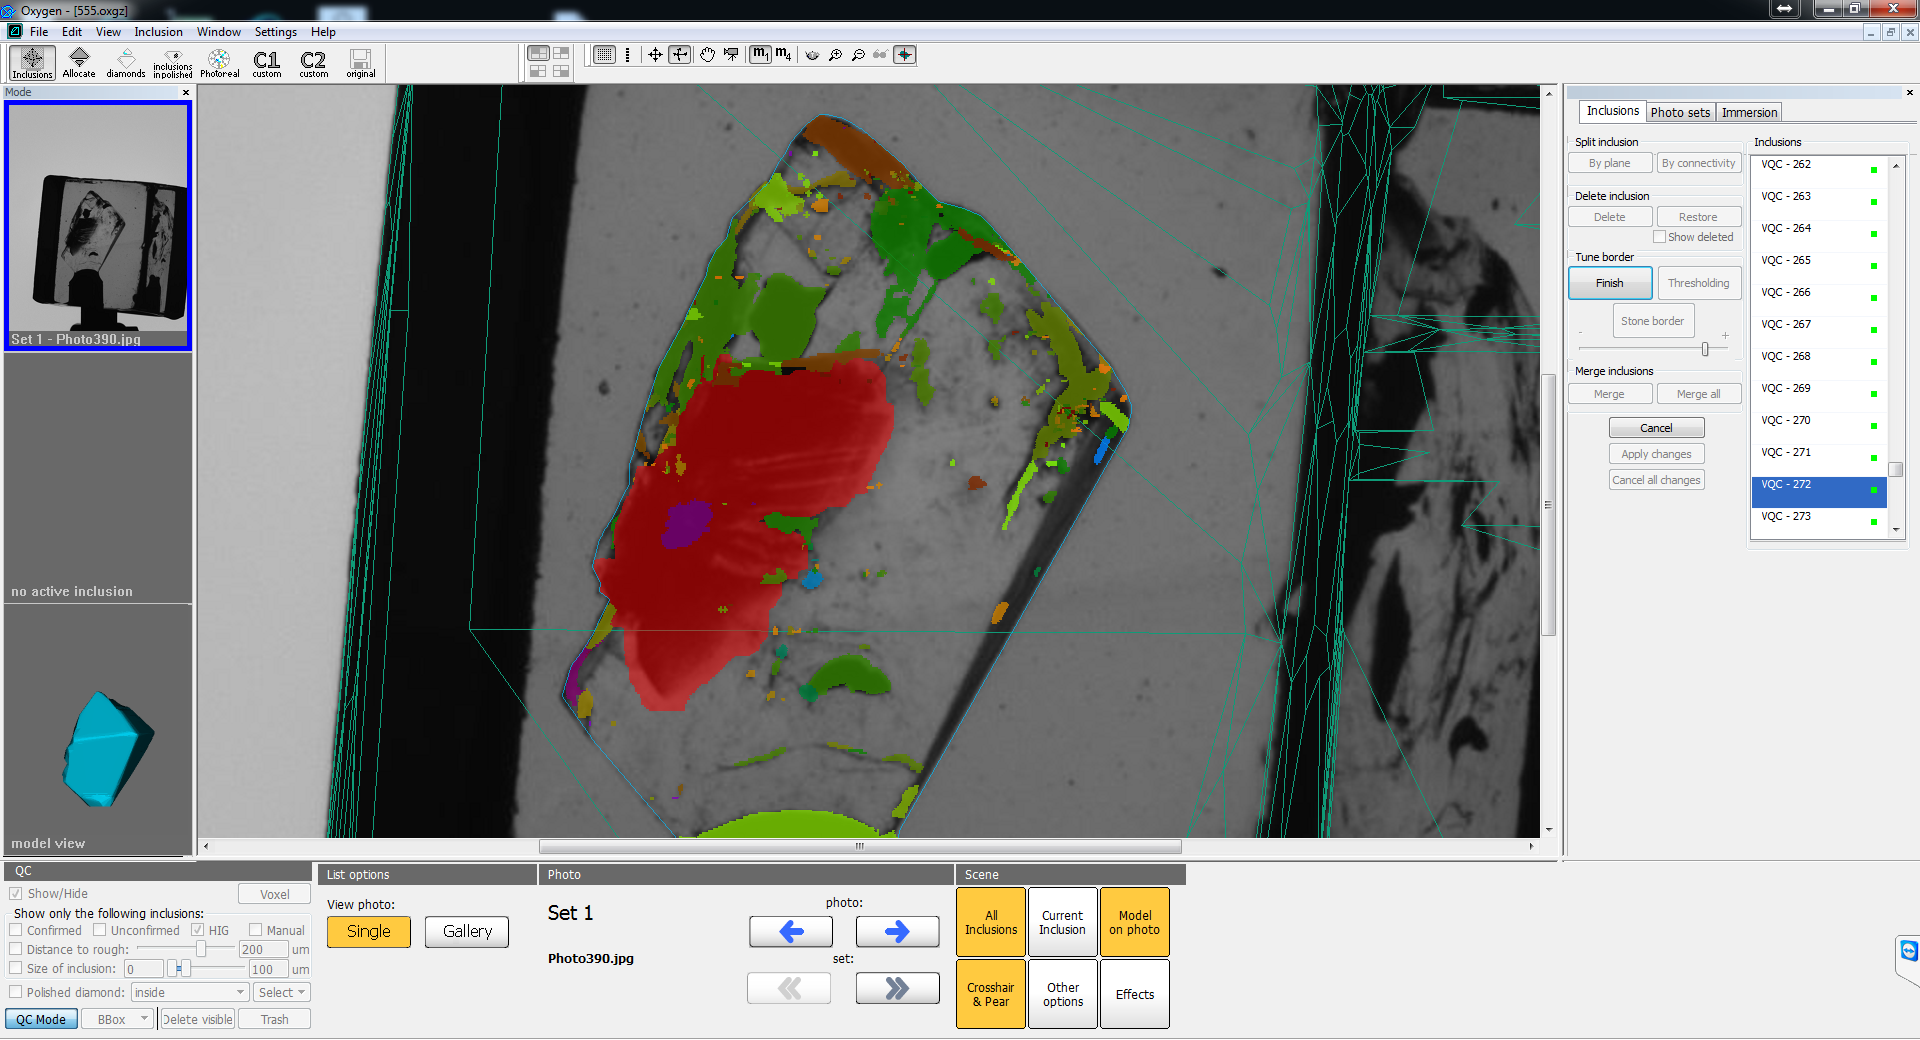
The result at the top (thresholding) has better border - border better corresponds to the the border between transparent and non-transparent areas. On the other hand, morphology eliminated transparent mini-holes in inclusion and smoothed the borders of reprojection.
So in most cases we advice to use thresholding tool for adjusting inclusion shape. Theoretically, you can apply morphology tool for inclusions with transparent parts and the result might be better than for thresholding in this case.
Also multiple application of this tool is useful if you want to remove small transparent holes in inclusion or split big inclusion from other ones connected by thin necks. These techniques are more complicated (but very useful) and described in chapter "Practically important cases".
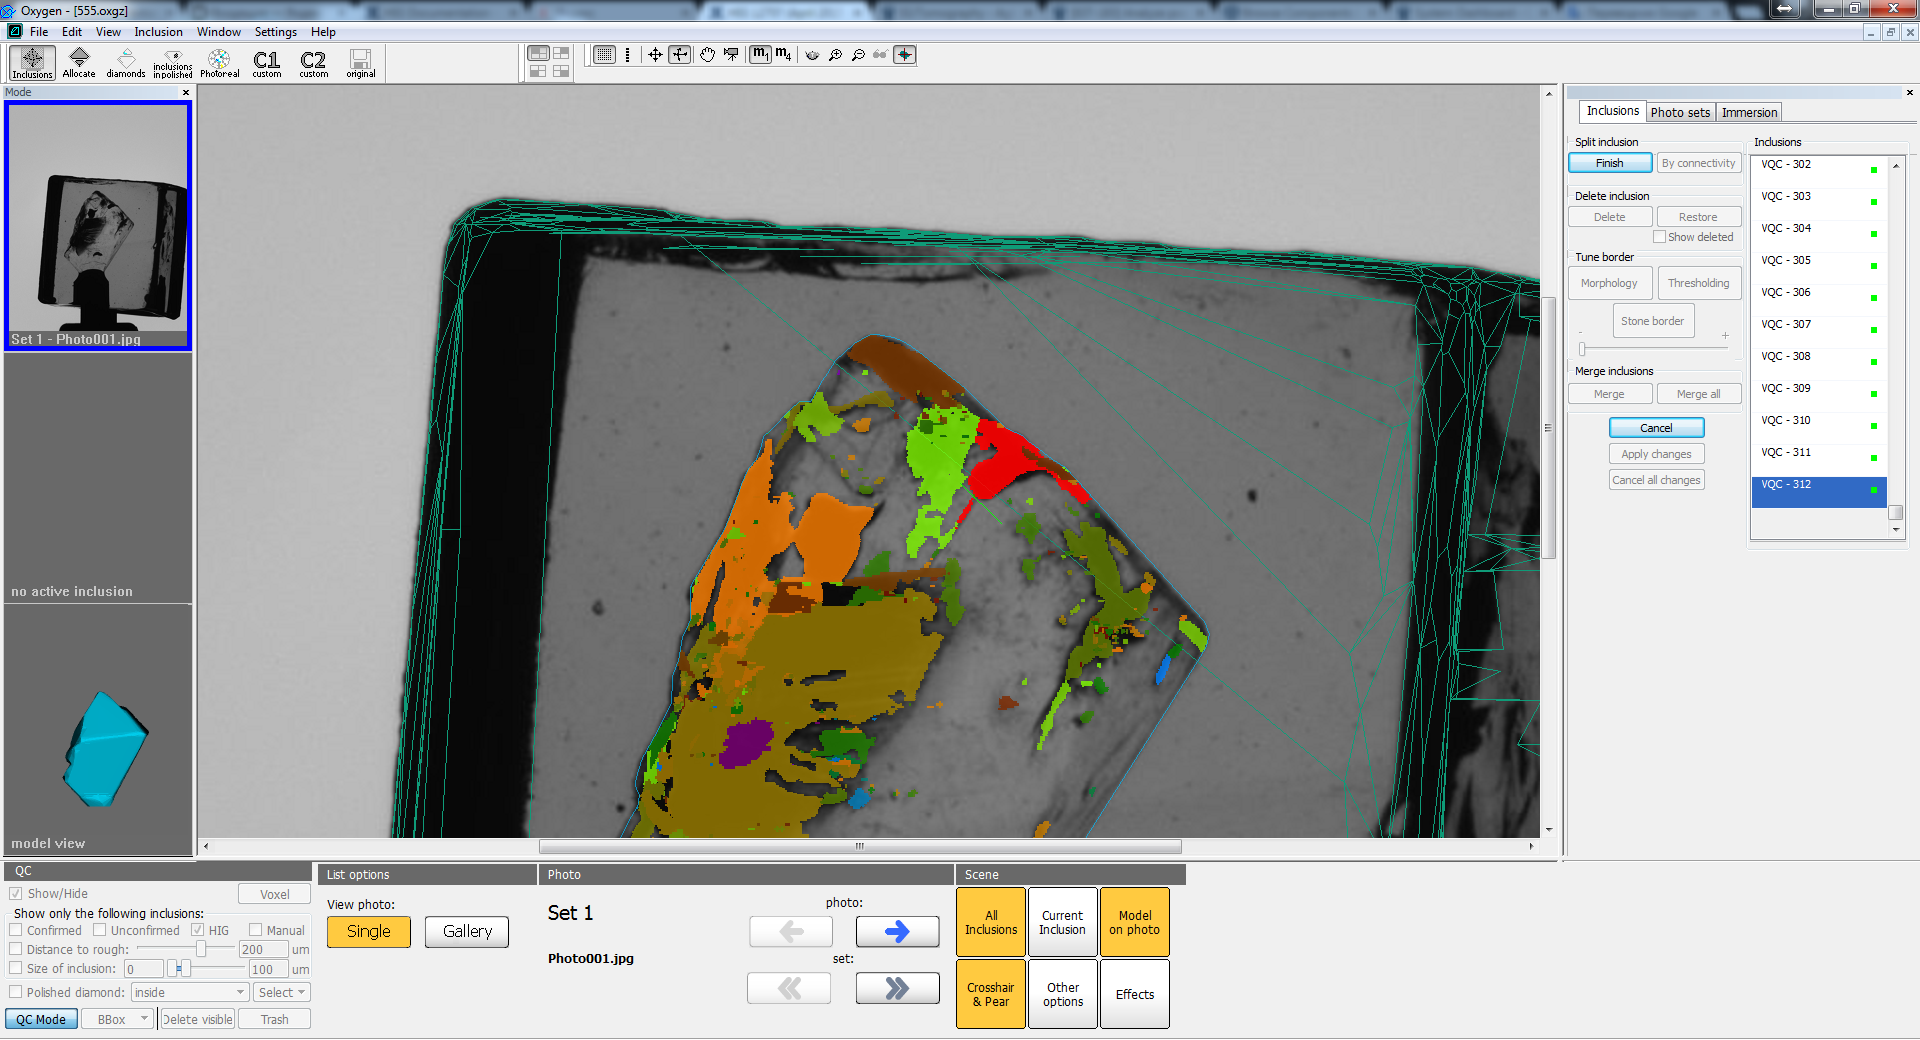
Inclusion merging
Sometimes it is necessary to merge several or all inclusions into one. For example, you want to adjust inclusion shape for several or all inclusions or merge some parts of inclusions that were split by plane. Important cases of using inclusion merging are described in "Practically important cases". Here we describe how to use this tool.
The case of merging several inclusions:
- Select one of the inclusions that you want to merge.
- Press "Merge" button.
- Click on inclusion that you want to merge with. All currently merged inclusions will be highlighted with red color. The second click on inclusion will excluded it from the group.
4. Click "Finish" to apply merge.
From this moment all selected inclusions are presented in voxel inclusion list as one voxel inclusion. You can apply different operations to it. For example on this picture you can see the application of thresholding to all merged parts of inclusion:
After you merged several inclusions into big one you cannot select its parts. To "unmerge" (split) parts of inclusions you have to select this super-inclusion and press "By connectivity" button in "Split inclusion" group box.
The case of merging all inclusions:
- Select one of the inclusions.
- Press "Merge all" button.
This case is useful if you want to emulate postprocessing algoritms (adjust inclusion shape for all inclusions) - for information see "Practically important cases".
Subsurface layer cutting
Often during QC you need to remove subsurface inclusions or laser markings. In classic QC mode you can filter such inclusions only in case if subsurface inclusions are isolated from internal ones. For example, for "coated" rough you cannot do this.
In voxel QC tools you may tune the thickness of subsurface layer that will be cut in real time. To do this:
- Press "Stone border" button in "Tune border" group box.
- Adjust the thickness of cut subsurface layer using slider in real time.
- Press "Finish" to apply changes and "Cancel" to reject.
On images below you can see the initial inclusions (top) and cut by subsurface layer (bottom):

Application of all changes
To apply all changes in voxel QC tools press the button "Apply changes". Without application the changes you cannot use these modified inclusions in Oxygen (for example in optimization). Then all voxel inclusions will be converted to classic format and you will see the classic inclusion panel. At this moment convertion is time consuming (the time is practically the same as the time of one postprocessing algorithm launch). That is why we recommend to process as much inclusions as it possible at one launch of voxel QC tools.
Rejection of all changes
If you want to reject all the changes of current voxel QC tools launch press "Cancel all changes" button.
Practically important cases
Emulation of postprocessing algorithms
To emulate postprocessing algorithms (sensitive, moderate, etc.) follow this steps:
- Select some inclusion.
- Press "Merge all" button.
- Adjust inclusion shape using "Thresholding" button and slider. Then click "Finish" button to apply changes.
- Press "By connectivity" button to split all inclusions again.
Deletion of the part of complex inclusion
Suppose we have an inclusion with complex topology and we want to delete one of its parts:

Follow these steps:
- Select inclusion and split it by plane (press "By plane" button and draw line to split inclusion from this point of view):
As you can see due to the complex inclusion topology we have cut two inclusion necks instead of one:

2. Select the right part of inclusion and split its neck by plane. After this you will have inclusion separated into 3 parts. But you need to delete right top part and merge two other parts in one.
3. To merge two other parts, select left part, click "Merge" button, select bottom part:
4. After pressing "Finish" button, you will have 2 parts of inclusion instead of 3. Then select top-right inclusion and press "Delete" button:
So this small example shows how to split inclusion of complex topology into arbitrary parts using plane split and merge operations.
Advanced usage of morphology - deletion of transparent holes in inclusion
This simple example shows how you may remove transparent holes in inclusion using multiple application of morphology. On picture below you can see the example of selected inclusion with holes (they are marked by green ellipses):
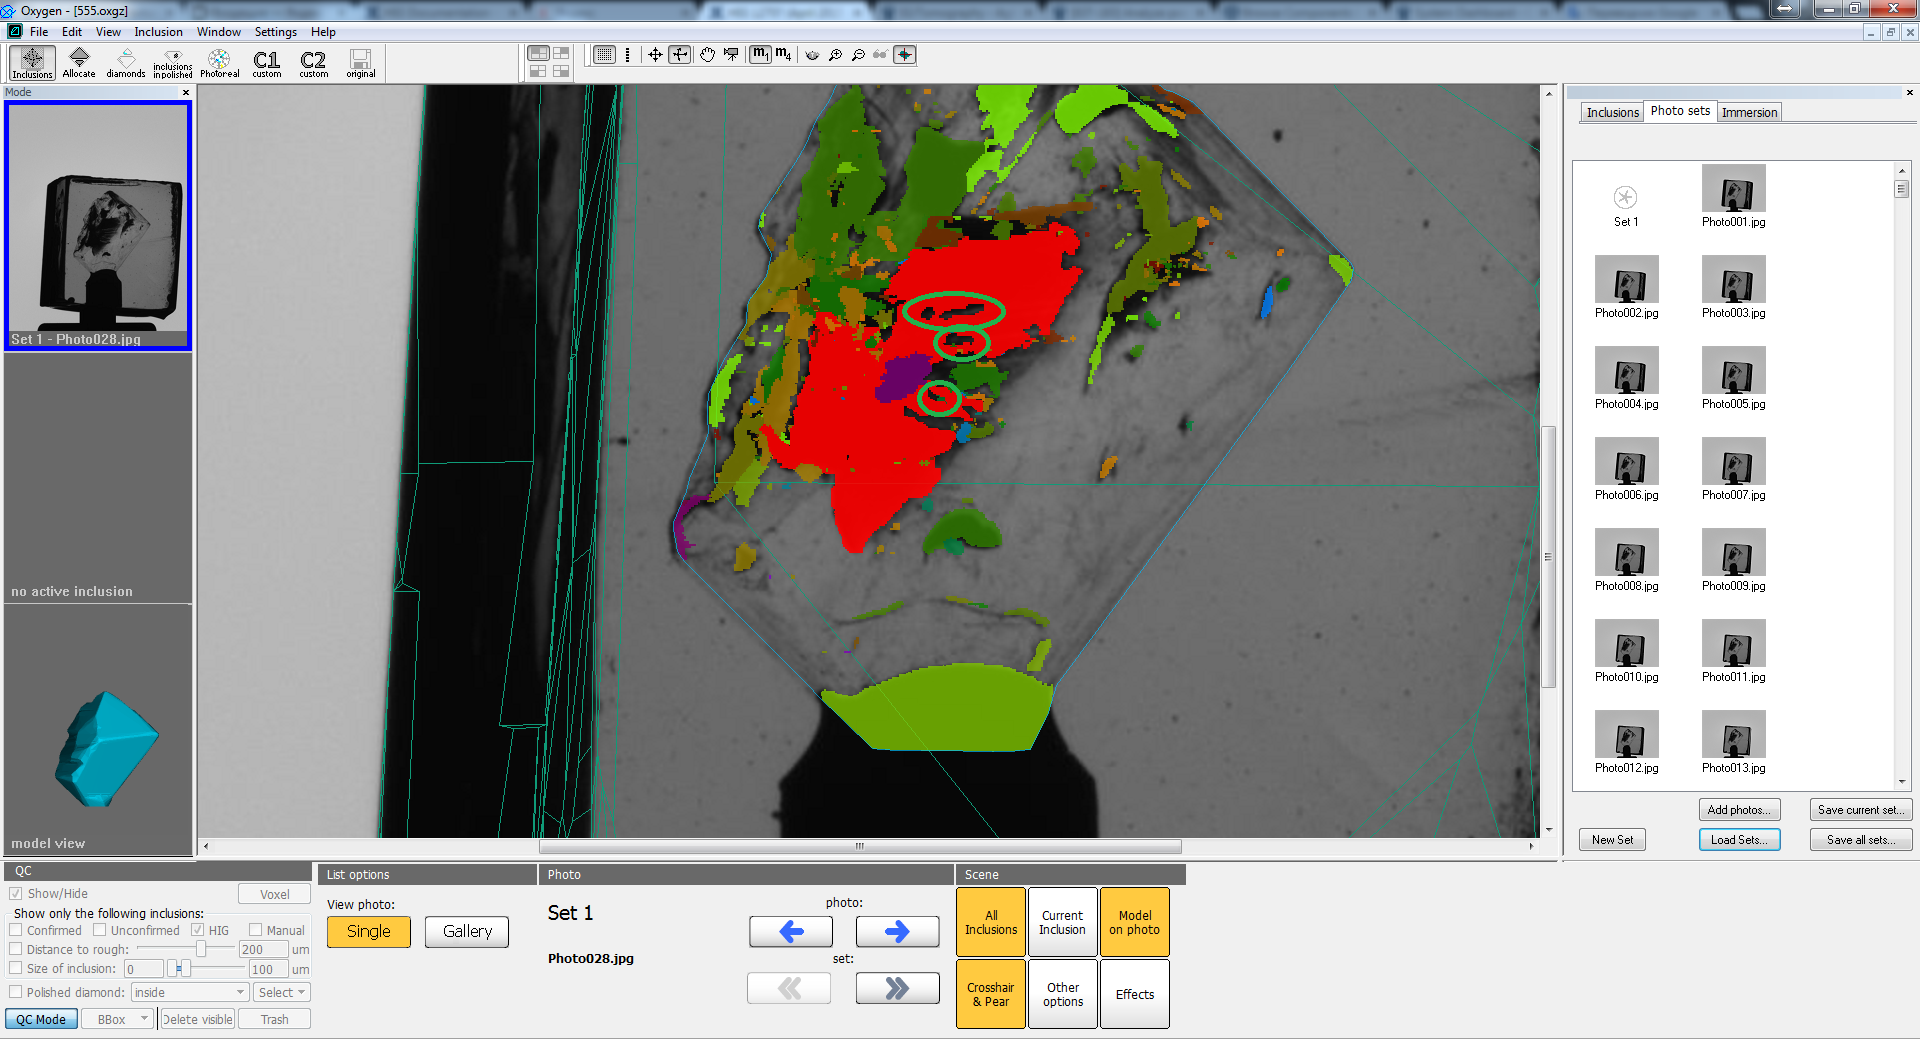
- Press "Morphology" button and by moving slider to the right remove inclusion holes:
2. Click "Finish" button. Then again click "Morphology" button and move slider to the left to restore the borders of inclusion reprojection:
The result is the inclusion without holes and with practically the same borders.
Note: Use this example in case when thresholding cannot eliminate holes (when hole is in transparent area) and when these holes are not too large compared to the size of inclusion. If the hole is large, using this approach may spoil the borders of inclusion.
Advanced usage of morphology - split big inclusion from laser markings
This simple example shows another way to remove markings from big inclusion using multiple application of morphology. On picture below you can see the example of selected inclusion merged with long laser marking:
- Press "Morphology" button and by moving slider to the left remove laser marking (or split it from big inclusion):
2. Click "Finish" button. Then again click "Morphology" button and move slider to the right to restore the borders of inclusion reprojection:
The result is the inclusion without connected laser marking and with practically the same borders.
If you press "Apply changes" button, this inclusion will be automatically converted into flat crack:
Before application of voxel QC tools this inclusion was not converted to flat crack, because it was connected with laser marking. That is why during voxel QC it is important to remove any parts connected with the crack.
NOTE: In this case we could remove the marking by splitting by plane. But there are cases when inclusion is connected with many laser markings. In this case multiple application of morphology tool will be more useful than multiple splitting by plane.
Other improvements
Among other improvements we want to mention the acceleration of autoplotting algorithm on 2 GPUs. In this table you can find the performance of new algorithm on various hardware configurations. Using second GPU improves the overall performance (including parts of the algorithm that are executed on CPU) by 1.3-1.4 times. To maximize the performance on 2 GPUs, please, follow these requirements on molding.
Known issues
About these bugs we know and we will fix them a soon.
Bug with clipping of inclusion reprojections in voxel QC model view
How to reproduce:
- Launch voxel QC mode
- Switch to photo view
- Twice zoom out photo with turned on reprojections (photo should not occupy the whole view)
- Switch to inclusion (3d) view
You will see that 3d view of voxel inclusions will be clipped:

To avoid this bug you may switch to photo view, twice make zoom in and switch back to current inclusion view.