Here you can find information about what is new in HPOxygen Server version 5.3.42.
Inclusions - Grey Status
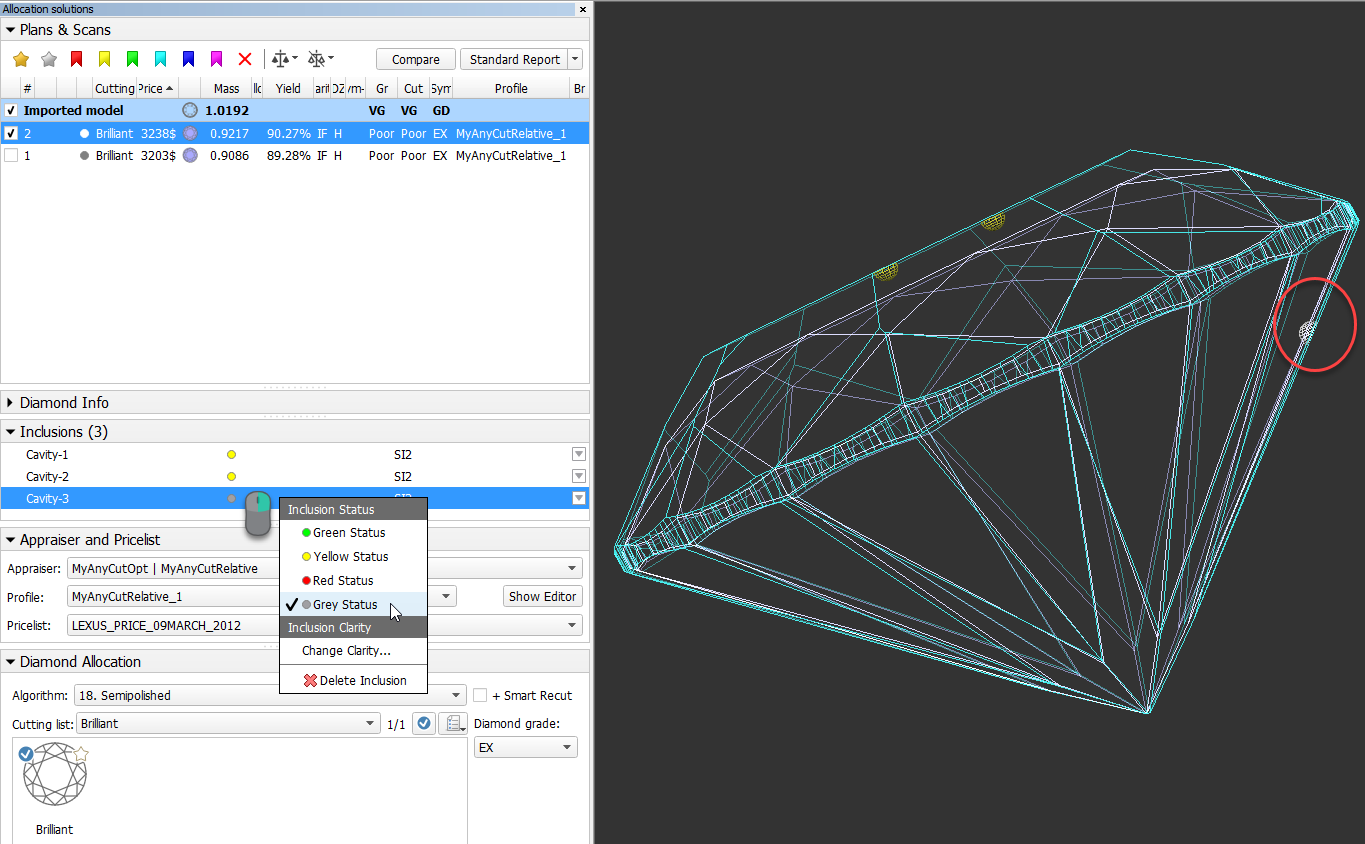
Now you are able to set Grey Status for inclusions of your model. Inclusions having this status will not be taken into account during allocation.
Solutions Report
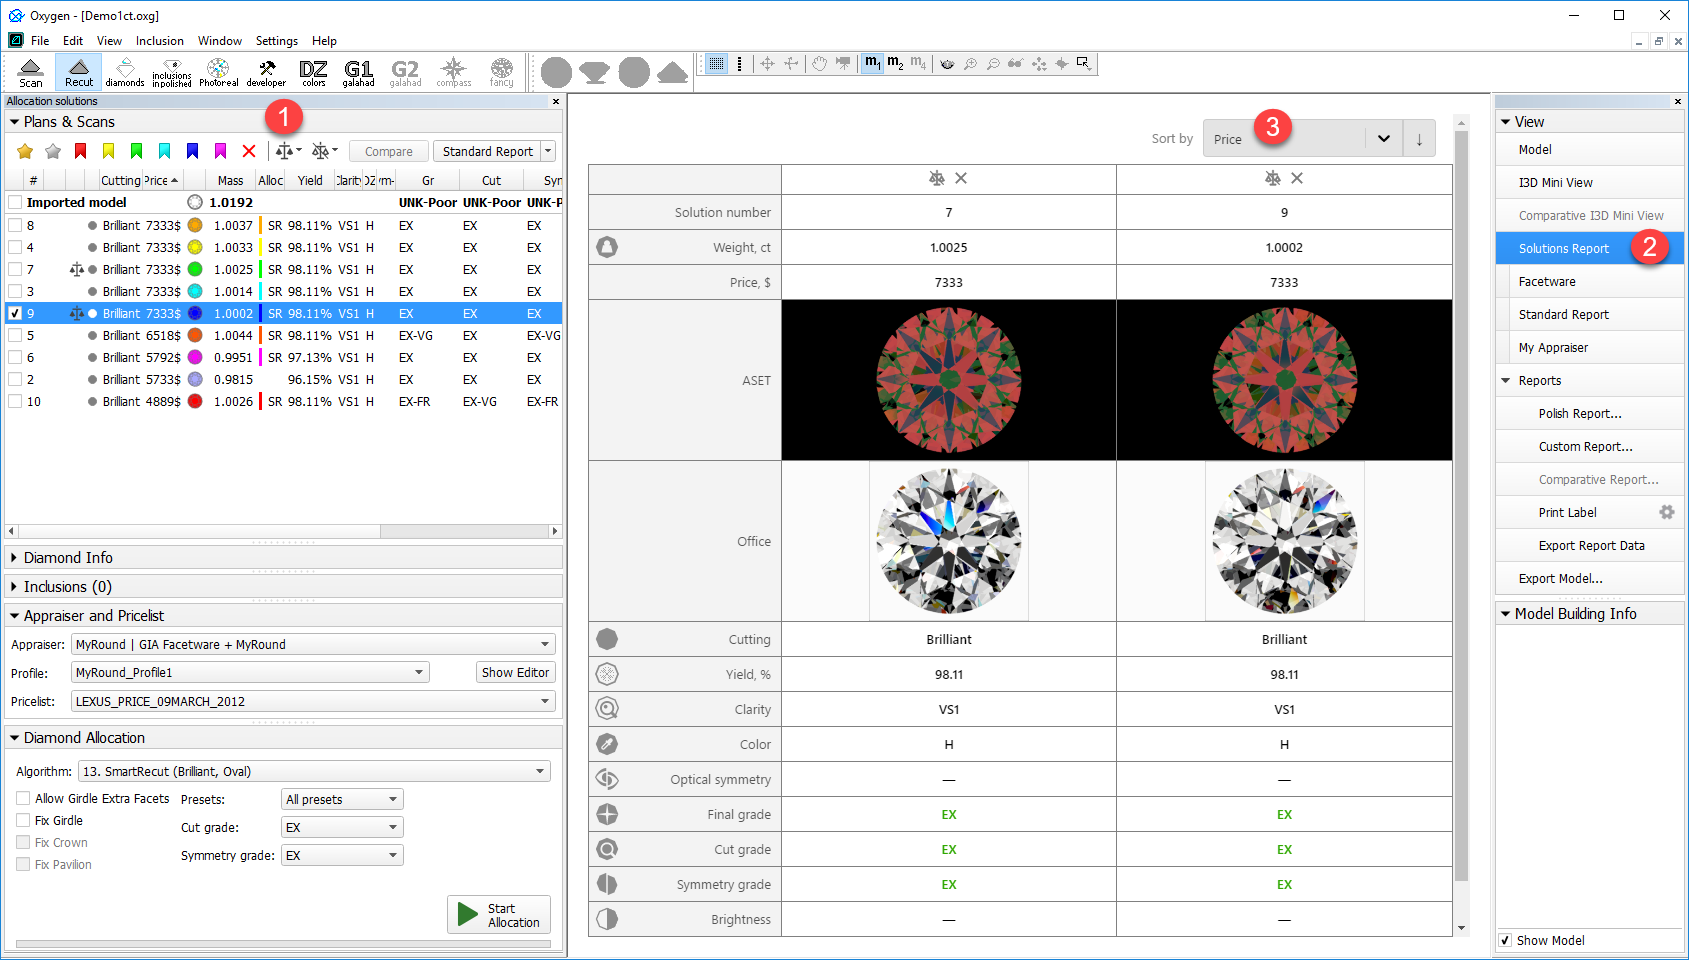
The system now allows comparing solutions using Solutions Report. This report allows comparing solutions by main parameters including ASET and Office pictures.
To use the feature:
- In the Solution List, select solutions to be included in the Solutions Report, then click
 . The included solutions are marked with the
  symbol.
 - On the right panel, click Solutions Report. The report is displayed in the Scene.
- Note If you include many solutions in the report they can be displayed not all at once, but on different pages
- Page switcher and the Columns per page setting are displayed in the bottom of the report page
- You can sort the solutions in the report using the Sort by control.
- You can add or remove solutions from a report via the Solution List using the context menu.
- You can remove a solution from the report by clicking
 (do not confuse with
  wich removes the solution from report and deletes from the Solution List)
 - When deleting a solution from the list, it is deleted from the report as well.
- You can add/remove all solutions at once. To do so, in the Solution List, click the arrow
 to the right of or , then from the displayed menu, select Add All Solutions to Solutions Report or Remove All Solutions from Solutions Report correspondingly.
Customizing Profiles - Improvements
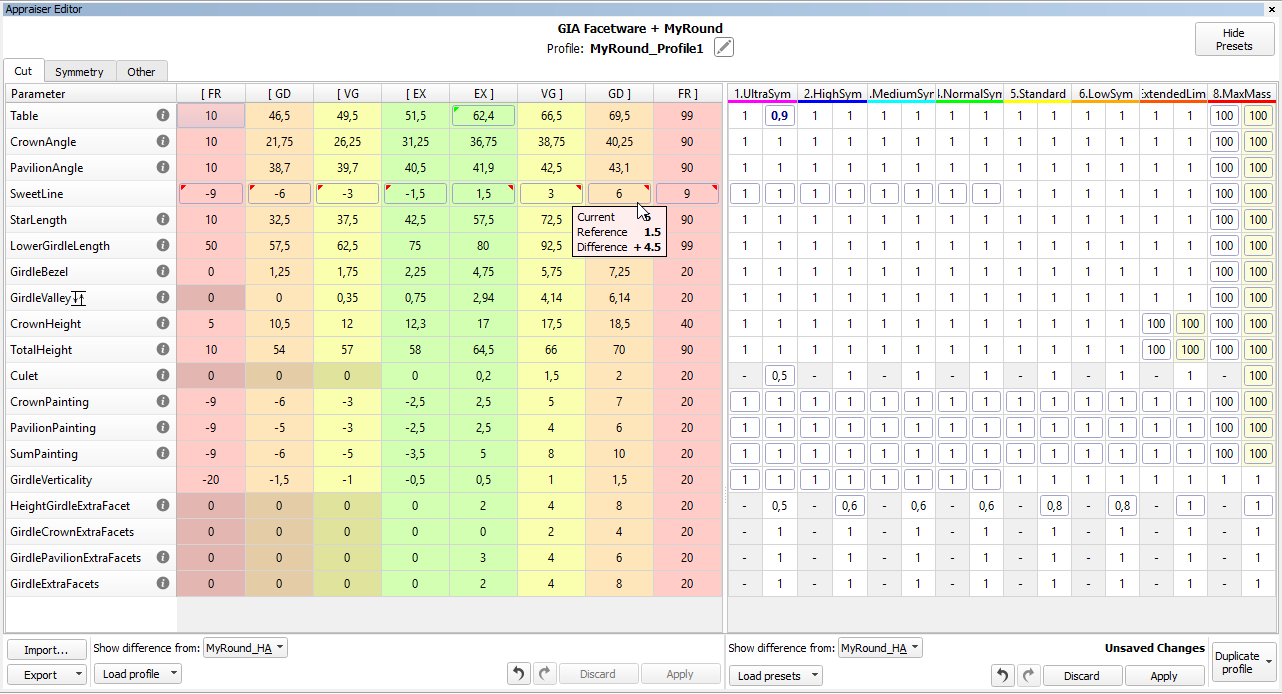
In HP Oxygen, each profile consists of cutting parameter intervals and Smart Recut presets values. The system allows copying both cutting parameter intervals and presets values into your own editable profile - there you can further tune them.
Now copying intervals and preset values is improved. You can:
- Duplicate existing profile into yours in one click (all tabs, all parameters, both intervals, and preset values)
- Quickly compare your profile with any other - both intervals and preset values
- Load intervals for all parameters (all tabs!) - in one click
- Load intervals only, presets only, or both intervals and presets - in one click
- Load presets values - for all presets or only for one preset
Below is a brief description of how to work with the new features:
- You can only modify editable profiles, so first go to one of them under your appraiser.
- Click Show Presets, if necessary.
- To compare your profile to another one, in Intervals and/or Presets sections, select value in Show difference from. Mouse over the highlighted differences to see details.
- To select parameter click it. Use the context menu to select all.
- To deselect parameter, click it again. Use the context menu to deselect all.
- For selected parameters, use the context menu to load Intervals from, Presets from or Intervals and Presets from.
- Unsaved changed values are highlighted with bold. Unsaved changes notification is displayed.
- To save changes, click Apply. Applying saves on all tabs. Applying intervals also saves presets, but not vise versa.
- To load intervals for all parameters (all tabs), in the Intervals section, use Load Profile.
- To load preset values for all parameters (all tabs), in the Presets section, use Load Presets. Use All presets or select the preset to load.
- To load an entire profile (all parameters and preset values on all tabs), use Duplicate Profile. Changes are automatically applied immediately.
- You can Discard unsaved changes. Discarding erases changes on all tabs, for intervals and presets separately.
- You can at any moment step-by-step Undo
 or Redo
  your changes. Works both for saved and unsaved.
 - You can copy and paste values, using CTRL-C, CTRL-V or the context menu.
- You can rename your editable profiles.
Managing Allocation Forms
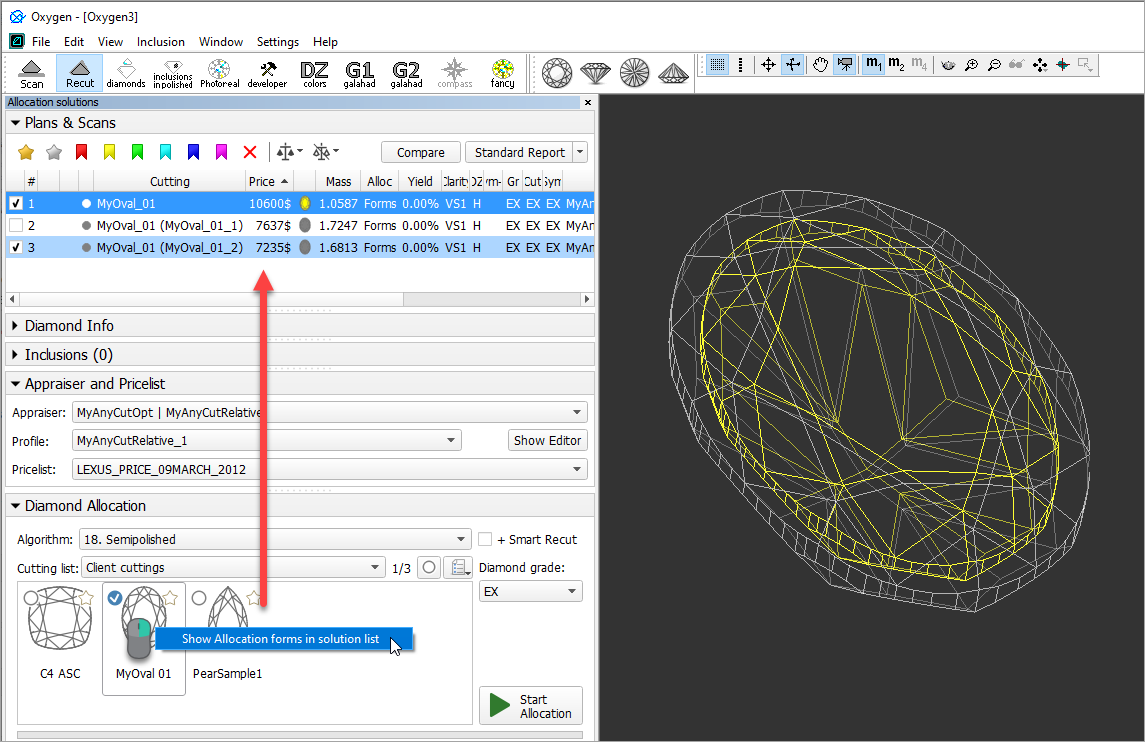
Now you can manage allocation forms of your registered cuttings in the solution list.
How you can manage the allocation forms:
- You can use empty project via File > New. This will provide you with an empty solution list.
- Or add your allocation forms to solution list of any opened project.
- To show allocation forms, select your cutting, then right-click it and select Show allocation forms in solution list. If your cutting has allocation forms, they will be copied to the solution list.
- You can use all tools of the system, available for usual solutions, to analyze characteristics of your allocation forms.
- Note Your displayed forms are copies. If you make some changes to them, this will not affect the initial copies actually assigned to the cutting. Still, you are able to register changed copy as the additional form for the same cutting.
- In the solution list, from the contextual menu, you can:
- Remove from allocation forms... This is the only operation affecting not only the copy but also the source.
- Add as allocation form to another cutting...
- Register as new cutting...
- If necessary, you can save you displayed copies of allocation forms as a separate project.
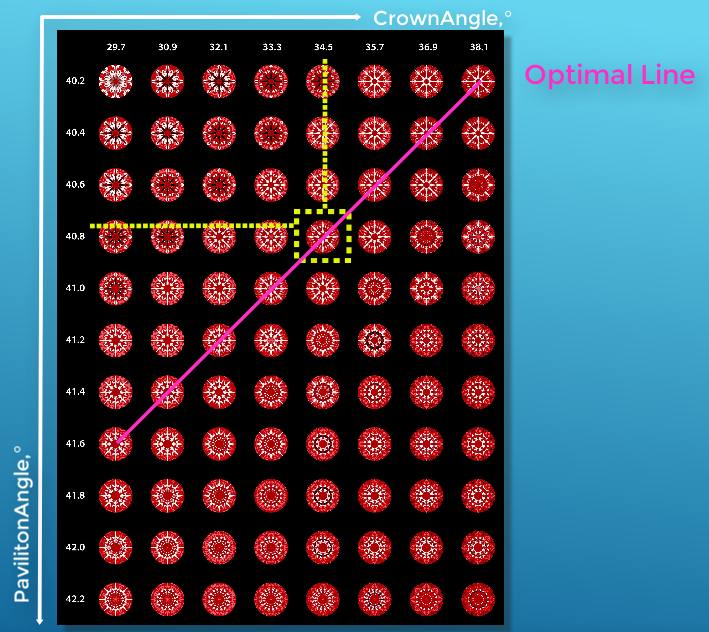
SweetLine Improvement
As the result of additional research, for the SweetLine parameter, the slope of the optimal line is changed from "negative 1:4,5" to "negative 1:6" which means "each 6° increase of CrownAnge is 1° decrease of PavilionAngle". This improves the accuracy of defining the set of solutions with the better optical performance.
Detailed information about using the SweetLine parameter is presented in the video below:
| Video | SweetLine - Time-Saving Approach to Getting Better Optical Performance | ||||
| Published: | 2019, October 1 | Last Updated: | 2019, December 5 | v.2.0 |
| ||||
Video summary:
| ||||
Video keywords: SweetLine, SweetLIne axis, optical performance, CrownAngle, PavilionAngle | ||||
| Published in: | Release Notes | 2019-10-23 - HPOxygen Server 5.3.42 | ||
| Documentation | Using SweetLine | |||
| Playlists | All Videos | |||
| Also | As Separate Page | Specification | |||
New Smart Recut Parameters
The new parameters have been added to the appraisers used by the Smart Recut algorithms:
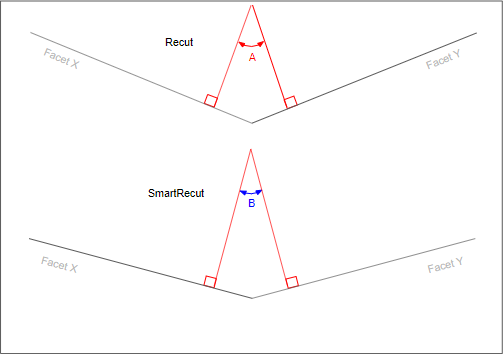
Defines how much (in %) the angle between normals of any neighboring facets can deviate after Smart Recut comparing to Recut.
If at least one of the neighboring facets is girdle or culet, the limitation is not applied. The girdle shape is controlled by the Girdle Shape Tolerance parameters. The culet is not taken into account.
Calculation
The parameter is set manually via preset and control the rule:
A(1+min/100) < B < A(1+max/100)
Where:
- A - the angle between normals of neighboring facets after Recut
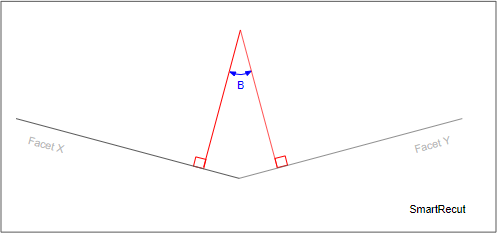
- B - the angle between normals of neighboring facets after Smart Recut
- min - a left boundary in preset, should always be negative, for example, "-25"
- max - a right boundary in preset
Usage and Examples
If the parameter set to "-25, 50" and the angle between normals of neighboring facets after Recut (A) is "10°" then:
- 10(1-0.25) < B < 10(1+0.5)
- 7.5 < B < 15
- the angle between normals of the same facets after Smart Recut (B) should be within the interval from 7,5° to 15°.
Reporting
| Reported in | Section | Values | Units | Bookmarks | Name in Reports |
|---|---|---|---|---|---|
None | NA | Single value | % from the initial angle | NA | NA |
Visualization in Appraisers
| Value | Units | Bookmark | Tab | Parameter Name | Comment |
|---|---|---|---|---|---|
| Single value | % from the initial angle | NA | Cut | AdjacentFacetsAnglesEveryTolerance, % | Visible only when presets are displayed. |
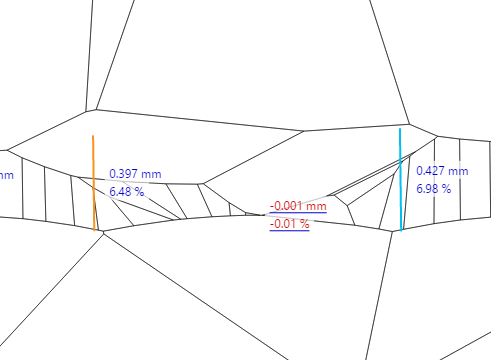
Sets limitation “not less than this value” for the angle between normals of any neighboring facets.
If at least one of the neighboring facets is girdle or culet, the limitation is not applied. The girdle shape is controlled by the Girdle Shape Tolerance parameters. The culet is not taken into account.
Calculation
The parameter is set manually via preset.
Usage and Examples
Should be used to avoid transforming the neighboring facets into a single plane.
The current default values are:

Reporting
| Reported in | Section | Values | Units | Bookmarks | Name in Reports |
|---|---|---|---|---|---|
None | NA | Single value | ° | NA | NA |
Visualization in Appraisers
| Value | Units | Bookmark | Tab | Parameter Name | Comment |
|---|---|---|---|---|---|
| Single value | ° | NA | Cut | AdjacentFacetsAnglesEveryMin | Visible only when presets are displayed. |
Client Versions Integration - Multi-Diamond Algorithms Enabled
As part of the integration of the different Oxygen client versions, the algorithms producing multi-diamond solutions are enabled in the system and now available in the Algorithm list.
Fixed Unknown Cut Grade Because of Girdle Value
The calculation error leading to a negative girdle and thus unknown cut grade has been fixed.
From: Utpal Mistry
Dear Sergey
Attached project shows negative girdle due to new GIA rule. which gives unknown cut grade.
--
Attached:
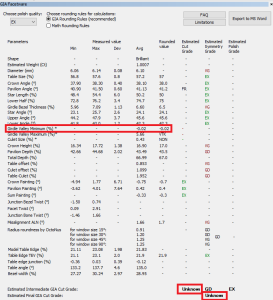
For the presented example and similar cases, the girdle height now will be "0".
Fixed Problems and Improvements
The following fixes for the known problems and improvements have been implemented:
- For the SmartRecut algorithm:
- the bugs for specific examples have been fixed
- minor improvements have been made
- For the "MyRound | GIA Facetware + MyRound" appraiser, "MyRound_H&A" profile, the presets have been improved to provide the better spectrum of solutions
- In the Scene, the model basis was broken in some cases after using I3D Mini View - the error leading to this wrong behavior has been fixed
0 Comments