...
- Prerequisites: Shadow scanner is connected
- Go to Inclusions mode.
- In the Inclusions mode, "live camera" Mode, you adjust the Camera and Lighting settings to have the best view of your rough.
- Shoot any number of photos or photo sets.
- Save photo sets to disk.
- If necessary, use any tool to convert series of images into a video for a "motion" presentation of your rough.
Smart Recut and Smart Normalize updates
SmartRecut errors Log
Sometimes the SmartRecut algorithm does not find a solution, and it is not clear what to do next. In some of these situations, the algorithm can automatically determine the cause of the problem. We have developed an error logging system for SmartRecut, SmartNormalize (/ Lite), SmartZoom algorithms so that users can adjust their actions based on the received information. You can see error messages in two locations:
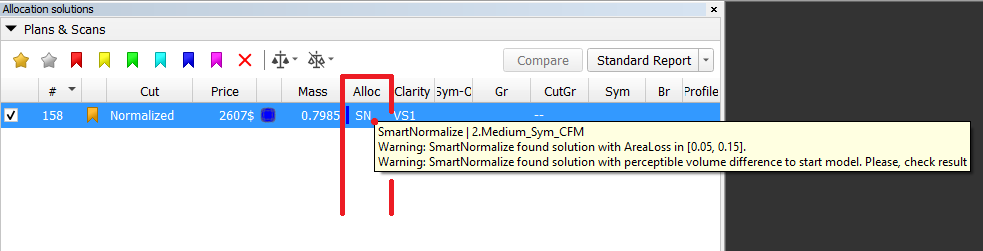
1) For SmartRecut, SmartNormalize, SmartNormalizeLite solutions errors can be viewed in the Alloc column tooltip
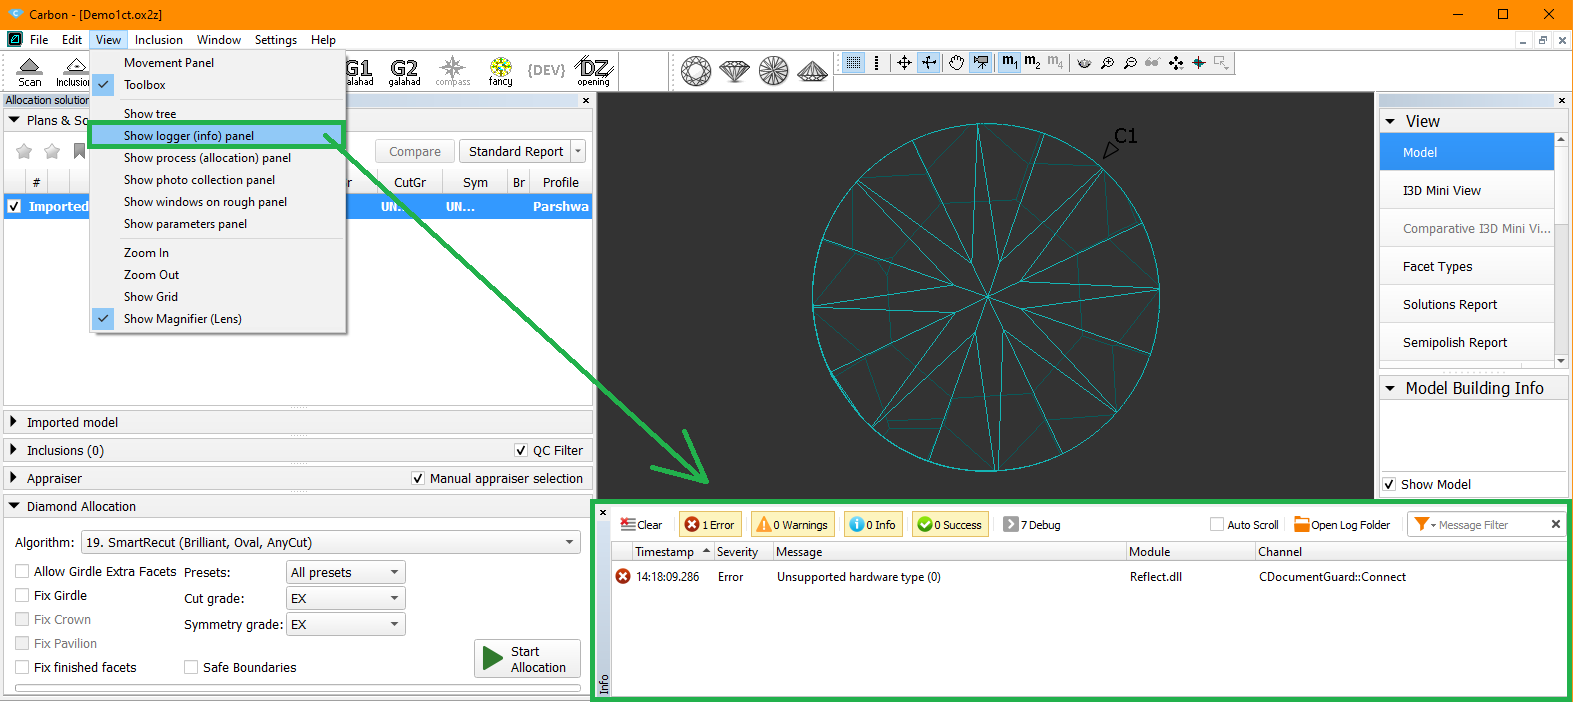
2) In the standard logger panel. To open it you need to press View → Show logger (info) panel.
These messages are related to Module SmartRecut.dll. Message always starts with the name of the related preset.
All messages can be divided into 4 groups:
1) Warning. Does not block the work, the algorithm gives some result. Tells the user some information and possibly instructions.

2) Error Messages containing "Please inform the developer". These are rare technical problems. The user cannot bypass them on his own.

3) Error Messages containing instructions for the user.


4) The rest of the error messages. There is no instruction in them. From the text of the message, you can sometimes understand what the problem is. For example, a specific cut does not interact correctly with the appraiser or reports.

SmartNormalize Batch-mode for registration of many (100 and more) allocation forms
To register Goodwin cuts allocation forms, you need to run SmartNormalize algorithm on every model. For hundreds of forms it takes a very long time and inevitable human errors. We have automated this process as much as possible.
1) Prepare models array for Cut registrations:
- Choose your cut pattern. We recommend registering models with different patterns in different cuts
Gather together .dmc files with models of the selected pattern. It could be scans or allocation forms of your old In-house cuts.
Specify Cut grade models in filenames if you have this information. Future allocation forms will have these names
2) Now you need to register yourself the first form
- Register cut using "Register as new cut...". You need not .dmc file for this. For example, .ox2z or .dmx file. For details see In-house cut registration
- Set parameters limits to Absolute Appraiser of your Cut. For details see Appraisers for specific in-house cuts
- Restart HP Carbon.
3) Then you can right-click on this Cut in Cutbook and choose "Batch add forms..."

4) Choose your .dmc files in pop-up Windows explorer and press ok. In order not to overload the computer memory and for ease of data recovery in case of any failures, we recommend running 100-500 models
5) You will see progress bar
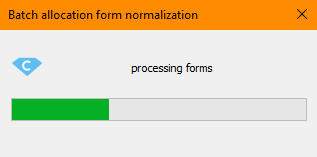
Each selected .dmc file will be loaded into the program. The SmartNormalize algorithm with the preset "2.Medium_Sym_CFM" will be launched on the model from the file. If no significant errors are found in the SmartNormalize process, the solution will automatically register as an allocation form.
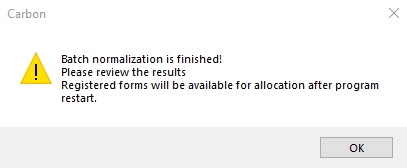
6) The following message will appear at the end.
In the Allocation solutions list, all models and BatchSmartNormalize solutions will be in № order
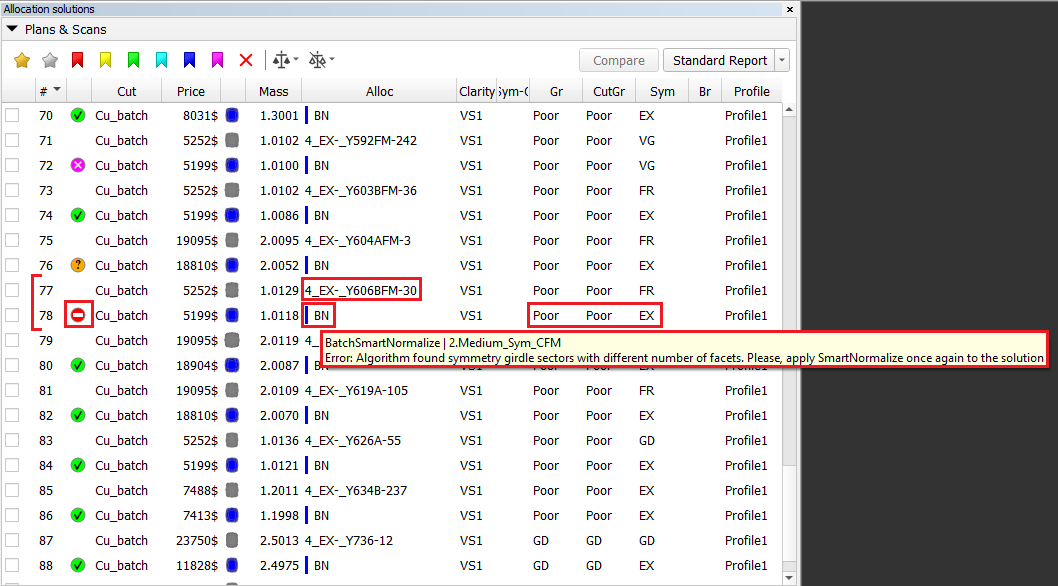
Here is the following useful information:
.dmc file name in "Alloc" column for loaded models
Tag "BN" and preset color in "Alloc" column for solutions
Grade by cut Absolute Appraiser
Errors in "Alloc" column tooltip
Color labels (details in next chapter)
SmartNormalize Auto Color Labels and Errors
To simplify the choice among SmartNormalize solutions, the algorithm began to place Color labels that warn about the presence of known errors. In SmartNormalize batch mode color labels also determines if the allocation form has been registered automatically.
| Color label in SN | What does it mean in separate SmartNormalize | Color label in SN Batch | What does it mean in Smart Normalize batch |
|---|---|---|---|
| Good solution for registration. No errors found automatically. |
| Automatic registration |
| Good solution for registration. Automatically found warnings should not bad affect the work with this preform in the future. Possible Warnings: 1) "SmartNormalize found solution with AreaLoss in [0.05, 0.15]." |
| Automatic registration. If you like, you can review these solutions, write down their names, and remove them from the allocation forms. |
| It means Warning: "SmartNormalize found solution with perceptible volume difference to start model. Please, check result" Volume difference is perceptible but not big. Most likely input model is rather asymmetric, but solution is good for registration. This situation need manual user check. |
| No automatic registration. We recommend reviewing these solutions and most likely adding them manually to allocation forms. If you don't like the solution, you can run all SmartNormalize presets on these models and maybe get a green solution. |
| The solution contains errors, registration with which is not recommended. |
| No automatic registration. Review these solutions and read errors in "Alloc" column tooltip. Try to get the green SmartNormalize solution by following the prompts in the error messages and running all the SmartNormalize presets. Or you can ignore these model. |
Can not be in SmartNormalize without batch mode. First cut form is unknown. |
| No automatic registration. It means Critical error: "SmartNormalize solution Facet Types is different from first preform Facet Types. Please, check result". Ignore these model. Most likely the .dmc file contains a model with a different pattern or with Extra Facets. We recommend registering models with different patterns in different cuts. In case of Extra Facets you can try to colorize the model Facet Types correct considering Extra Facets and running all the SmartNormalize presets. But remember that checking for violet label will no longer work without a batch and you yourself need to check the identity of the pattern. |
SmartRecut AnyCut Girdle control upgrade
During SmartRecut AnyCut optimization, the Girdle_Shape1stDerToleranceModule and Girdle_PointsAxialSymmetryIdeality parameters can create contradictions. The first one tries to keep the girdle shape of the Recut solution. The second one tries to make the girdle perfectly symmetrical. If the Recut solution girdle is not perfectly symmetrical, then an unresolvable contradiction may result. This is mainly a consequence of user errors during cut registration. Examples of such errors are in Girdle_PointsAxialSymmetryIdeality
In this version, SmartRecut uses Facet Types to determine the symmetrical sectors of the girdle and averages the start girdle shape of the Recut solution over reliable symmetrical sectors. Due to this, the probability of an unresolvable contradiction is significantly reduced. And the correlation between the Girdle_PointsAxialSymmetryIdeality parameter and the AreaLoss value improves.
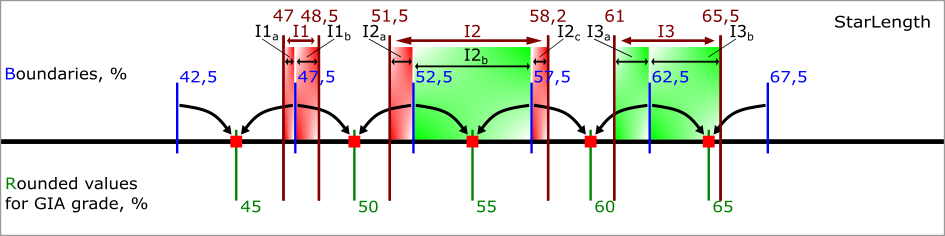
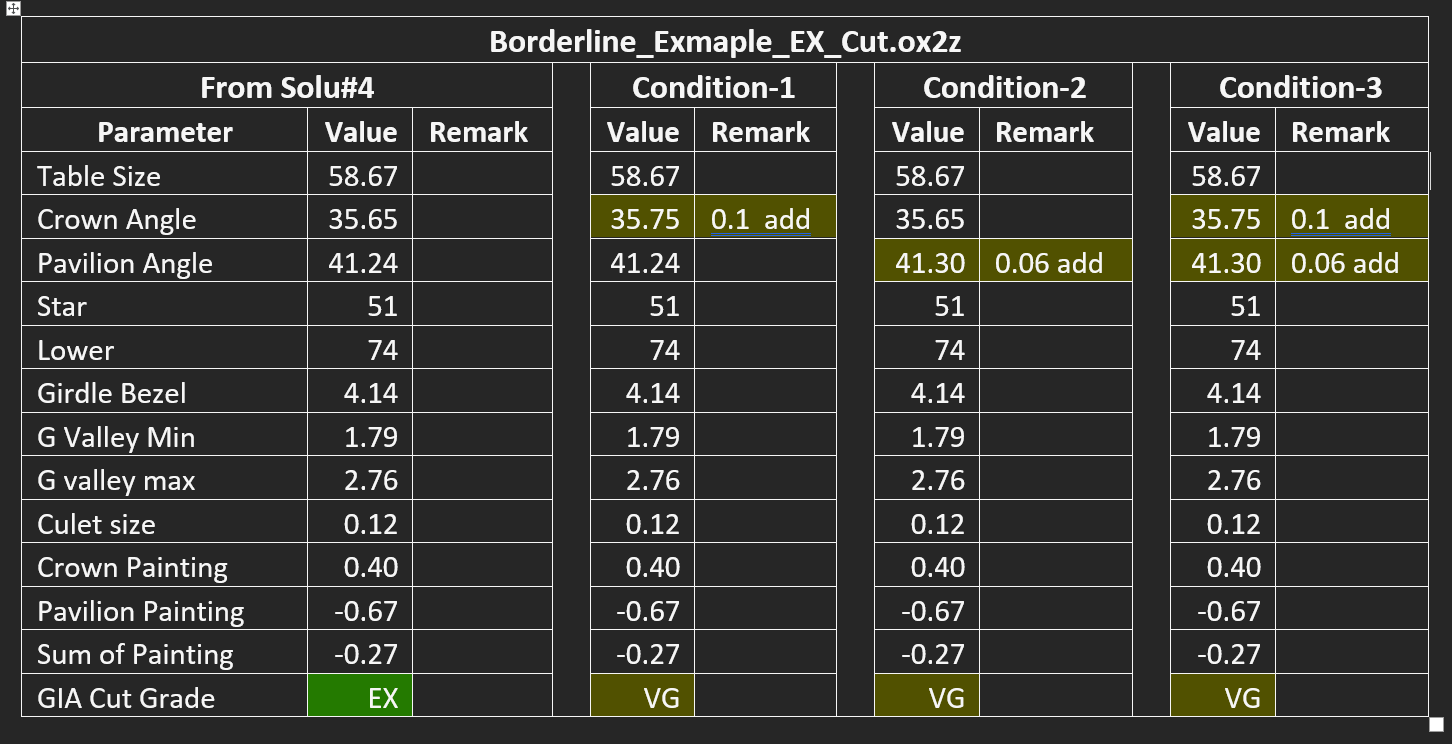
MyRound Boundaries and GIA Cut grade conflict in SmartRecut
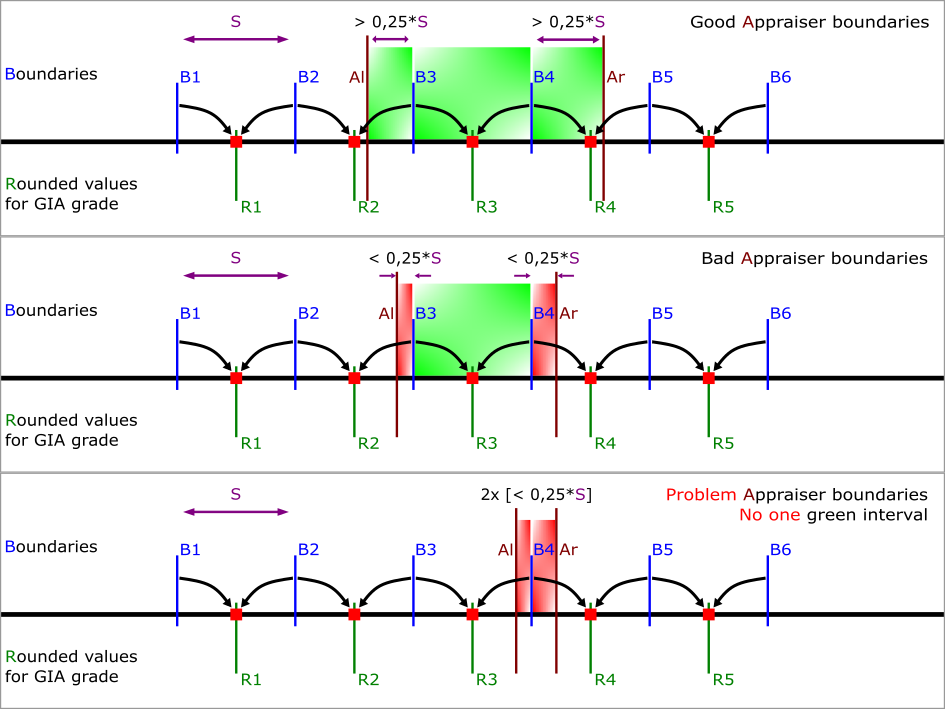
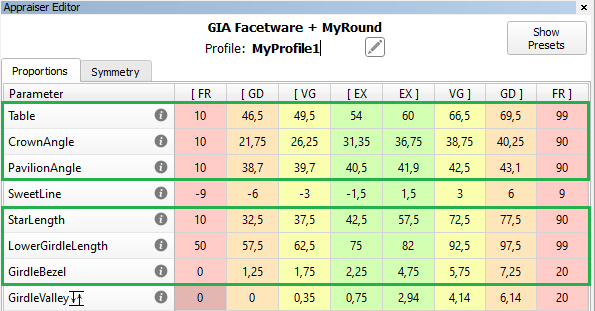
SmartRecut sometimes found solutions with bad GIA Cut Grade due to narrow MyRound boundaries on the parameters Table, CrownAngle, PavilionAngle, StarLength, LowerGirdleLength, GirdleBezel. This program behavior has been fixed. However, SmartRecut still cannot use the space close to the Boundaries between two 6D-cells ("dead zone"). If this happens then there is error message comes to Log:
To fix this problem please refer to the new documentation page Recommendations on Boundaries for main GIA parameters or open below description:
| Expand | ||||||||
|---|---|---|---|---|---|---|---|---|
| ||||||||
|
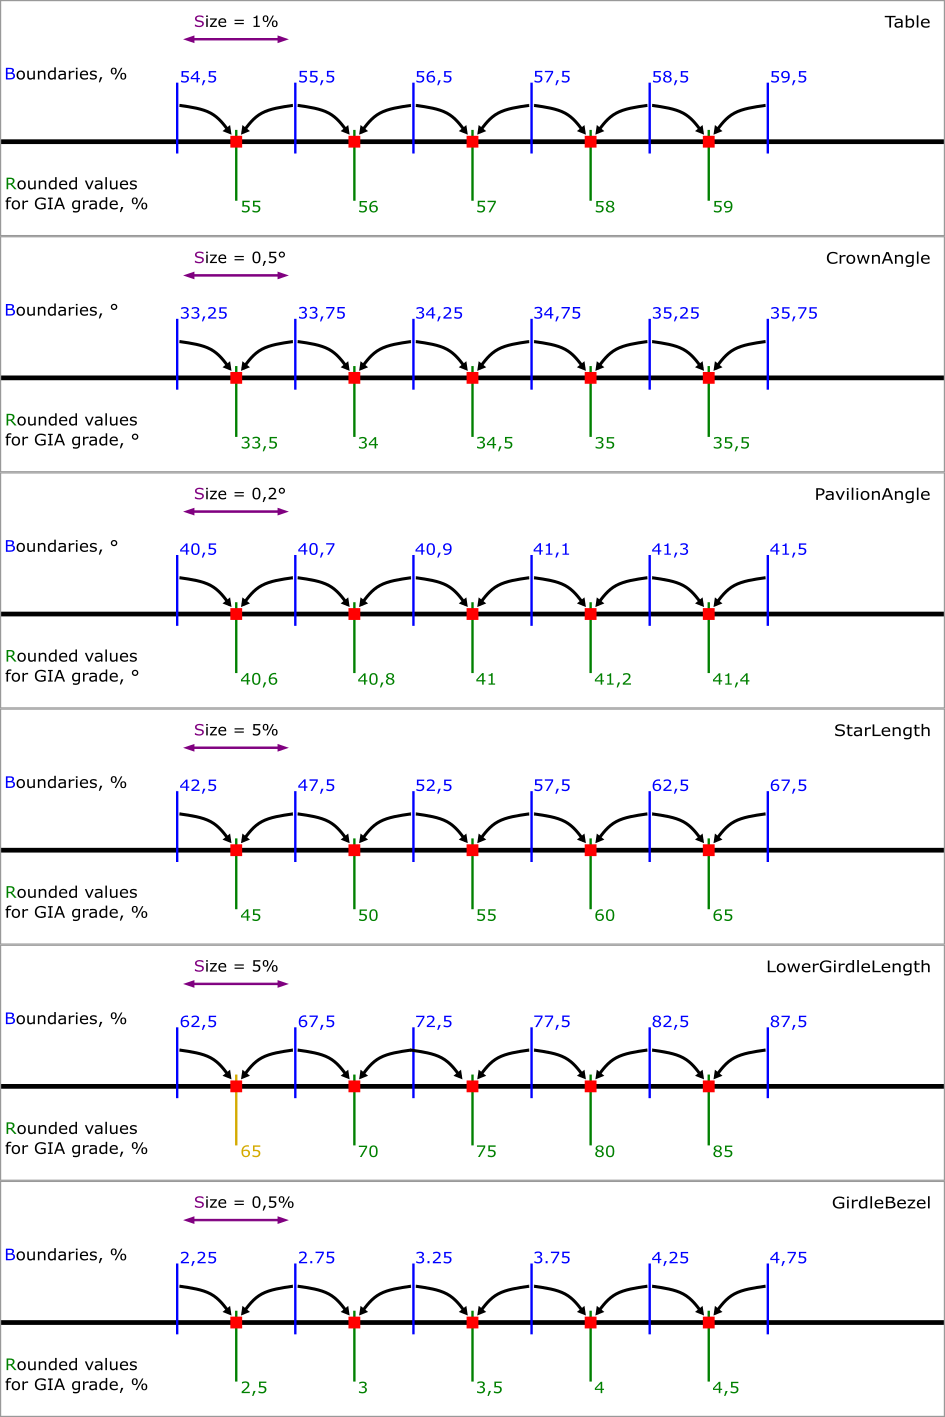
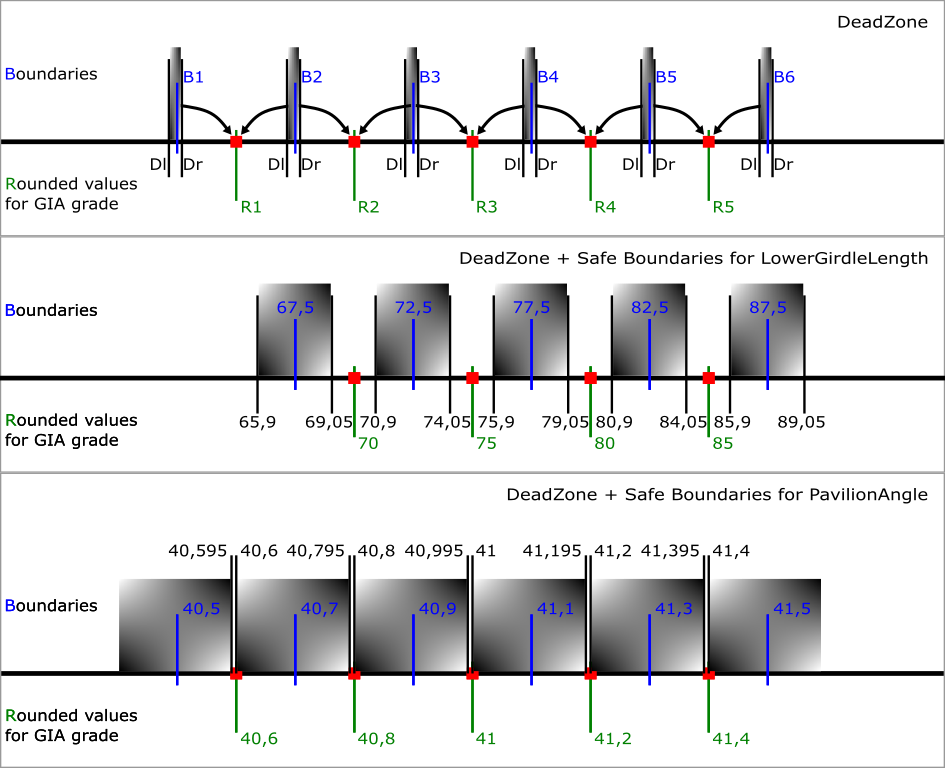
Precise fixation of parameters StarLength and LowerGirdleLength in SmartRecut (Brilliant)
StarLength and LowerGirdleLength are parameters that greatly affect the pattern of the stone, but practically do not affect the mass. Sometimes there is a need to get a specific average value for these parameters. Now you can do this by setting an interval of 0.02 length in MyRound. SmartRecut solutions will have the value exactly in the center of the interval. However, when setting narrow boundaries, it is necessary to take into account the dead zone, especially when working in Safe Boundaries mode. You can find out more information on the new documentation page Recommendations on Boundaries for main GIA parameters

SmartRecut + Safe Boundaries upgrade
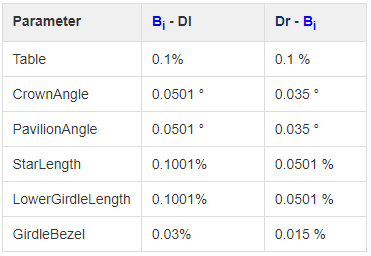
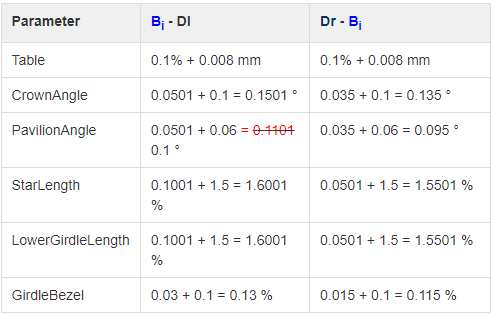
There are two errors when grading diamonds obtained from SmartRecut solutions by GIA. First — the scanned on different scanners model may slightly deviate. Second — GIA before rounding uses a peculiar way of parameters averaging instead of the usual mathematical averaging. But SmartRecut can only use usual mathematical averaging. In the previous version both errors was including in Safe Boundaries margin. Therefore, if we added the full margin to the solution Math values then it was ok. But if we added the full margin to the solution GIA values, then it was possible to go beyond the GIA Cut grade.
In the current version Safe Boundaries margin is responsible only for the possible scanner error. And SmartRecut separately takes into account GIA rounding error (dead zone). So you can add the full margin to the solution GIA values, it will be ok.
Handy change of clarity or status of inclusions from scene
...