Solution Sawing Panel
To open the Solution Sawing panel, press the Sawing button on the main toolbar of the application (Main\Optimization\Sawing). There is also a similar command in the menu of the Marking-out panel (x\Solution Sawing).
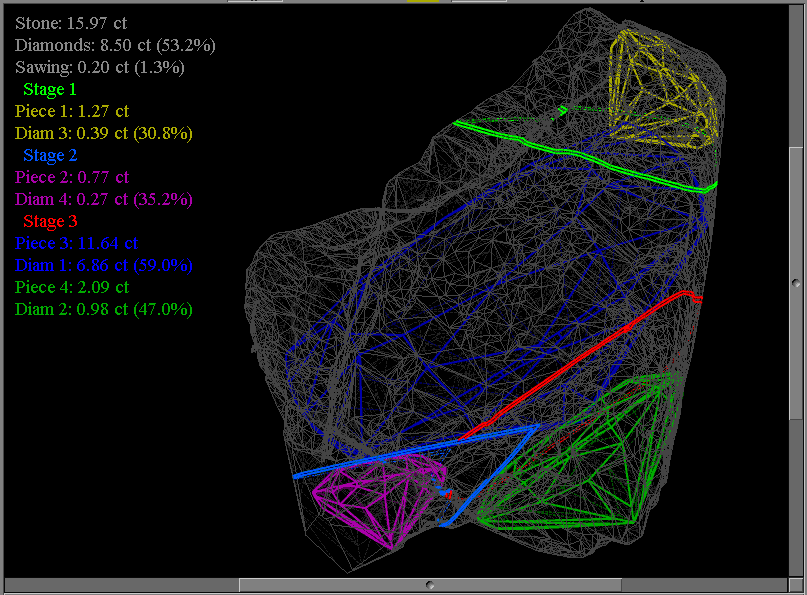
To make the decision on choosing the sawing sequence out of several options, use the following information displayed next to the sawing scheme: the carat weight of the raw stone as well as that of the resultant diamonds and the portion sawed off, both for the full solution and for each particular piece.
Diamond sawing is divided into a few stages. Each of the stages comprises either a single operation or several operations conducted simultaneously. Only those operations having no particular sequence can be grouped into a single stage. The smaller the reference number of the operation, the earlier it must be conducted.
For each stage (and, separately, for each operation of a multi-operation stage), you may watch: the residue of the raw stone, the resultant diamonds, the sawing plane (or two half-planes, in the case of Pie-type sawing), and the two pieces sawed.
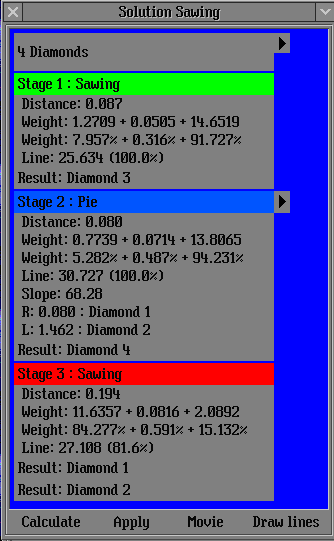
The top line in the Solution Sawing panel displays the total number of the diamonds produced as a result. If there is an arrow button next to this line, you may select one of a few possible sawing designs (Target 1, Target 2, and so on), which differ in the shape of the final pieces.
Below the top line, there are the lines of all the sawing stages. An arrow button next to a certain stage line means that the operation can be changed at the current stage.
Next is a button with information on the sawing operation. For planar sawing operations, the following information is displayed: the minimum distance between the objects, the carat and the relative weights of the two pieces and the portion sawed off. The Line value determines the length of the line drawn on the diamond (in millimeters). The value in parentheses shows which percentage of this line refers to the diamond (not to the pieces already sawed off by this stage).
For the Pie-type saw-cuts, the following additional parameters are displayed: Slope (the slope angle of the planes), R, and L (the distances to the objects to the right and to the left from the saw-cut line, with indication of the numbers of the diamonds).
The bottom line(s) of each stage contain(s) the result: the diamond(s) in the piece(s) sawed.
If sawing is not complete, the Remains line at the bottom of the list displays the diamonds that have not been separated into individual pieces.
There are four buttons at the bottom of the panel. Press the Calculate button to recalculate the sawing designs. The Apply button is responsible for passing the chosen sawing design to the solution contained in the Marking-out panel. Warning ! The Apply button of the Marking-out panel has a different function: it deletes the sawing design for the current solution. Press the Movie button to dynamically display the whole process of diamond sawing. The Draw Lines button allows you to draw the chosen sawing pattern on the diamond.

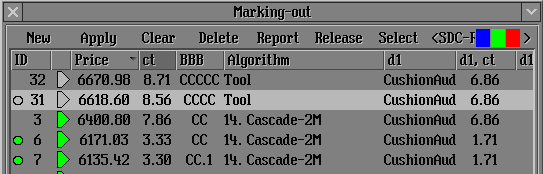
The Solution Sawing panel works only with the active solution from the solution list contained in the Marking-out panel. When you change the active solution in the Marking-out panel, the Solution Sawing panel either displays the sawing design previously saved for this solution or becomes empty, if there is no sawing design previously saved. Small circles in the ID column of the Marking-out panel mean that the corresponding solutions already have some sawing designs.
When saving the resultant solution, only one sawing design is recorded in the Marking-out panel instead of the whole tree of possible designs. To obtain all the designs again, it is necessary to press the Calculate button.
Drawing Sawing Lines
To draw the chosen sawing pattern on the diamond, press the Draw Lines button. A template with new type of lines - "Sawing" - is used to form the line to draw.
Program checks presence of given new type of lines "Sawing" in active template. If there is no such Sawing lines then program check others templates on presence of this type and such template could be found then program makes it active. If there is no any loaded template with Sawing lines then program creates new template with Sawing lines and makes it active.
This template is the same as template in file DrawLineTemplate.dlt file (located in root folder of program, C:\Program Files (x86)\OctoNus Software\Pacor Client 6 by default) that could be loaded by executing the Import Draw Line Template... command from the menu of the Marking-out panel. The template uses a new line type, Sawing, as an addition to the line types introduced earlier (Diamond, Layer, and и Bound). The settings of the template from the DrawLineTemplate.dlt file are so that different line styles correspond to different stages: Solid line for Stage 1, Dotted line for Stage 2, Dashed line for Stage 3, and Long Dashed line for Stage 4 and all the following stages. Hereafter, it is useful to save the startup file of the application with this template or with another template built on the basis of a similar scheme and more suitable for the needs of a specific enterprise.
Pie Option
At the moment, the algorithm tries to choose the sawing plane so that to separate one or several diamonds from the other diamonds and then recursively processes the residual pieces. If a single plane is not enough to complete this task, the Pie algorithm is used. This algorithm implies cutting off a piece by means of two half-planes, which is similar to cutting a pie. Since not every manufacturer is armed with such a technology of diamond sawing, there is a special checkbox, "Use 'Pie' option for sawing process", in the Options panel of the Marking-out tab.

By default, this option is turned on. To turn off the Pie option, uncheck the checkbox and save the System.bin file.
Example
Use the SolutionSawingDemo.Mmd file to execute this example.
1. Open the file.
2. Choose the first solution (ID=32, Price=6670.98).
3. Press the Sawing button. The Solution Sawing panel will then pop up and, after a while, possible sawing designs will be recalculated.
4. By pressing the small arrow button next to ‘5 Diamonds’, it is possible to view different designs of the shape of the final pieces (there are only 2 possible designs for this example).
5. Then it is possible to press stage, operation, or result buttons to view the look of the diamond pieces and the cut diamonds inside them at each sawing operation. If you press these buttons keeping the Shift key also pressed, the basis of the viewed scene changes so that to place the sawing plane horizontally at the center of the screen.
6. It is also possible to change the sawing order by pressing the small arrow button next to the stage chosen. For instance, if you choose ‘Sawing: Diamond 4’ instead of ‘Sawings: Diamond 3,5’, which is default for Stage 1, the whole sawing process will have the following order: first 4, then 3+5, and finally 1.
7. After analyzing the possible sawing designs and choosing the acceptable one, it is necessary to press the Apply button in the Solution Sawing panel. As a result, a small circle will appear on the chosen solution line in the Marking-out panel. This circle indicates that the corresponding solution has a sawing design saved.
8. Then, it is possible to choose a next solution in the Marking-out panel, for instance: ID=31, Price 6618,60. This solution already has a sawing design. Therefore, it will immediately appear in the Solution Sawing panel.
9. If you choose a solution with no sawing design saved, the Solution Sawing panel will become empty. To create a new design, press the Calculate button.