Here you can find information about what is new in HP Carbon version 1.2.95.
| Tip |
|---|
This version is available for download from the Octonus official web site. |
| Panel | ||||||
|---|---|---|---|---|---|---|
| ||||||
|
...
What is it for?
To get plans for beautiful and massy diamondswith the best combination of mass and performance, add your in-house cuts to the system, then bind future plans to them populate them with forms, then allocate plans close to these forms with a hybrid appraiser.
How?
- Add what you consider beautiful as your in-house cut.
- Add variations of forms.
- Bind Allocate future plans close to your forms by a hybrid appraiser.
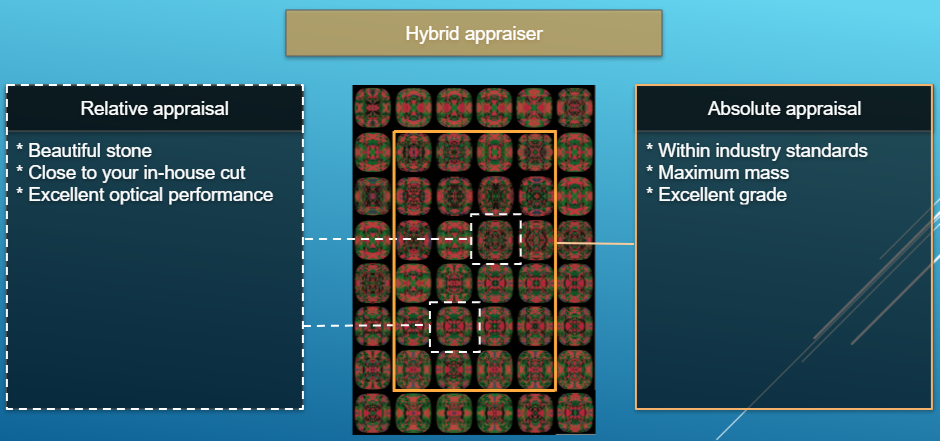
A hybrid appraiser has both absolute and relative parts:
...
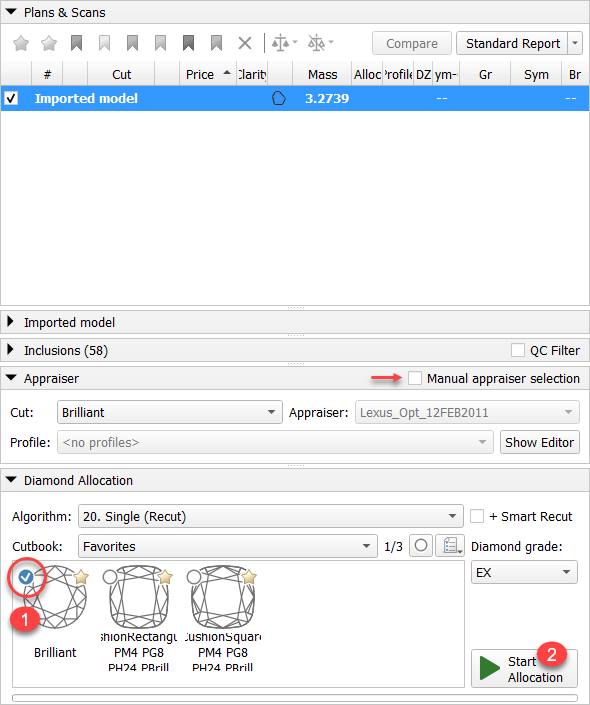
- In the Recut mode, in the left panel, in the Diamond Allocation section, from the Cutbook select "In-house Cuts".
In the cut list, right-click your cut, and then from the context menu select Create Appraiser. The dialog is displayed.
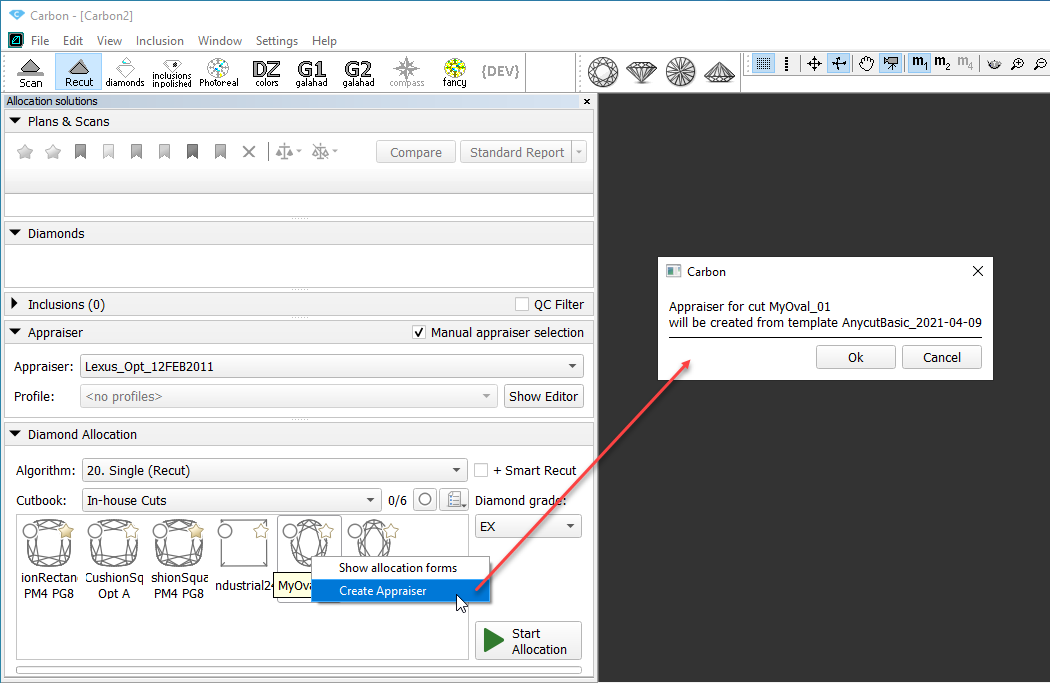
In the dialog, read the information about the template and then click OK. Your new appraiser is created, named the same as the cut. Two profiles are automatically created for it.
Info title Notes * The new appraiser is created by copying the template. As for now, the only available template is the "AnycutBasic_2020-12-09" which is identical to the "MyAnyCut".
* If you previously already created the appraiser for this cut, the system will suggest rewritingit - for the cut, only one its appraiser can be presented in the system.- In the Appraiser section, from the Appraiser list, select your appraiser.
- Select the profile to be edited, then click Show Editor. The Appraiser Editor window is displayed.
In the Appraiser Editor set boundaries for your parameters and then click Apply. For hints on how to edit profiles, see Configuring Profiles here.
Warning Pay special attention that the absolute part must be filled with the parameters corresponding to your cut.
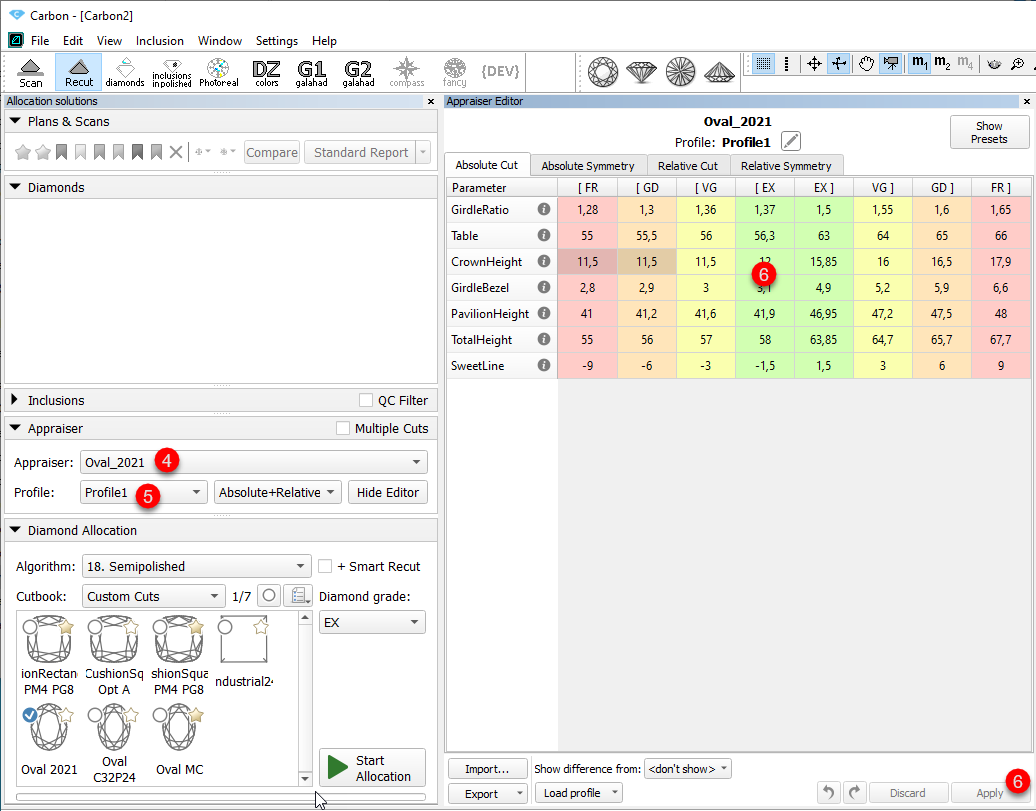
- If necessary, set boundaries for the second profile as well.
- As a hybrid appraiser only works when the linked cut has a good set of allocation forms, do not forget to add these forms to the cut (see details at In-house cut registration > "Adding allocation forms" and some questions and answers on allocation forms below).
...
| Was | Now | ||
|---|---|---|---|
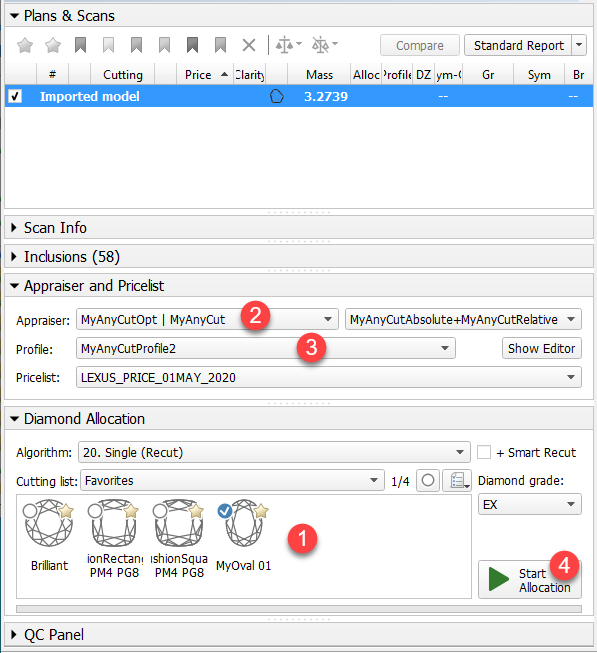
| System behavior | Allocation, 1 cut | Process: In Recut mode, in the Diamond Allocation section, you select the cut, then, in the Appraiser section, from the Appraiser list, manually select the appropriate appraiser and Profile, then click Start Allocation. Result: If you selected the wrong appraiser, there may be no results or they can be bad. | Process: you select the cut, then click Start Allocation. Result: The linked appraiser* will be used automatically (and the last selected Profile of it) |
| Allocation, more than 1 cut | Process: In Recut mode, in the Diamond Allocation section, you select your cuts, then manually select the "Lexus_Opt..." (must include selected cuts) appraiser and start allocation. The "Lexus_Opt..." should be pre-configured by an expert (no modifications via UI - only editing as file). Result: If your cut was not described in the "Lexus_Opt...", there may be no results or they can be bad. | Process: you select the cuts, then click Start Allocation. Result: The linked appraiser* will be used automatically (and the last selected Profile of it) for each included cut. | |
| Appraisal of already existing solutions | In the Plans & Scans section, you click the solution, then, in the Appraiser section, from the Appraiser list, manually select the appropriate appraiser and Profile, then click Show Editor. | In the Plans & Scans section, you click the solution, in the Appraiser section, the system automatically displays the linked appraiser. When your switch between the solutions of different cuts, the appraiser changes correspondingly. | |
|
|
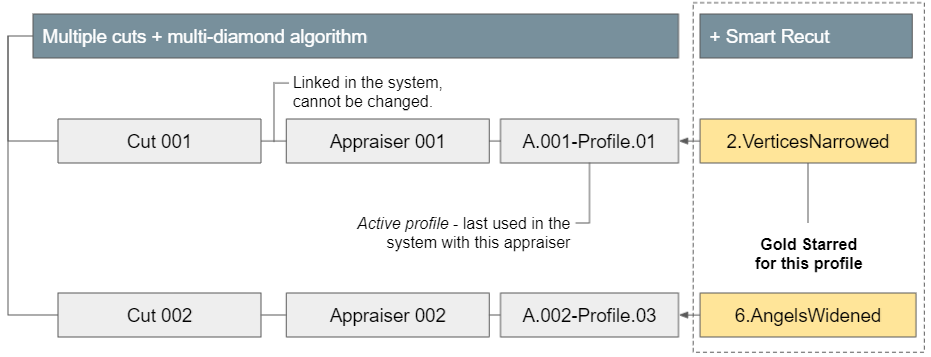
* In the system, cuts and appraisers are linked like this:
...
- In the Diamond Allocation section set Algorithm to smart recut one.
- In the solution list, select the "Recut + Recut" solution.
- In the diamonds section, select one of the solution diamonds. In the Appraiser section, the appraiser linked to the cut of the selected diamond is displayed automatically. Its active Profile is displayed as well.
- From the Presets list, select the preset you want to be used.
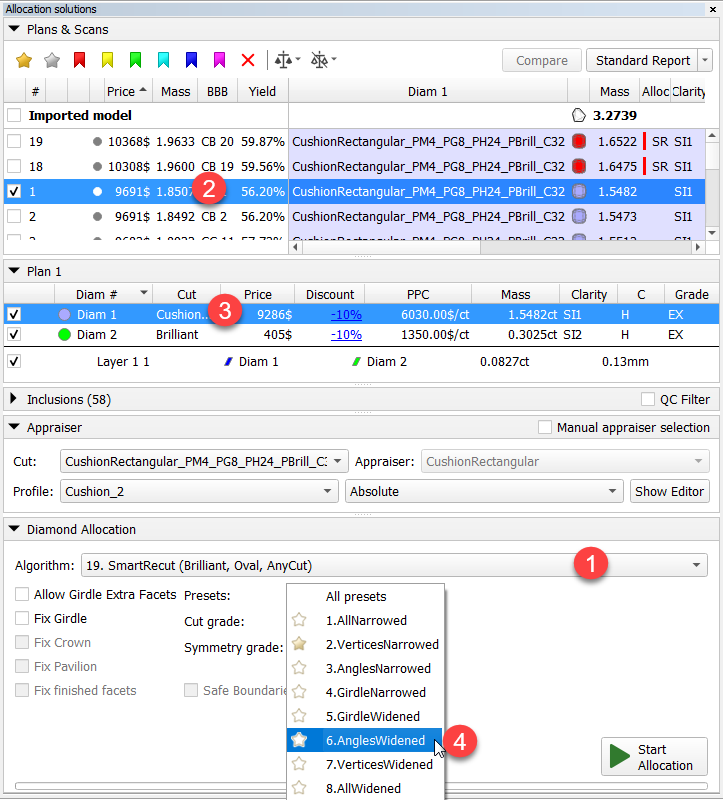
- Run allocation for the selected diamond. The new "Smart Recut + Recut" solution is added to the list, where Smart Recut is built with the selected preset.
- Repeat configuration for the diamond remaining Recut.
- Run allocation for the second diamond. Now you have a new "Smart Recut + Smart Recut" solution with each SR produced by the new preset.
...
The "gold star" shows which Smart Recut preset of preset will be used for the active profile will be used of the linked appraiser when running allocation for multiple cuts with for multiple cuts with a multi-diamond algorithm with + Smart Recut option. There is a default gold star for each profile of each appraiser working with Smart Recut. Thus, you can skip configuring gold stars - in this case, the default will be used (for MyRound profiles - preset №4preset №4, for MyOval and MyOvalPerformanceWare - №6, for MyAnyCut MyOval and MyOvalPerformanceWare - №6, for MyAnyCut and alike - №8 №8).
|
Notes on structure:
Notes on usage:
|
...
- Click Show Editor. The Appraiser Editor window is displayed.
- In the Plans & Scans section, switch to the required solution. The Appraiser Editor window will automatically switch to the appraiser linked with the cut/active profile.
For switching active profile
...
You can switch to the old mode of working with the system where the manual selection was possible (and required). To do that, in the Appraiser section, select the Manual appraiser selection checkbox.
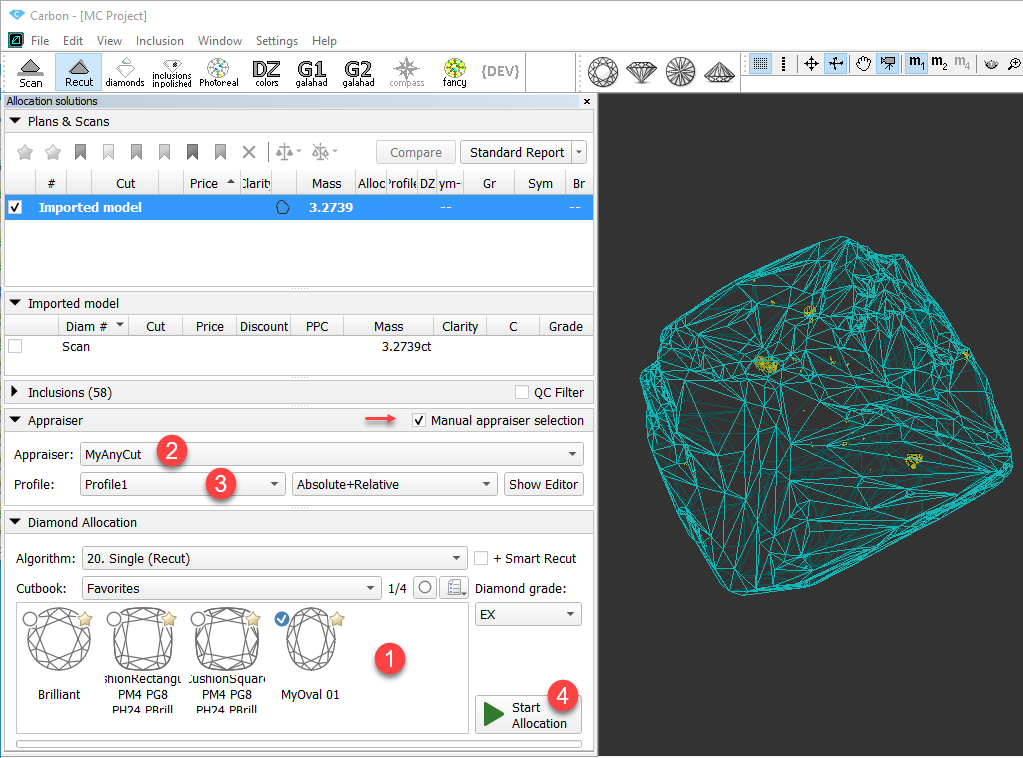
To switch back to the automatic appraiser selection, deselect the checkbox.
...
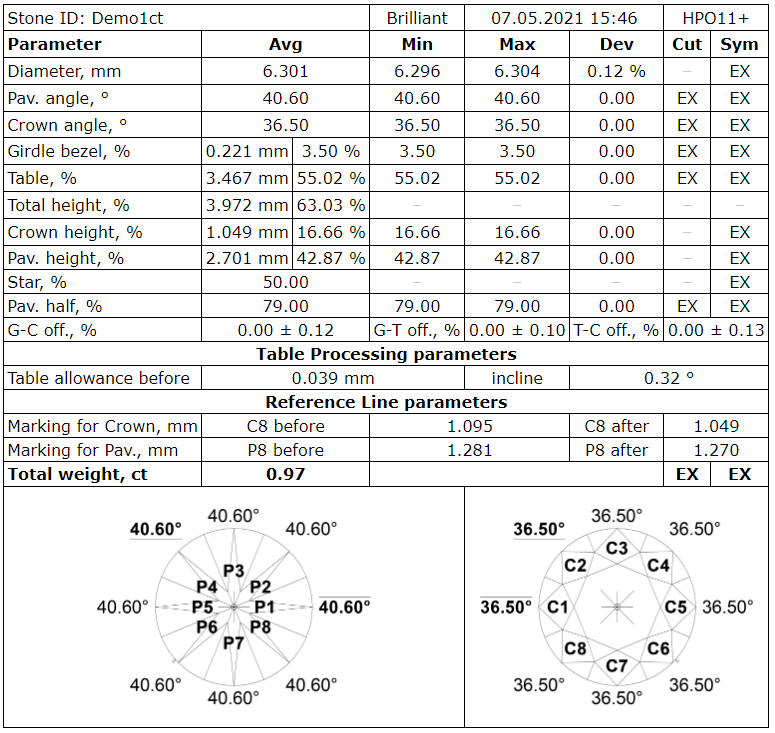
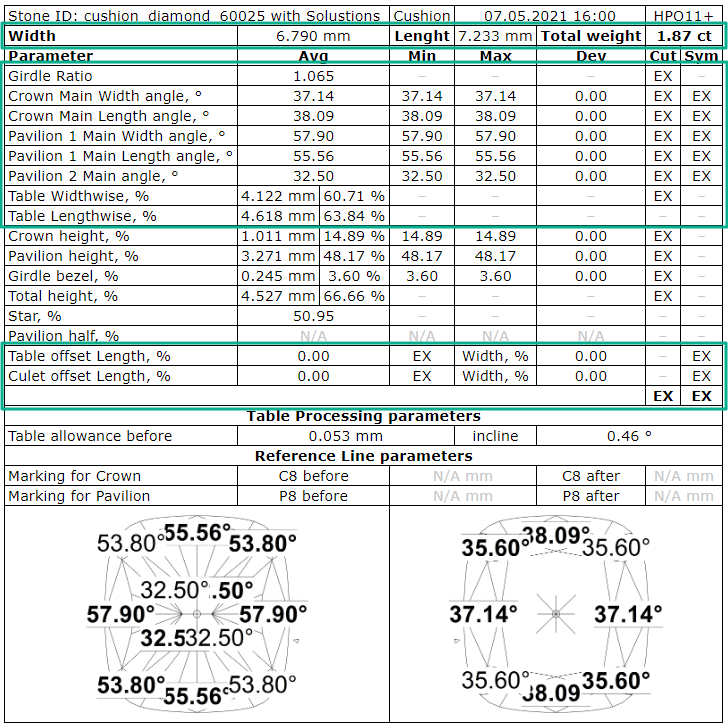
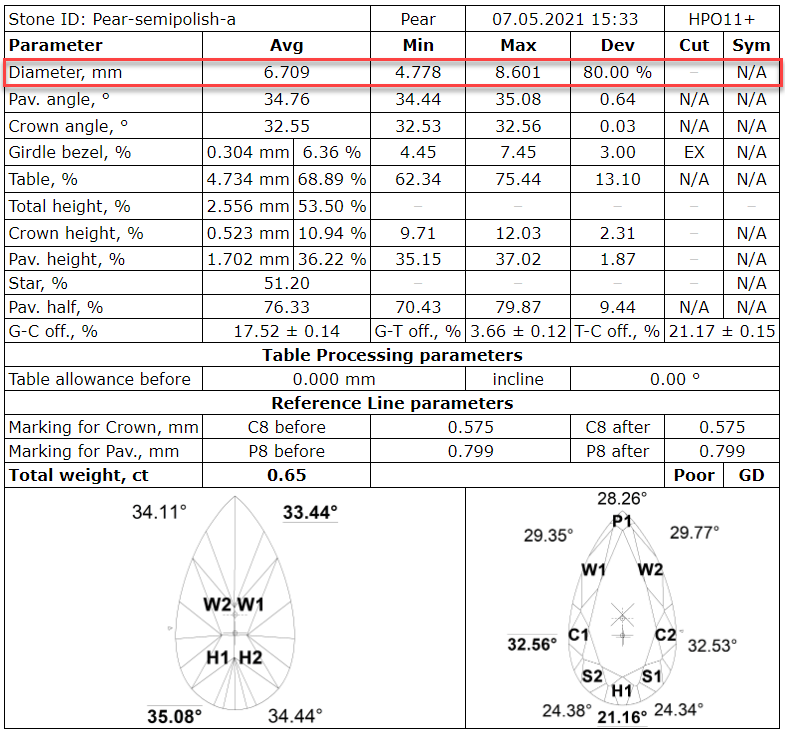
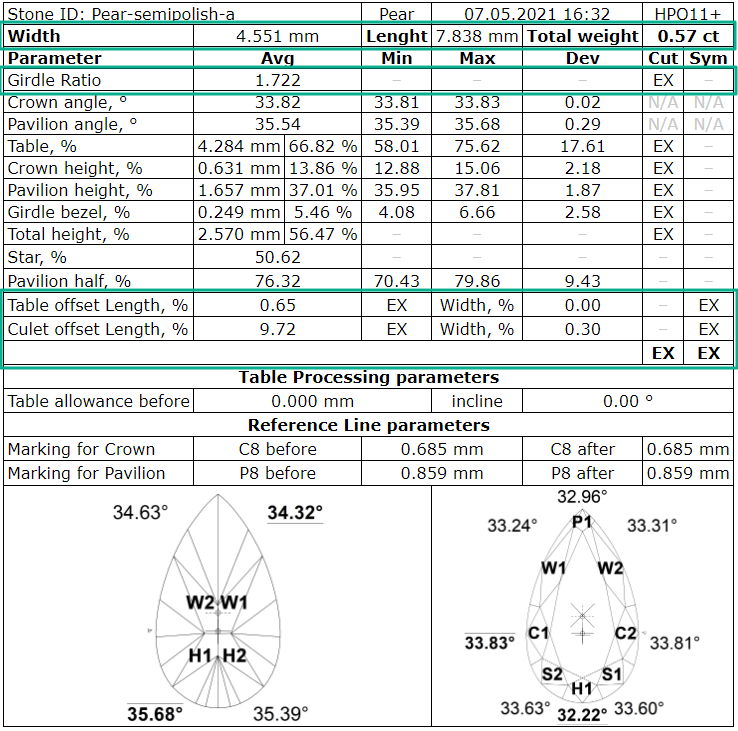
- Main parameters of a solution.
- Table processing parameters.
- Reference Safe line parameters.
- Image with the angles of the main facets on the pavilion.
- Image with the angles of the main facets on the crown.
- Image reflecting the process of polishing a table (angle 1).
- Image reflecting the process of polishing a table (angle 2).
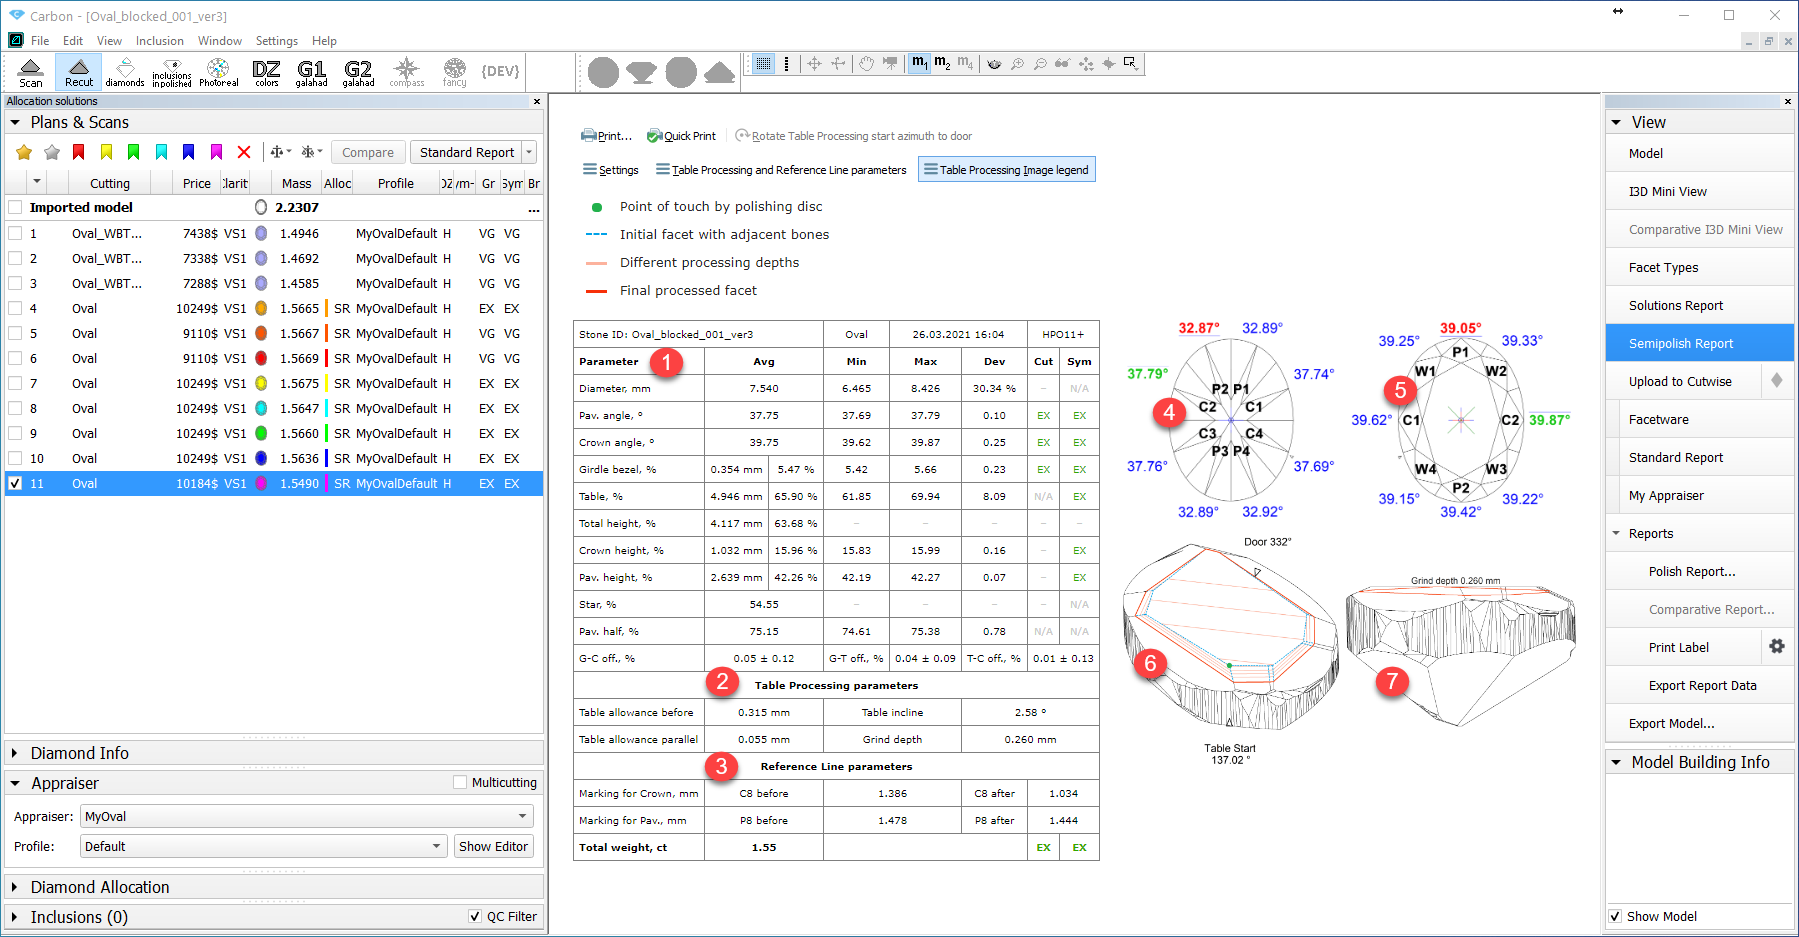
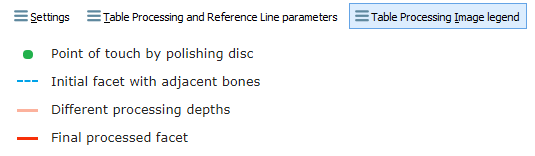
The images (6-7) reflecting the process of polishing a table includes information about:
- Poing of touch by polishing disc
- Positions of different planes related to polishing
- Door azimuth
- The azimuth of the table polishing start point.
- The Grind depth table processing parameter (see description here).

The report includes the Rotate Table processing start azimuth to door control (active if the hardware is connected).
...
- Right-click the Brilliant cut and then select Show allocation form for Current Appraiser in solution list. Allocation forms will be displayed in the solution list.
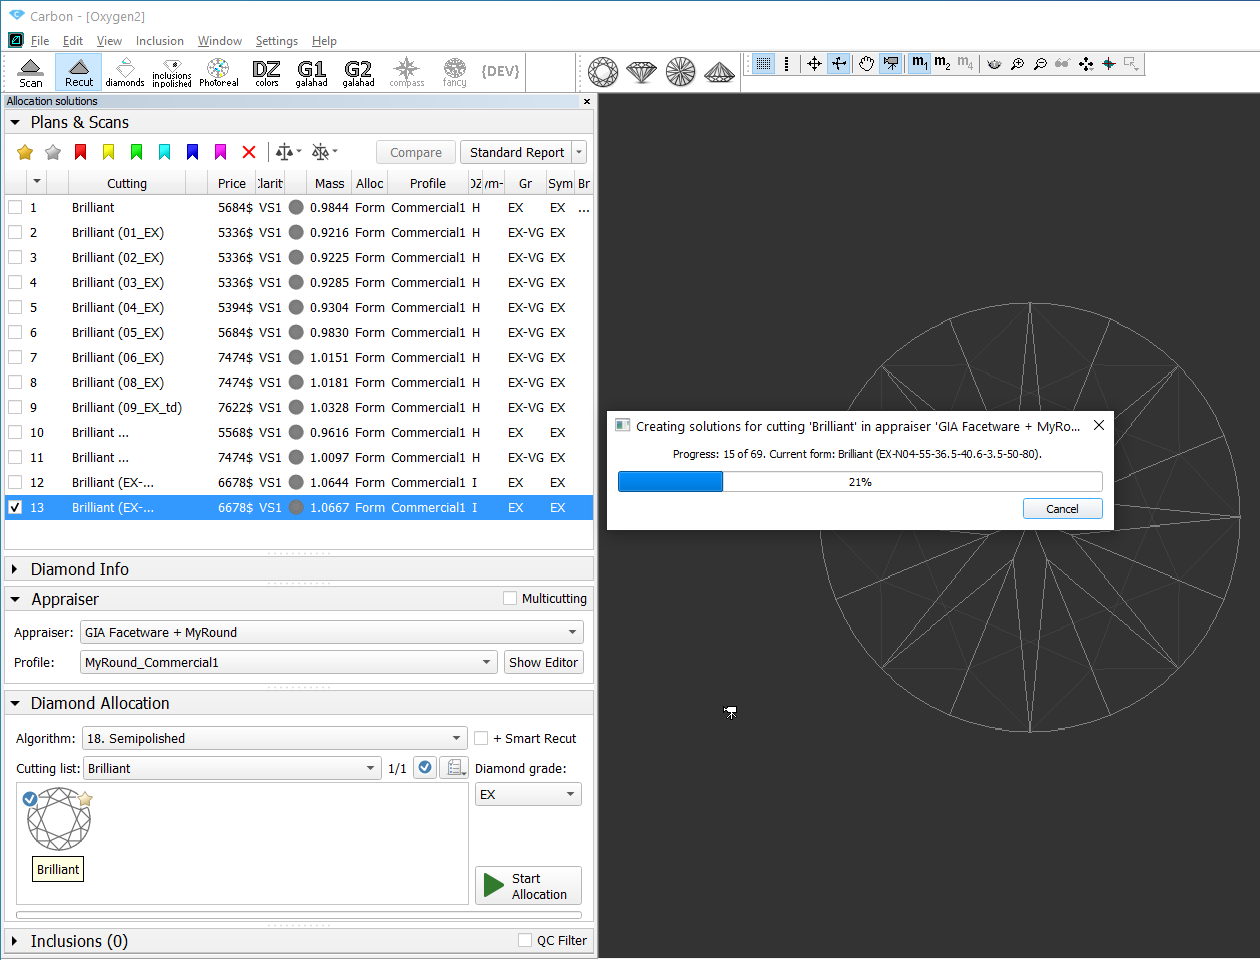
Note that for the Brilliant cut this command considers the current appraiser - before using the command, the appropriate appraiser should be selected. The reason is that several appraisers may be able to work with default cuts - each with its own set of allocation forms. Therefore the allocation forms for the default cuts (including Brilliant) are stored within the appraisers. If you do not select the correct appraiser (the one containing the allocation forms for this cut, the command will be unavailable:
...
- Select the solution.
- Set Algorithm to "20. MEC for round bruting".
- Run allocation. As allocation is finished, in the solution list, the new model representing a bruting radius is displayed.
- In the solution list, select this solution.
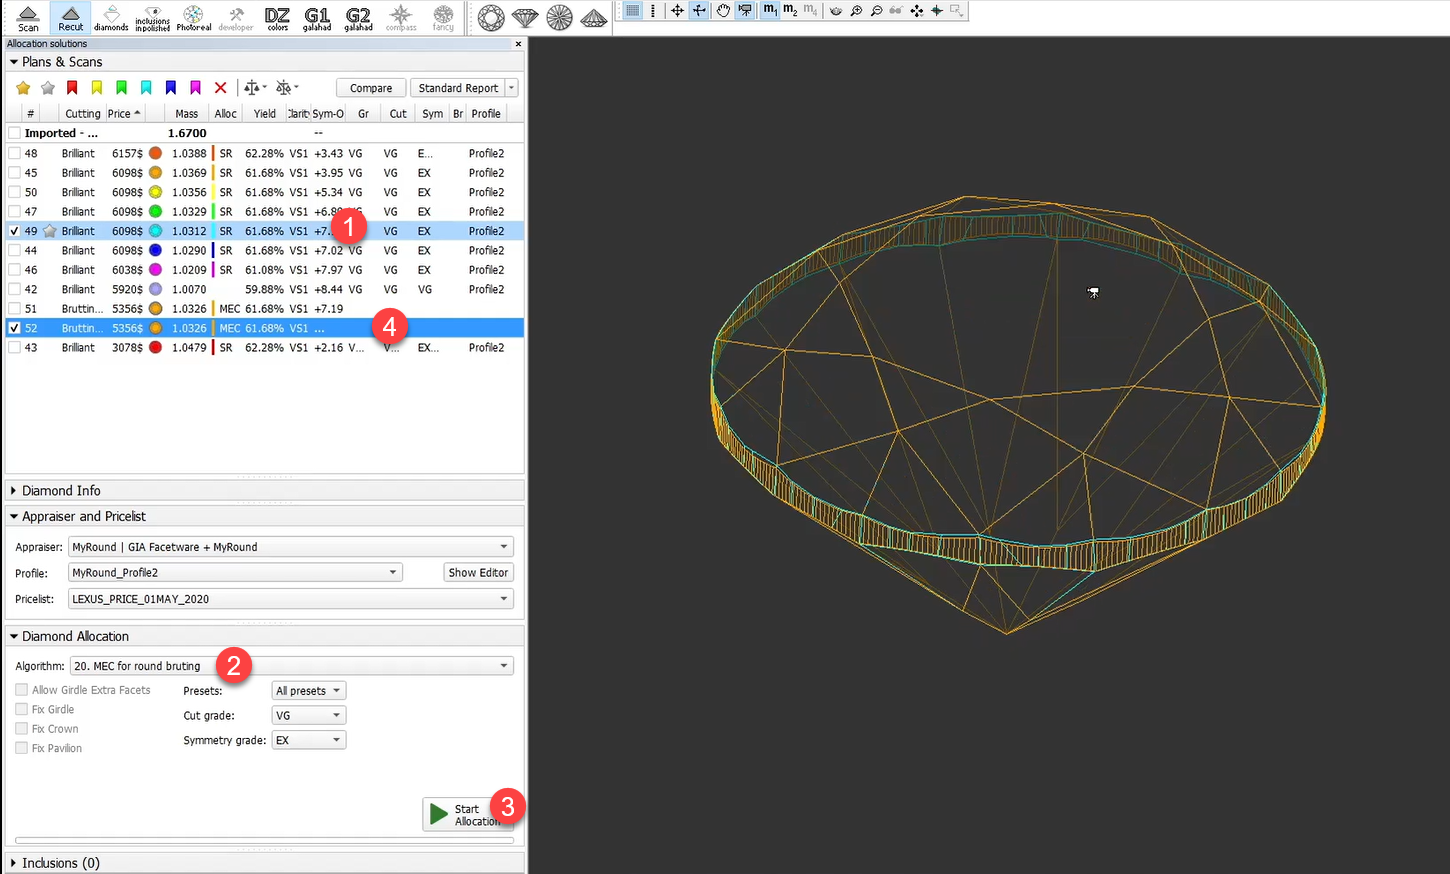
- From the main menu, select File > Export > MME for EOS bruting... Set name and location for your MME model file.
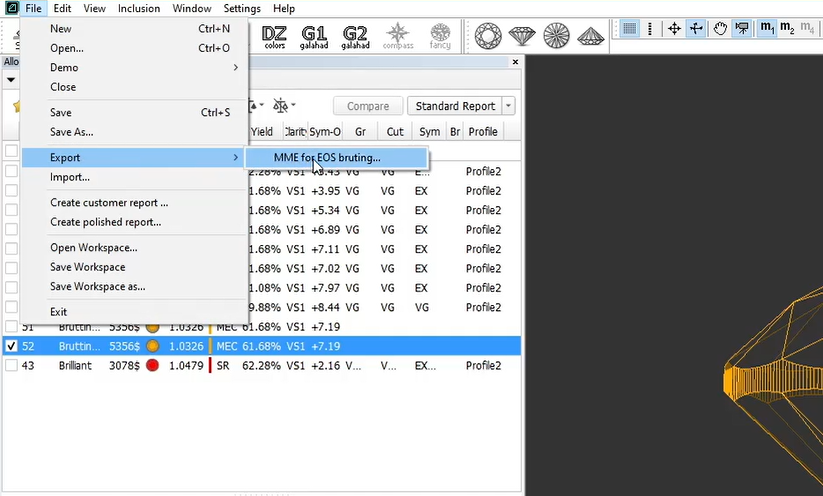
- In your bruting software, use the created MME model.
...
| Old Term | New Term | Old Name in User Interface | New Name in User Interface |
|---|---|---|---|
| Cutting | Cut | All elements containing "Cutting" | Now contain "Cut" |
| Cutting list | Cutbook | ||
| Scan mode > Cutting & Method | Scan mode > Cut & Method | ||
| Client cutting, user cutting | In-house cut | Cutting list = "Client Cuttings" | Cutbook = "Custom In-house Cuts" |
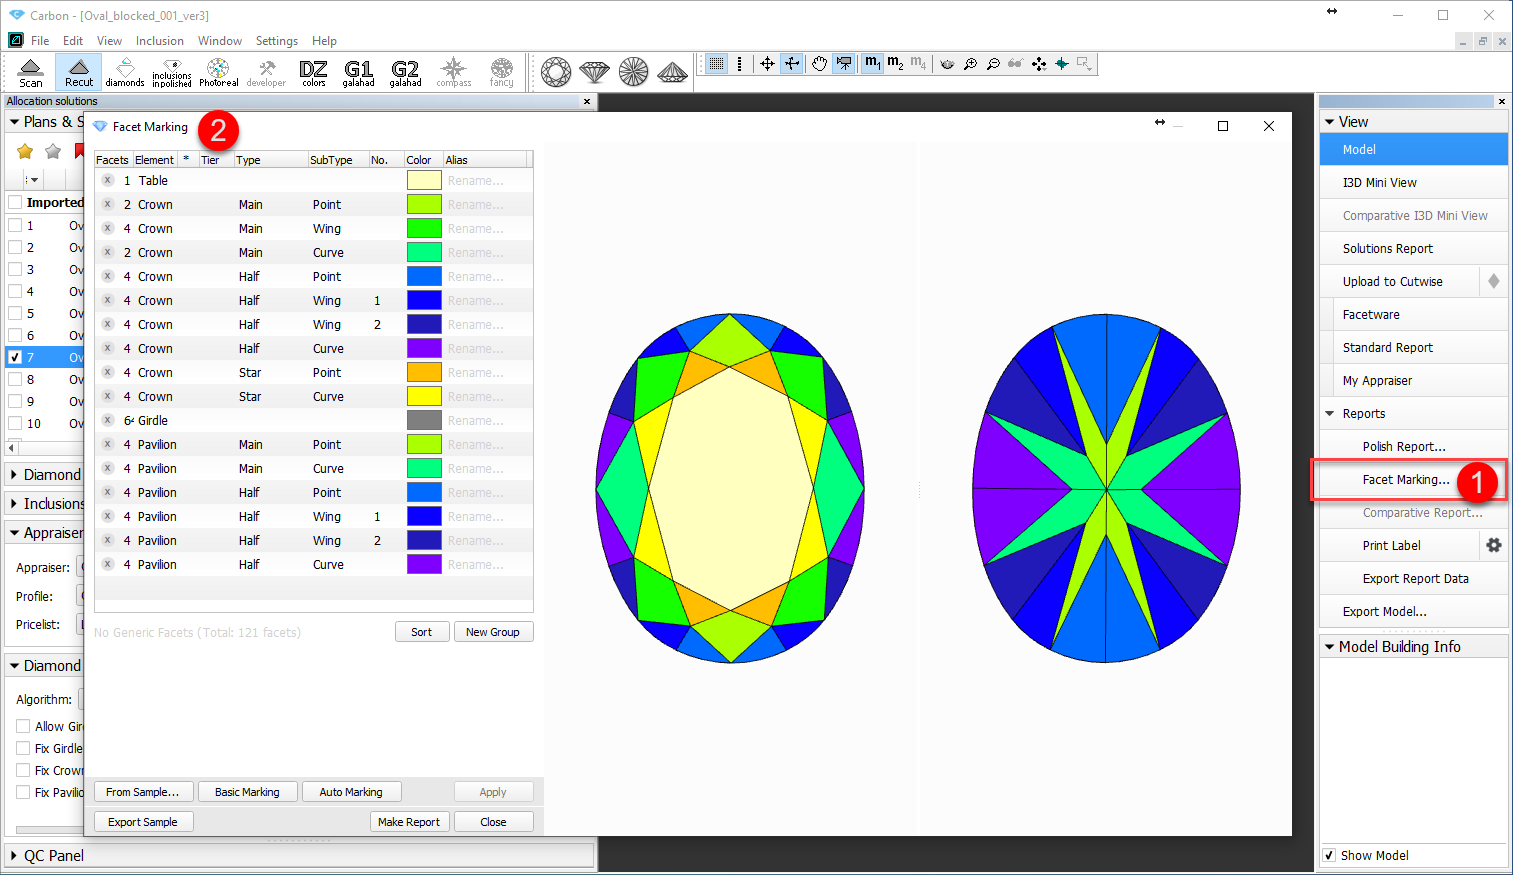
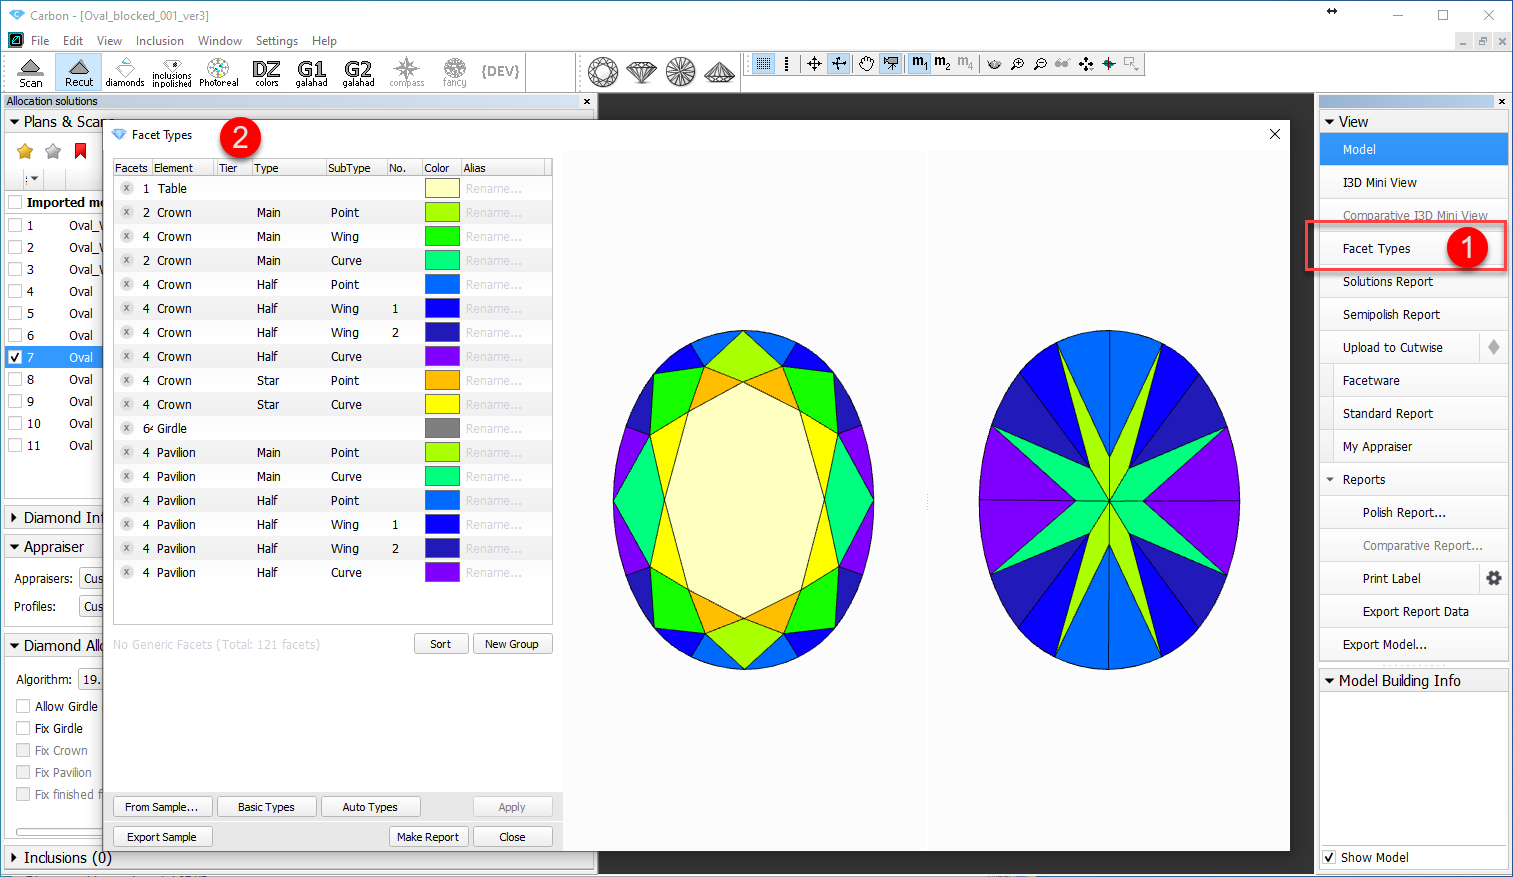
| Facet marking | Facet types | Right panel > Facet Marking | Right panel > Facet Types |
...
For more compliance with the system usage practices, the Facet Marking feature is renamed to Facet Types.
| Was | Now |
|---|---|
|
|
Allocation Solution Panel - Behavior and Order of Sections
...
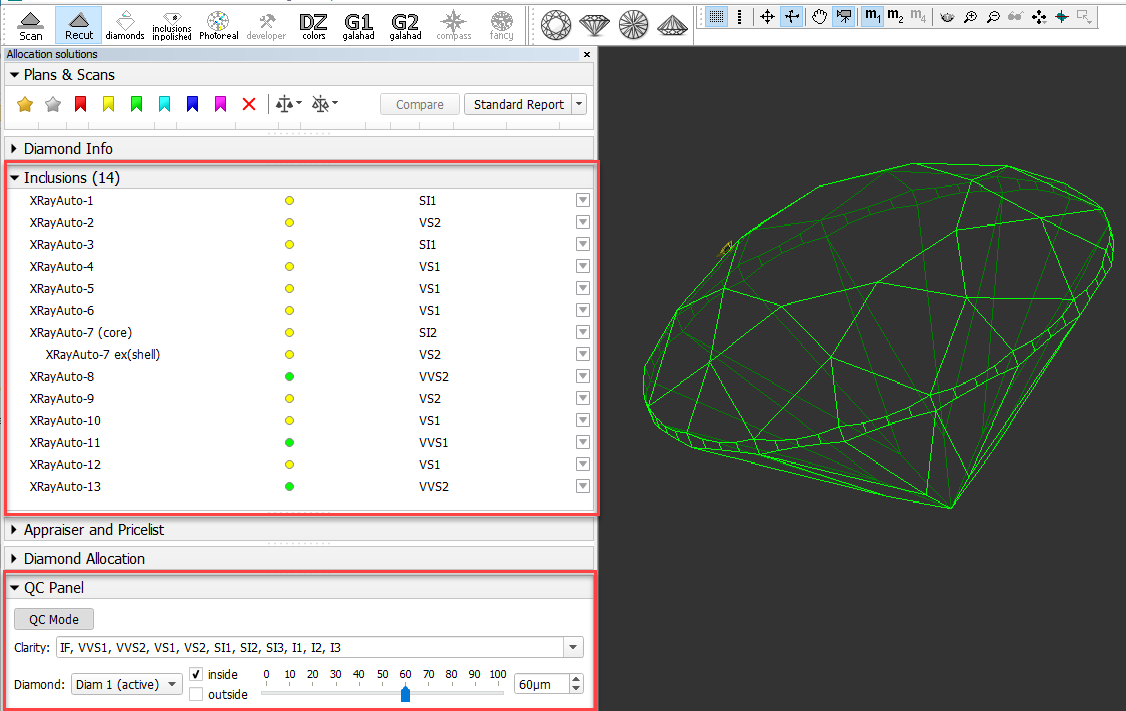
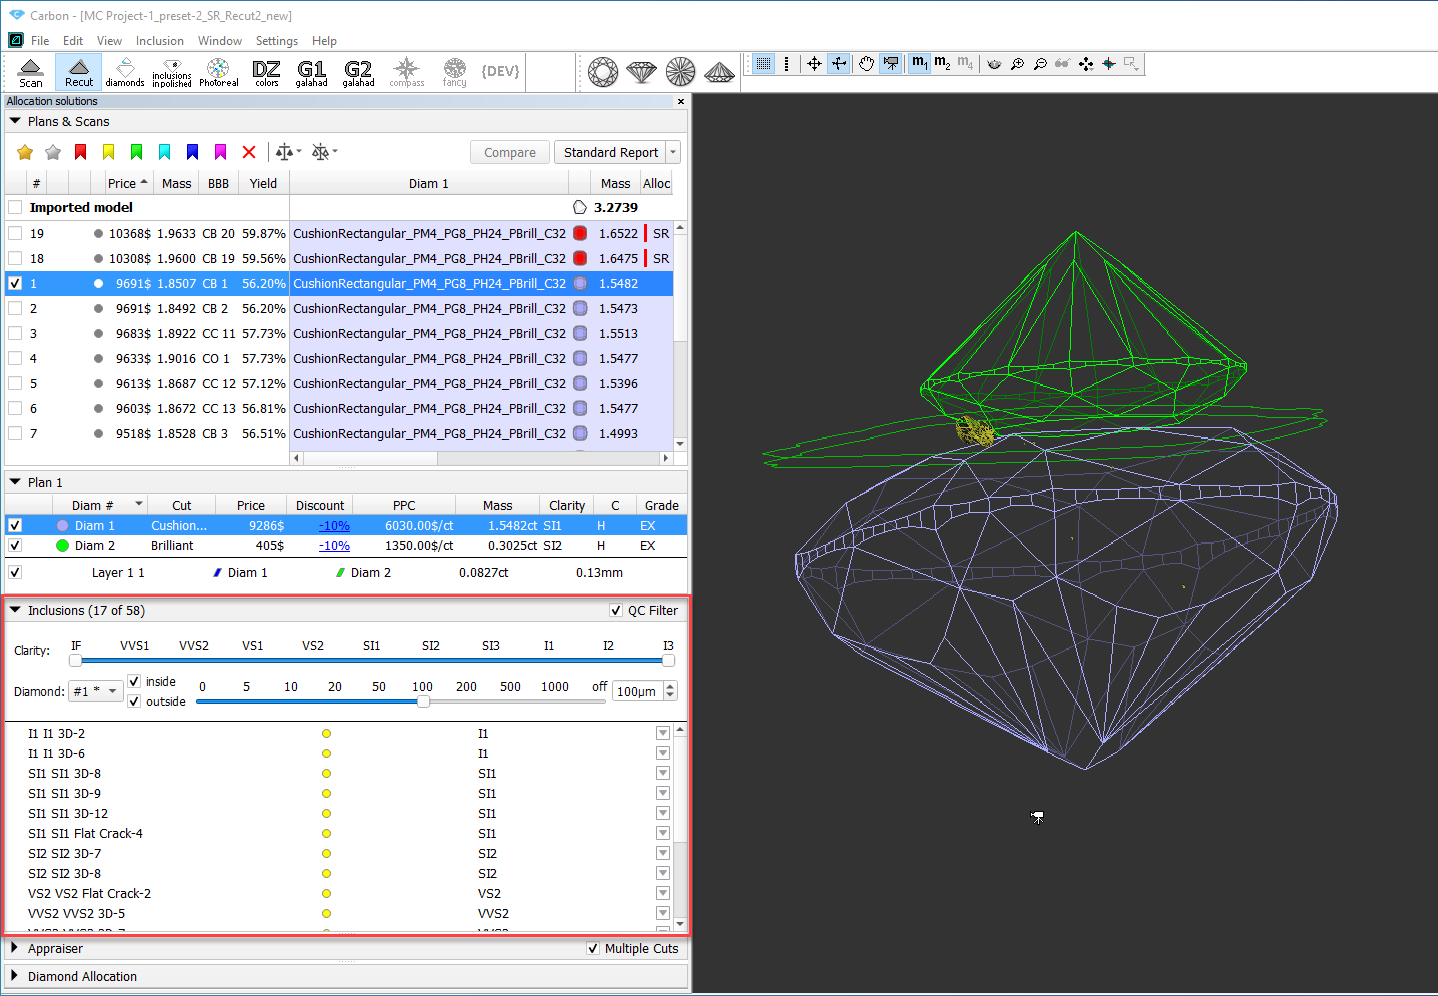
The Inclusions panel lists diamond inclusions and allows users to manage them. Previously, the system also included a separate QC Panel used for inclusions filtering. To provide a more comfortable way of working with inclusions, these two panels are combined - the QC filter is included in the Inclusions panel and, if activated, affects the list of displayed inclusions.
| Was | Now |
|---|---|
|
|
| Applying filter in the QC Panel affected what was displayed in the Scene, but did not affect the Inclusions panel. | Panels are combined. When activating the QC filter, the inclusions are filtered both in the Scene and in the Inclusions panel itself which makes it easier to locate and select the required inclusions. |
...
To avoid duplication of information, the Diamond Info panel information was merged into the Diamonds panel:
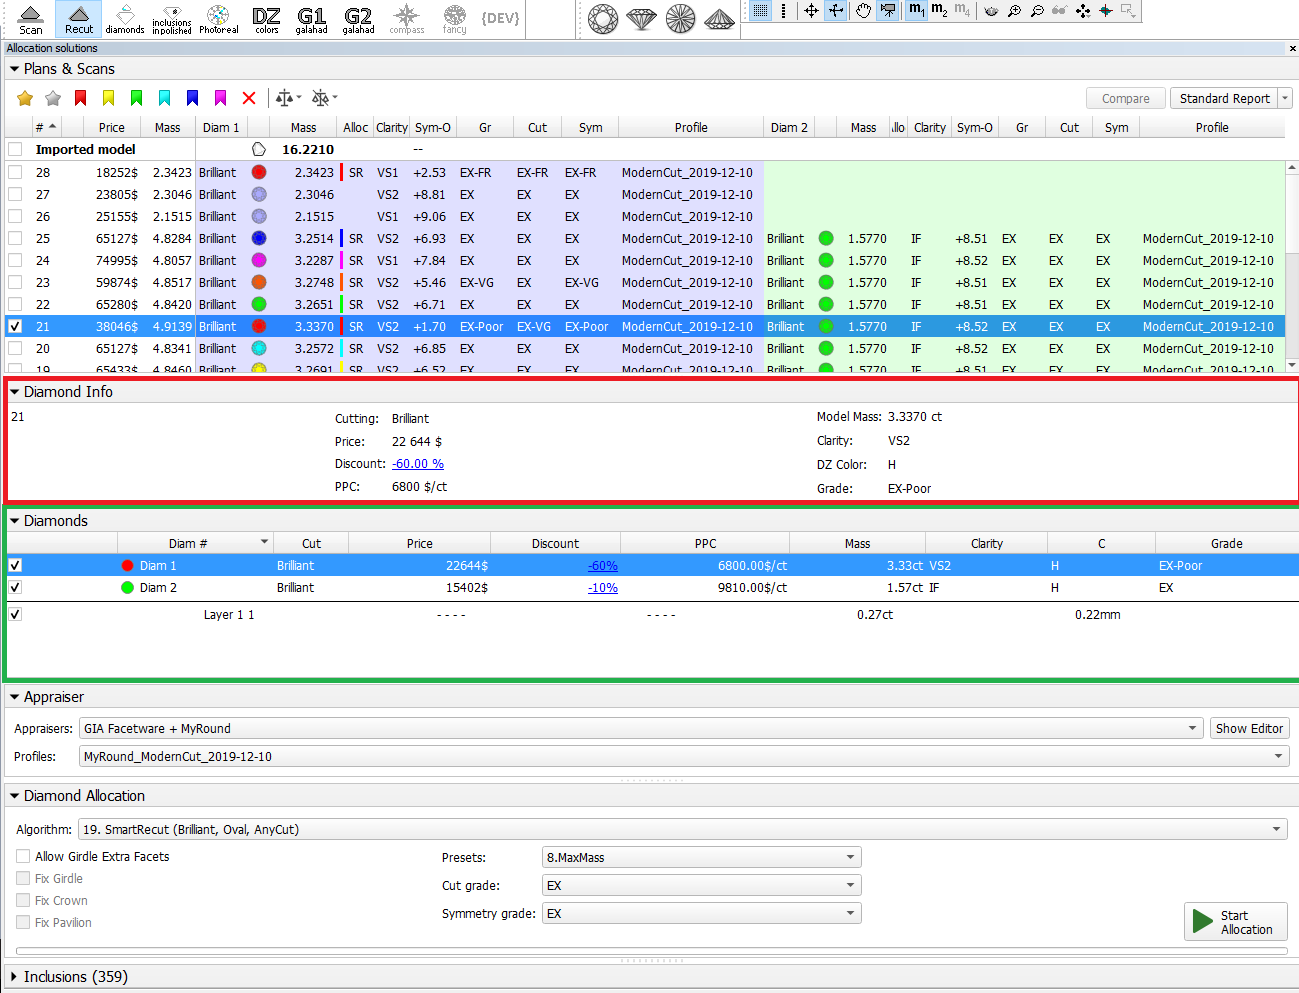
Now all the detailed information about the selected scan/solution you can find in a unified detailed information section. The section name dynamically changes to Scan Name/Solution Nuber (like "Imported Model", "Plan 1", "Plan 2"):
...
The apply facet types from sample functionality introduced in the previous release have been improved. The major changes are:
...
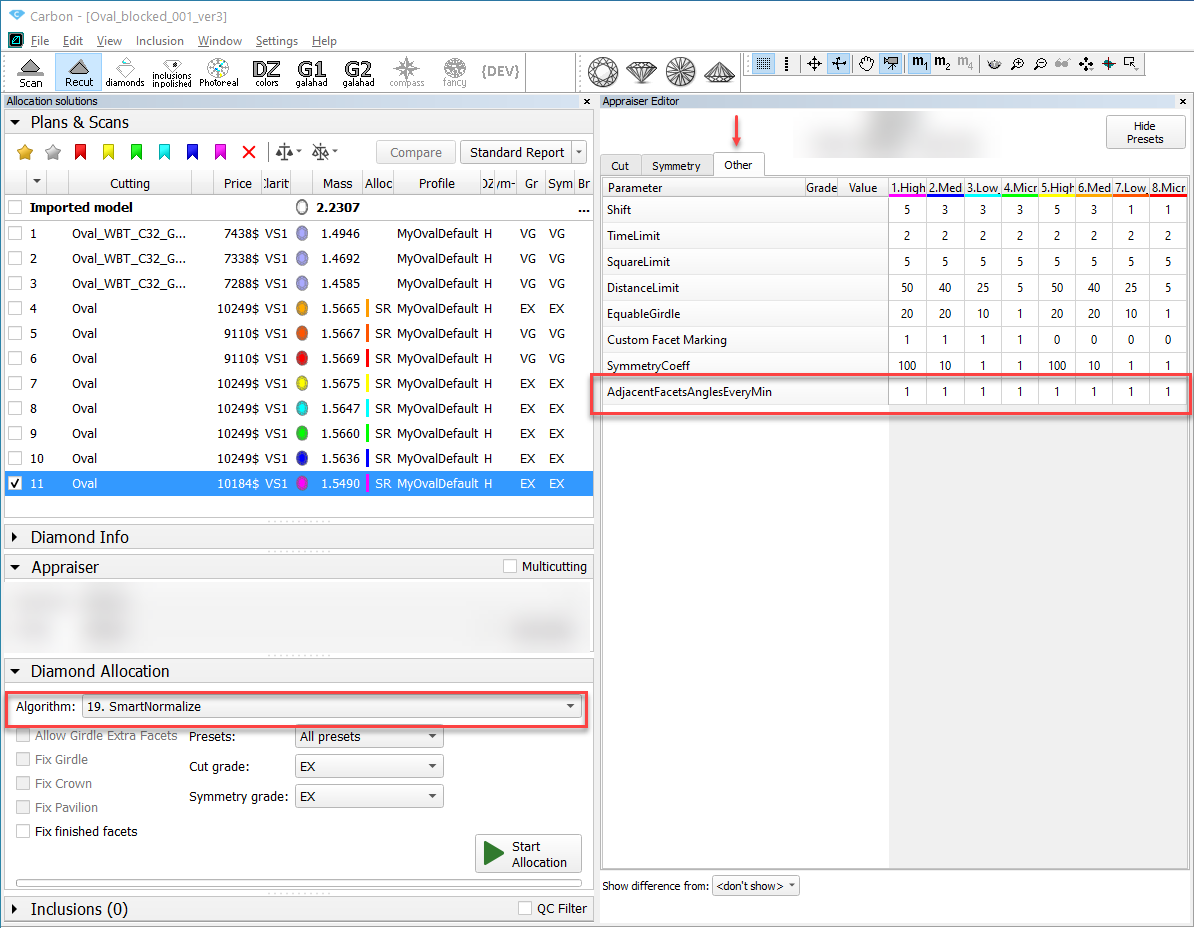
The AdjacentFacetsAnglesEveryMin parameter previously was available only within the "MyAnyCut" appraiser - now it is also available in the presets of "MyOval" and "MyOvalPerformanceWare" appraisers.

Adding to SmartNormalize
The AdjacentFacetsAnglesEveryMin parameter is also added to the presets of the "19. SmartNormalize" and "19. SmartNormalizeLite" algorithms.
Polish Report Templates
...
For the Cushion reports, the "Tier" information is added:
| Was | Now |
|---|---|
|
|
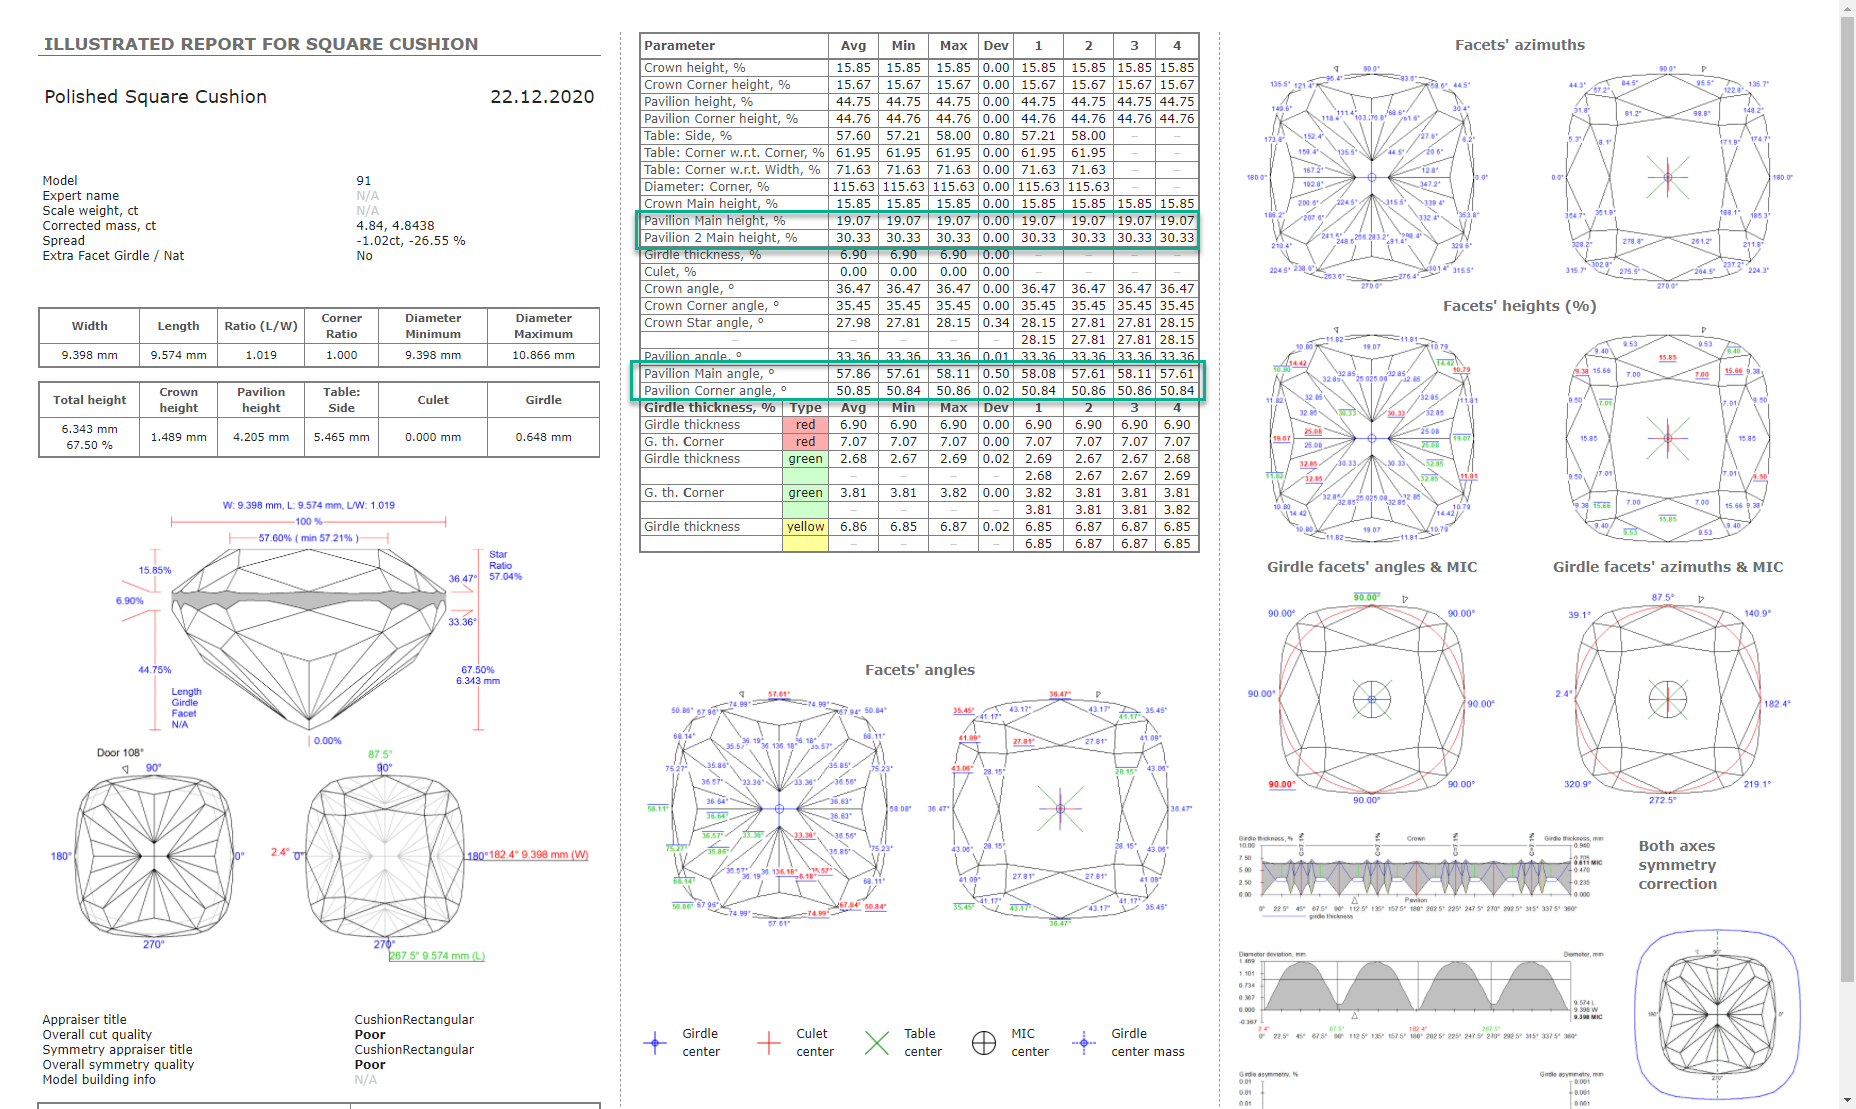
The Polish Illustrated HTML, RTF, and Standard Report templates for Cushion and Square Cushion are affected.
...
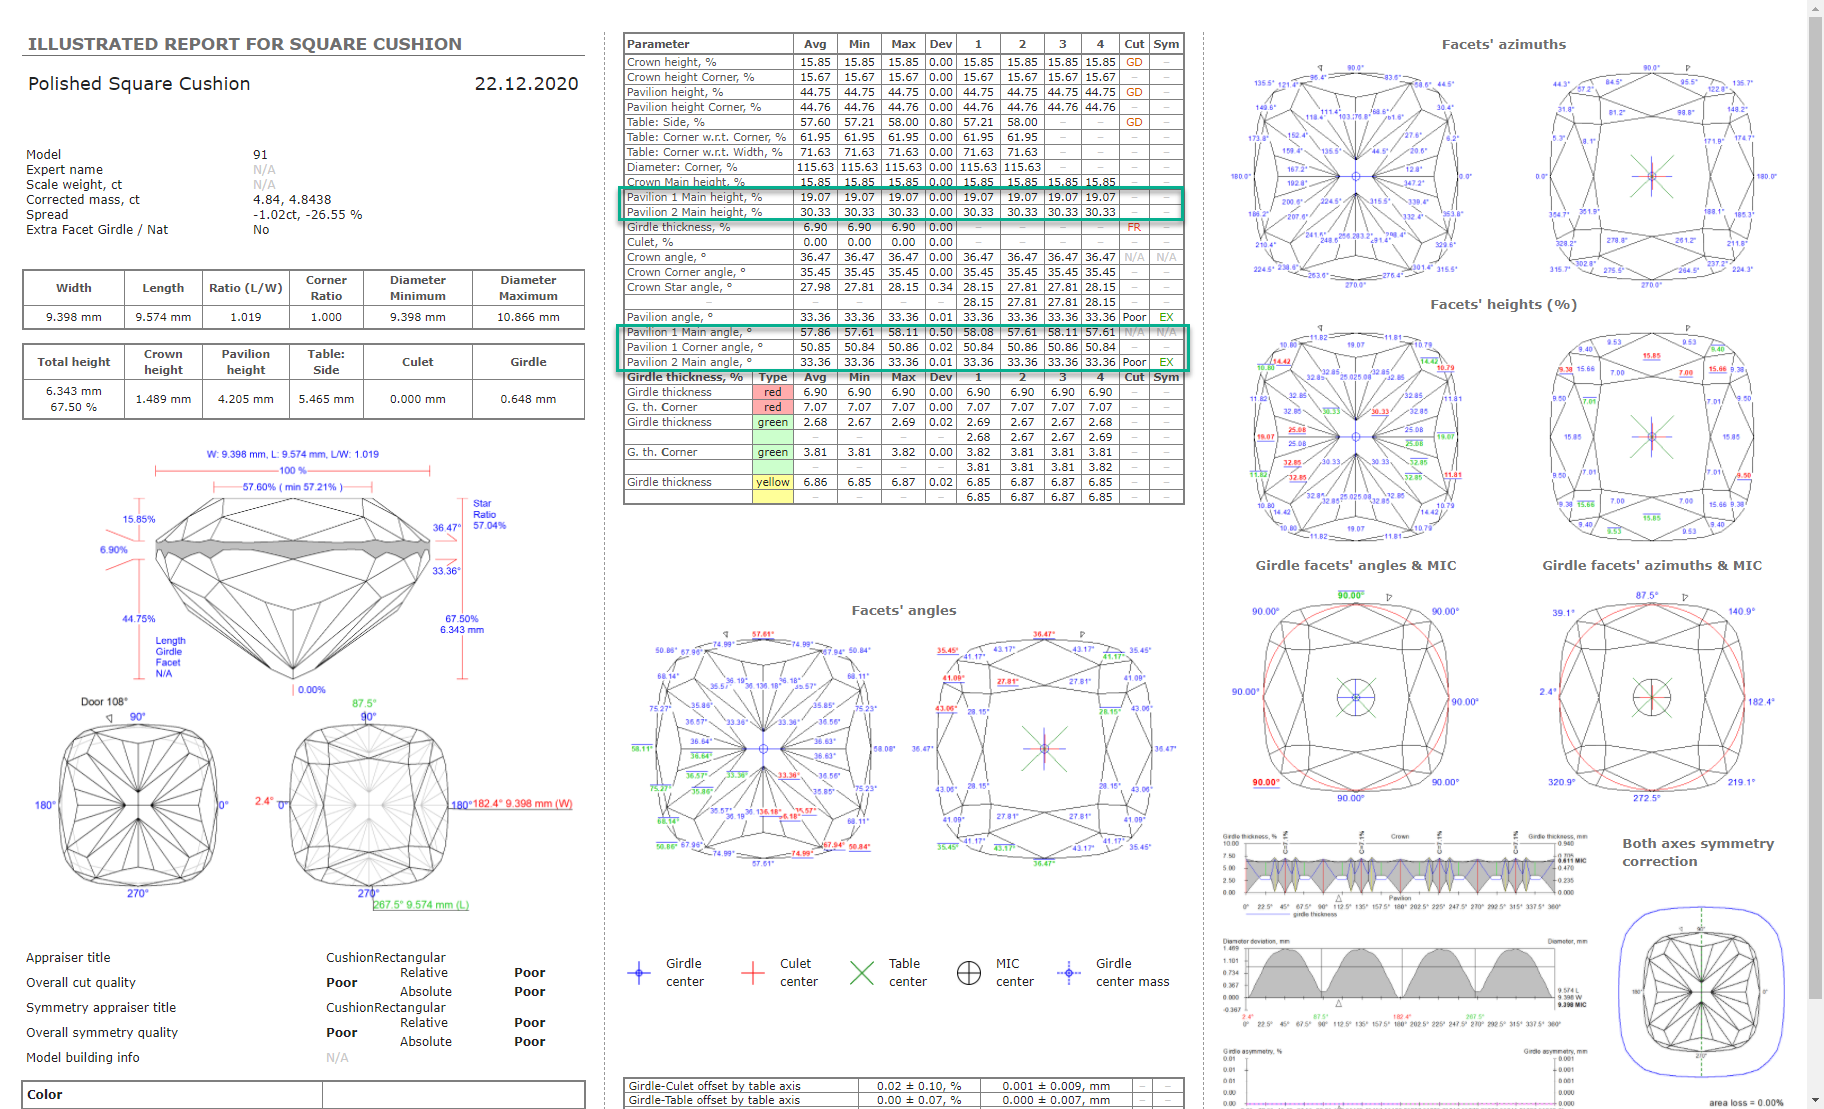
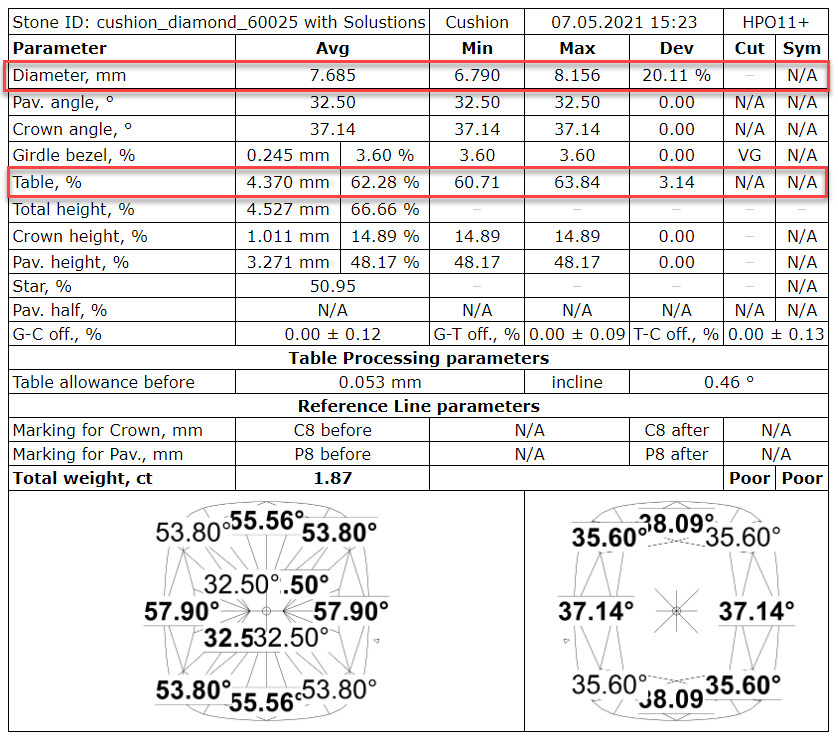
For the Cushion reports, the grades information is added:
| Was | Now |
|---|---|
|
|
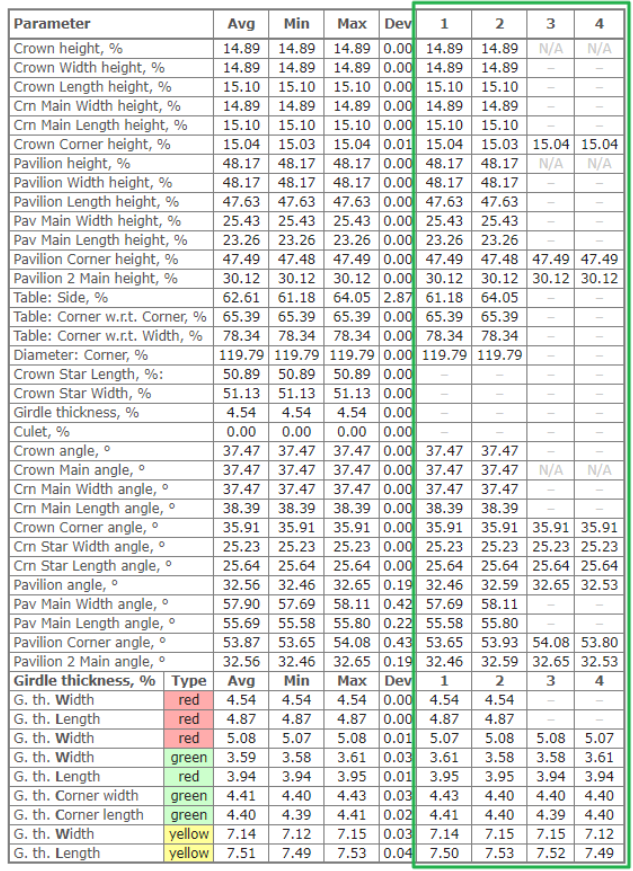
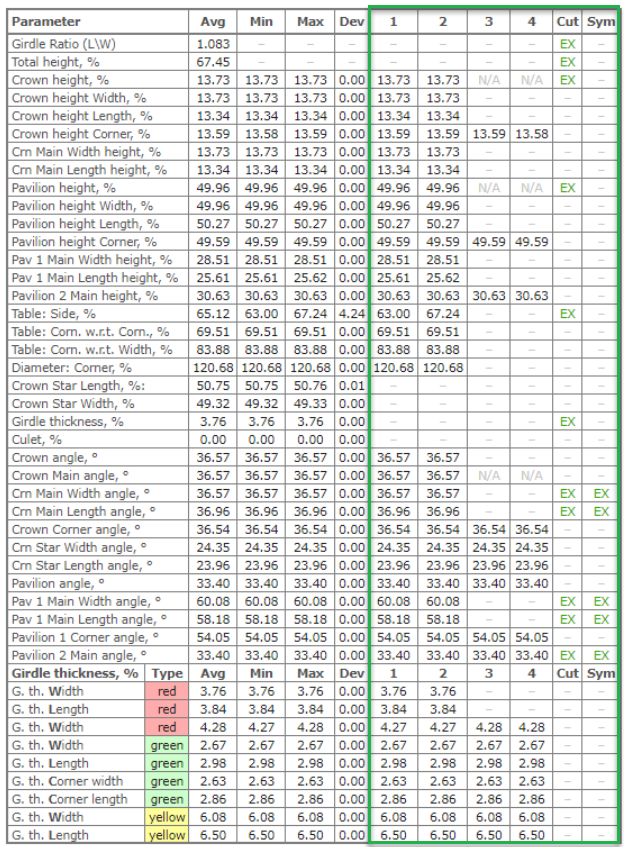
The Polish Illustrated HTML and Standard Report for Cushion and Square Cushion are affected.
...
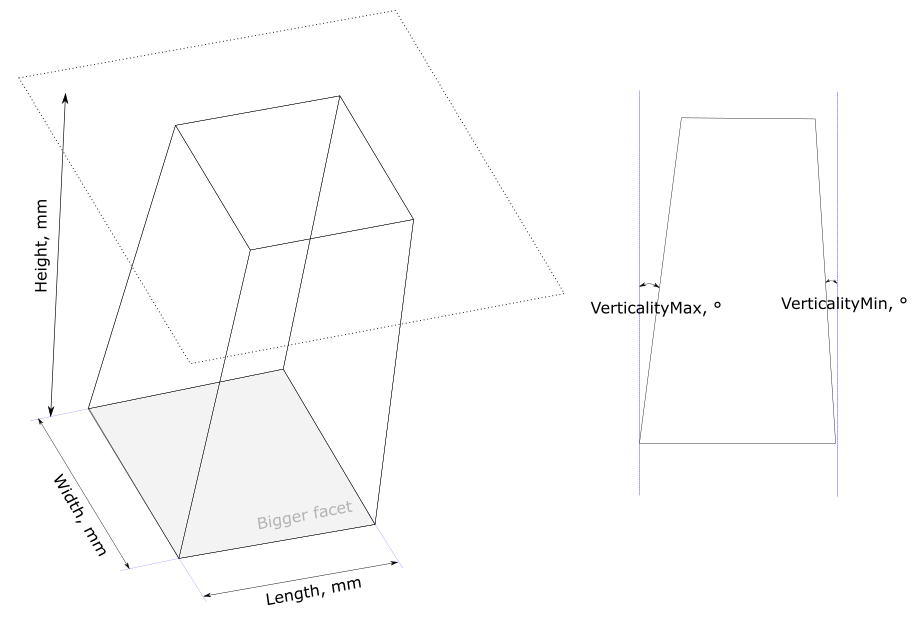
You can now quickly estimate the trapezoid-like objects of the "Industrial24" standard. To do this, use the new "Industrial24" appraiser.
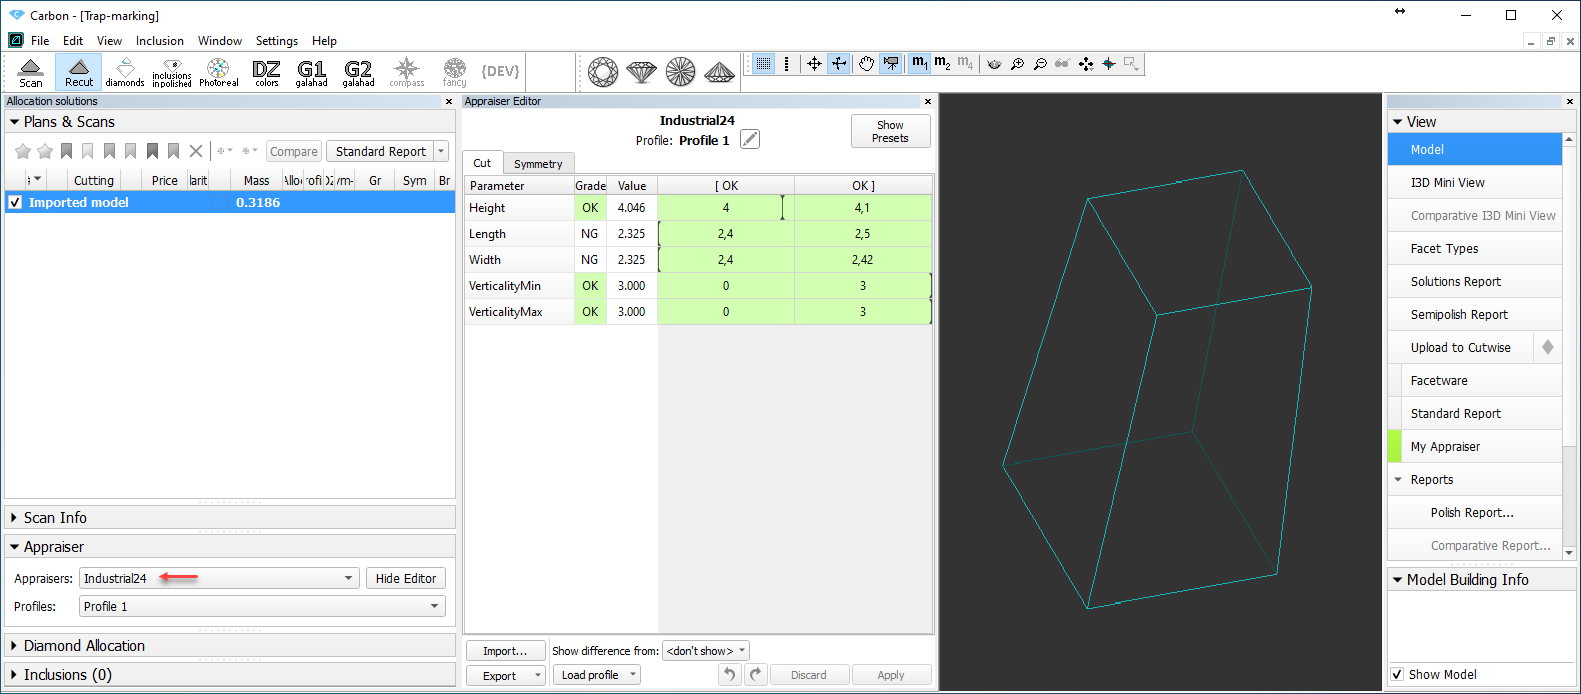
The "Industrial24" standard is aimed to produce:
- Width-Length of bigger facet close to 2.4 mm
- Height close to 4 mm
- Max and Min incline angles no more than 3°
Currently, the following grades are available for important parameters:
...
- Select Settings > General Settings.
- In the Automatic Actions section, click the Post-Scan Export tab.
- Enable STL text, STL binary, or both, and set save locations for them.
- Click OK.

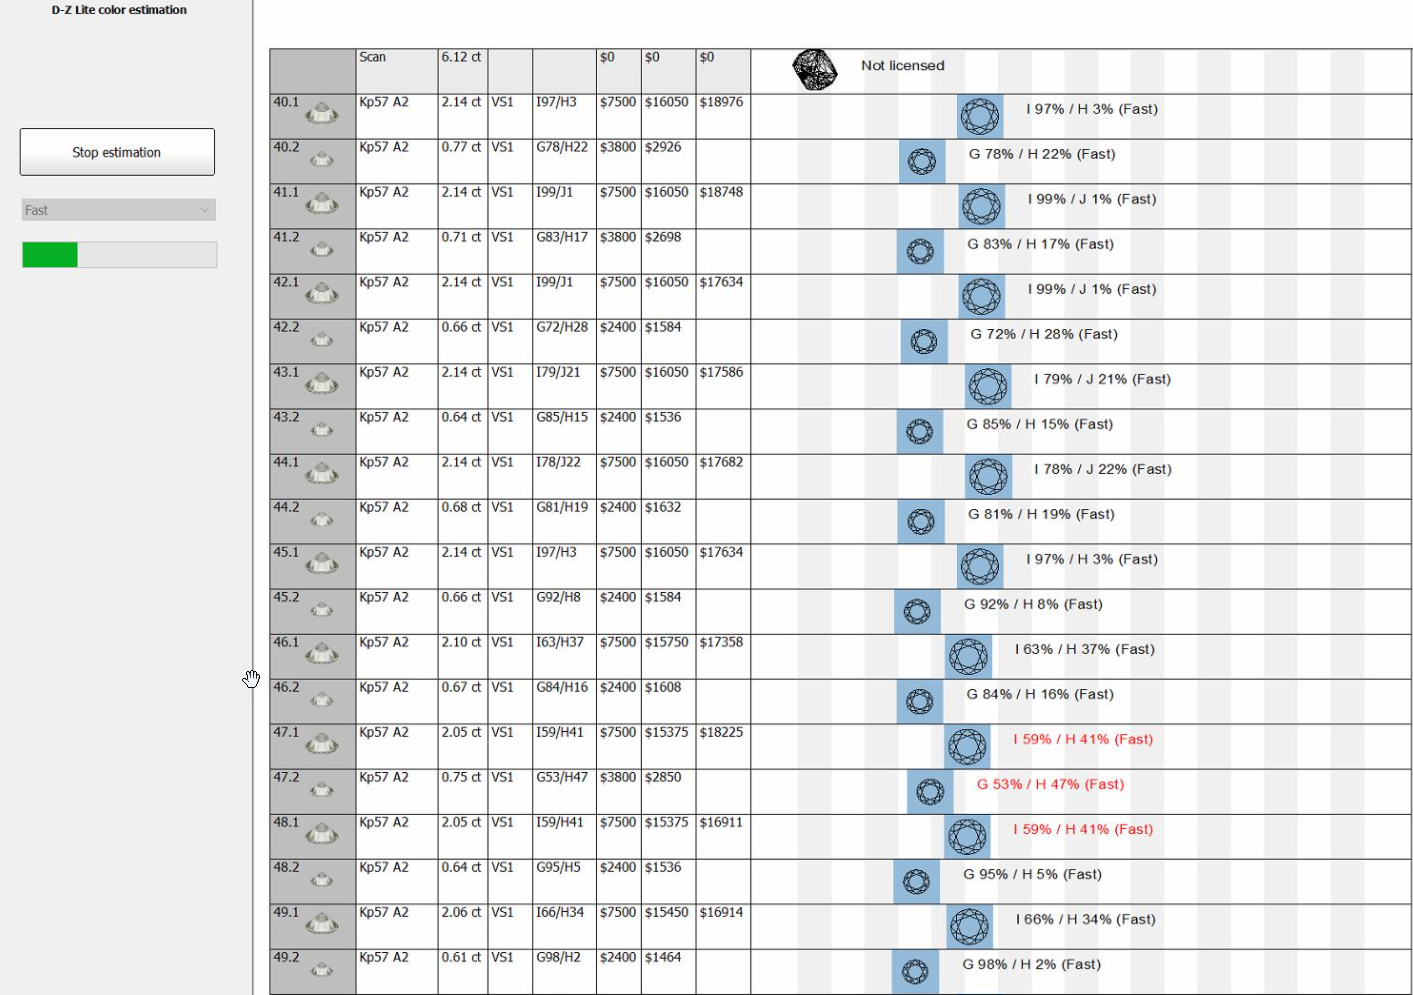
DZ Color Estimate
...
| Before Estimation | After Estimation, WAS | After Estimation, NOW |
|---|---|---|
|
|
|
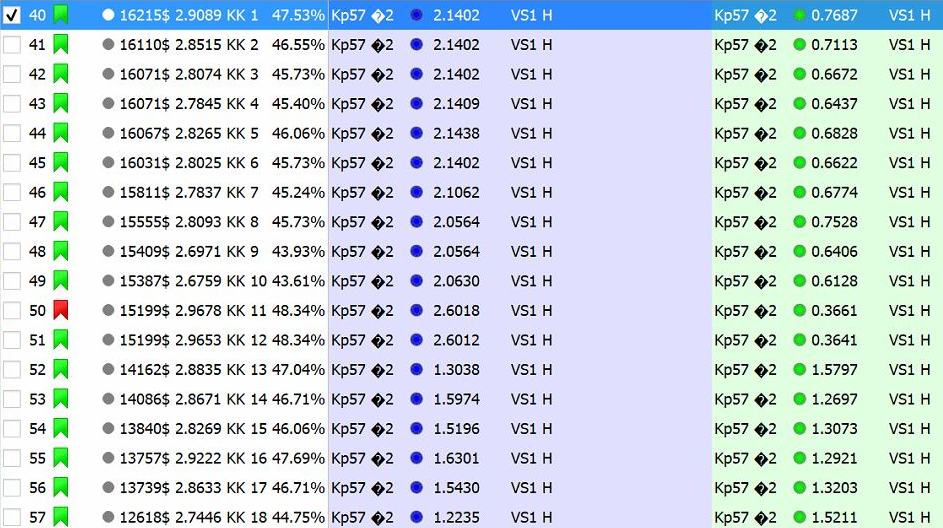
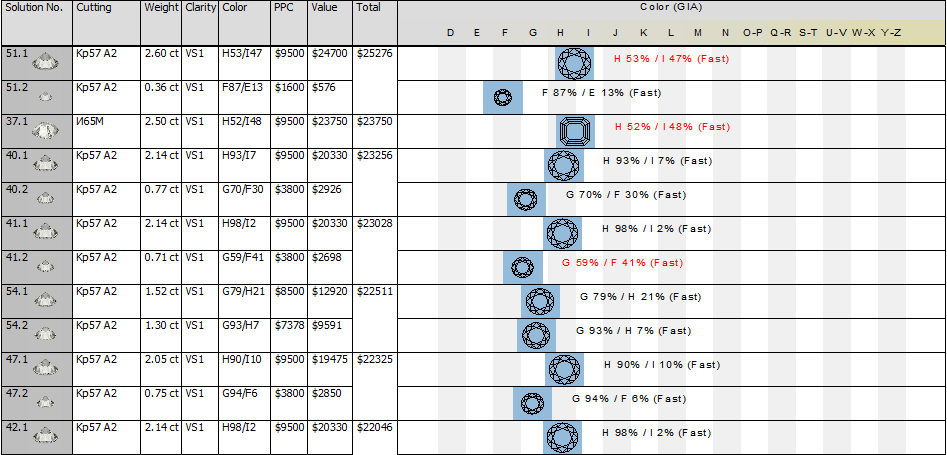
| Sorted by price. | The prices have changed, but this is not reflected. | The prices have changed, and this is reflected - solutions are sorted by the new price. |
...
- In the solution list, select the checkboxes to the right of the solutions you want to get an estimation for.
- On the toolbar of the Plans & Scans section, click the
 Add solution(s) to Solutions Report button. The solutions are marked with .
 - In the solution list, right-click the solutions you want to start estimation from and then select Estimate color grade for ...
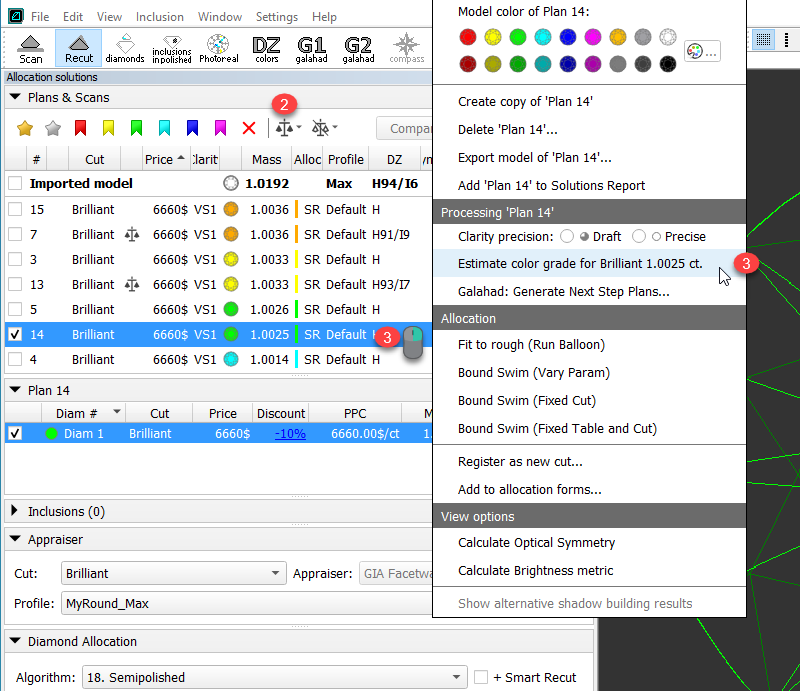
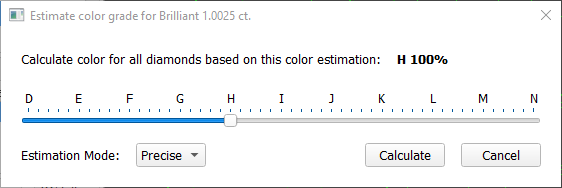
The estimate dialog is displayed. - In the estimate dialog, set color estimation for your starting solution and the Estimation Mode.
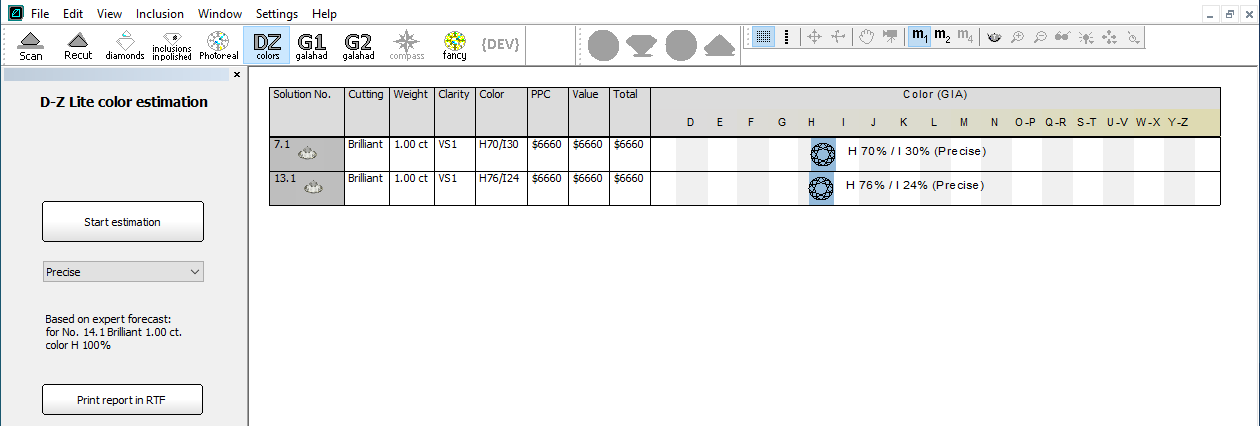
- Click Calculate. The system switches to the DZ colors mode and displays the progress. As soon as the calculation for the selected solutions is finished, their results are displayed in the table.
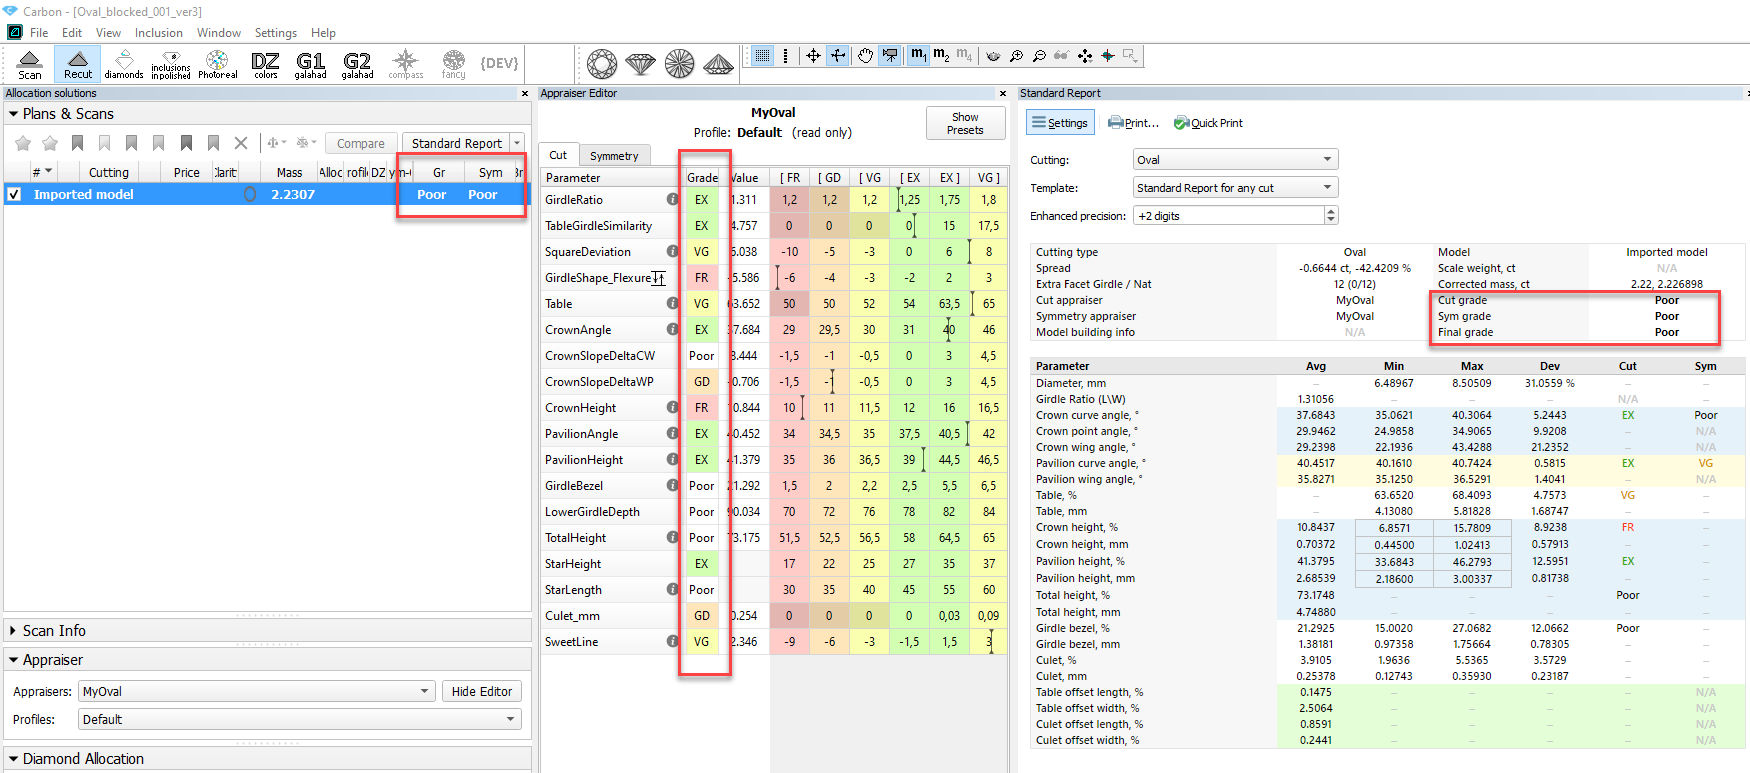
Grades for Scans
...
- Solution list (was before)
- The Appraiser editor
- Reports (Standard and Polish)
Report Actualization
...
In Label Report, for a more informative representation of cuts (parameters and grades), the templates were changed. Some parameters were added, some were removed. Below are examples of Cushion, Brilliant and AnyCut Label Reports:
| Was | Now | |
|---|---|---|
| Brilliant |
|
|
| Cushion |
|
|
| AnyCut |
|
|
| Removed, Added | ||
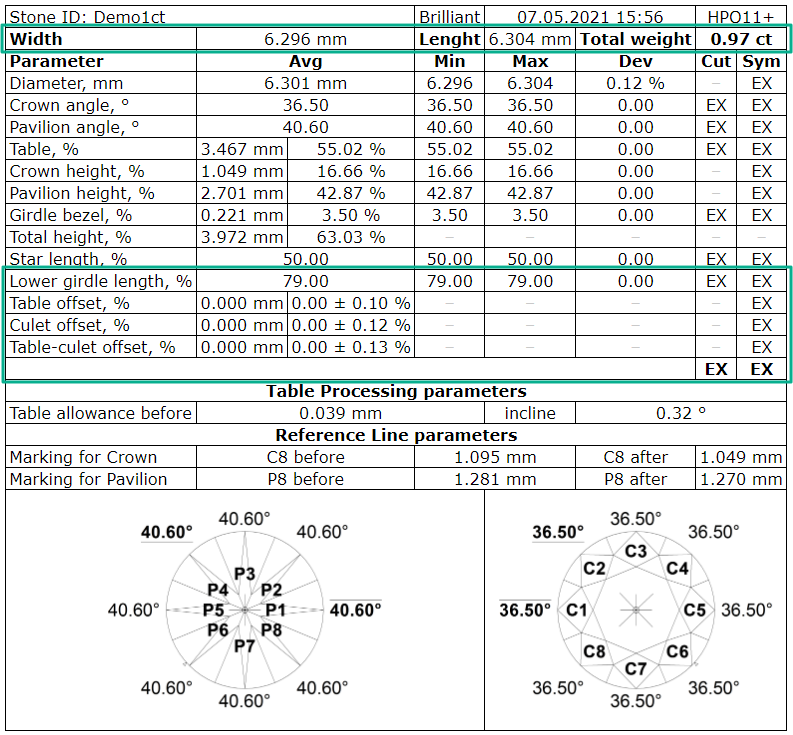
...
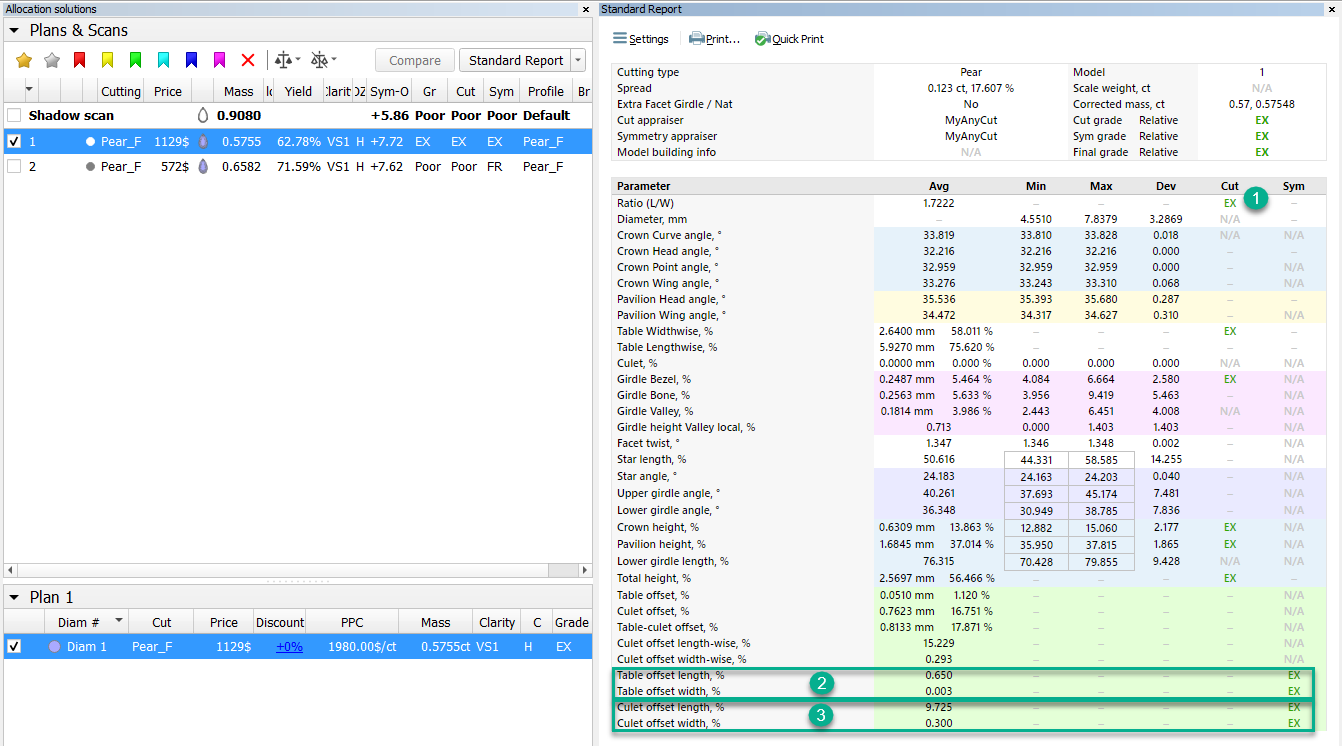
- Ratio (L/W) - Cut grade is added.
- Table offset length, Table offset width parameters, and their Sym grades are added.
- Culet offset length, Culet offset width parameters, and their Sym grades are added.
Facet Types - Octonus Cuts Library
...
- Click Facet Types. The Facet Types dialog is displayed.
- In the Facet Types dialog, click From Sample...
- In this was not done before, click
 OctoNus Cuts Library
Samples from the library folder are added to the list.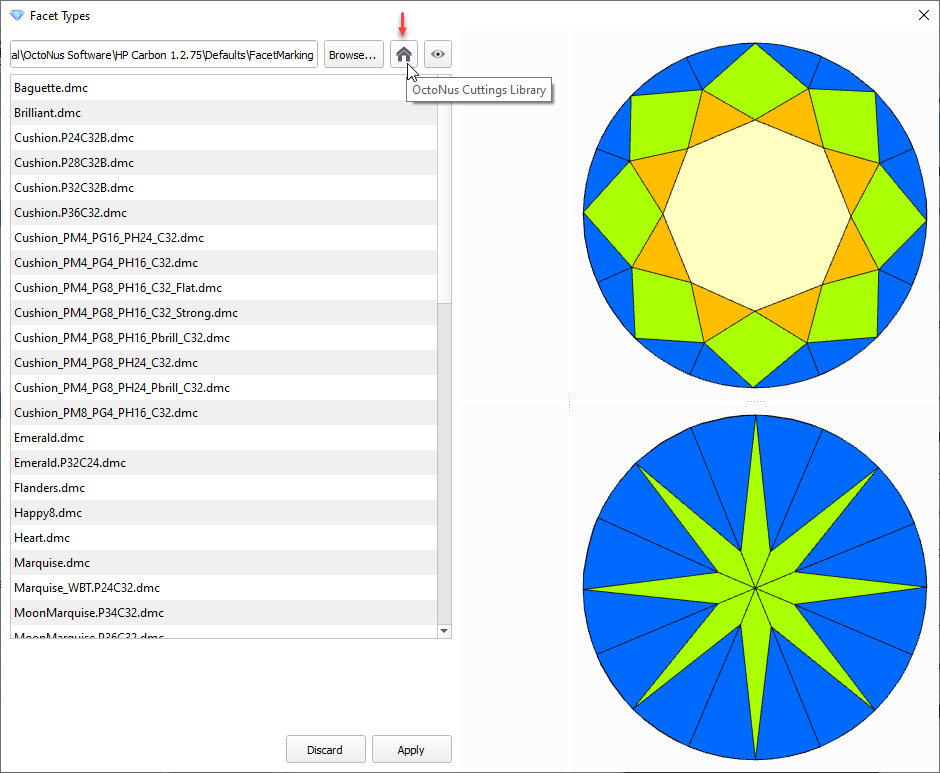
- If you want to access the library folder, click Browse.
...
- Right-click the step.
- From the context menu select Edit Step. The edit panel is displayed.
- In the edit panel, set the new Depth.
- Click Apply. The new allowance depth is set for the step.
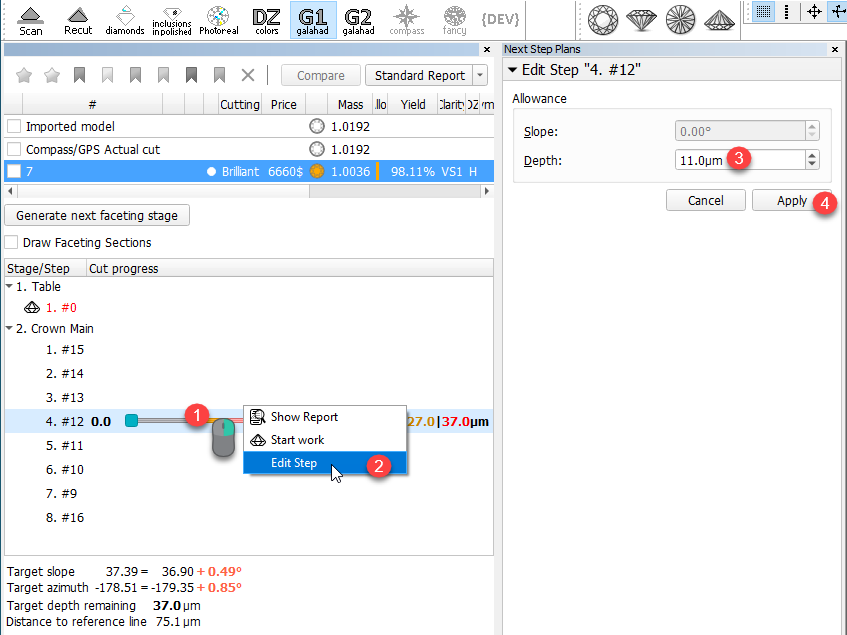
If you have a modified allowance for the step, you can Discard this difference and revert this step to the stage standard value.
...
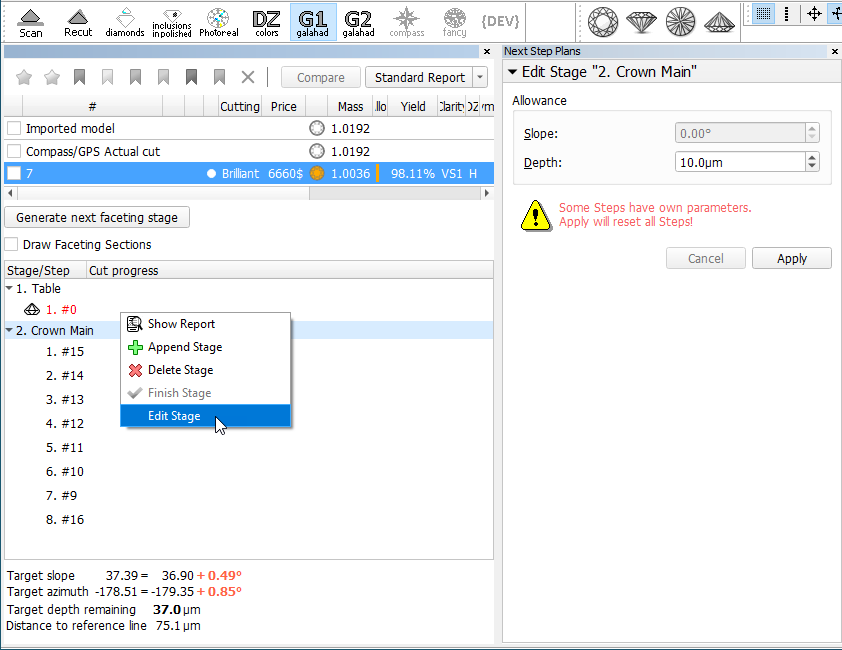
Allowance can also be edited for the stage. Note that if some steps of the stage have their own changed allowance, applying a new value for the stage will reset all steps, the corresponding warning is displayed:
Ximea Firmware Automatic Update
...