The system allows working with the inclusions in the polished diamond.
Access information about inclusions
Information about inclusions, their positions, sizes, and shapes comes with the project file containing a model. The information itself is gotten by external tools.
Note
Inclusions can also be created manually in the HP Oxygen system itself. See Create inclusions manually below.
To access information about inclusions, do one of the following:
In the Recut mode, on the left panel, overview of the Inclusions section. | On the top panel, click |
|
|
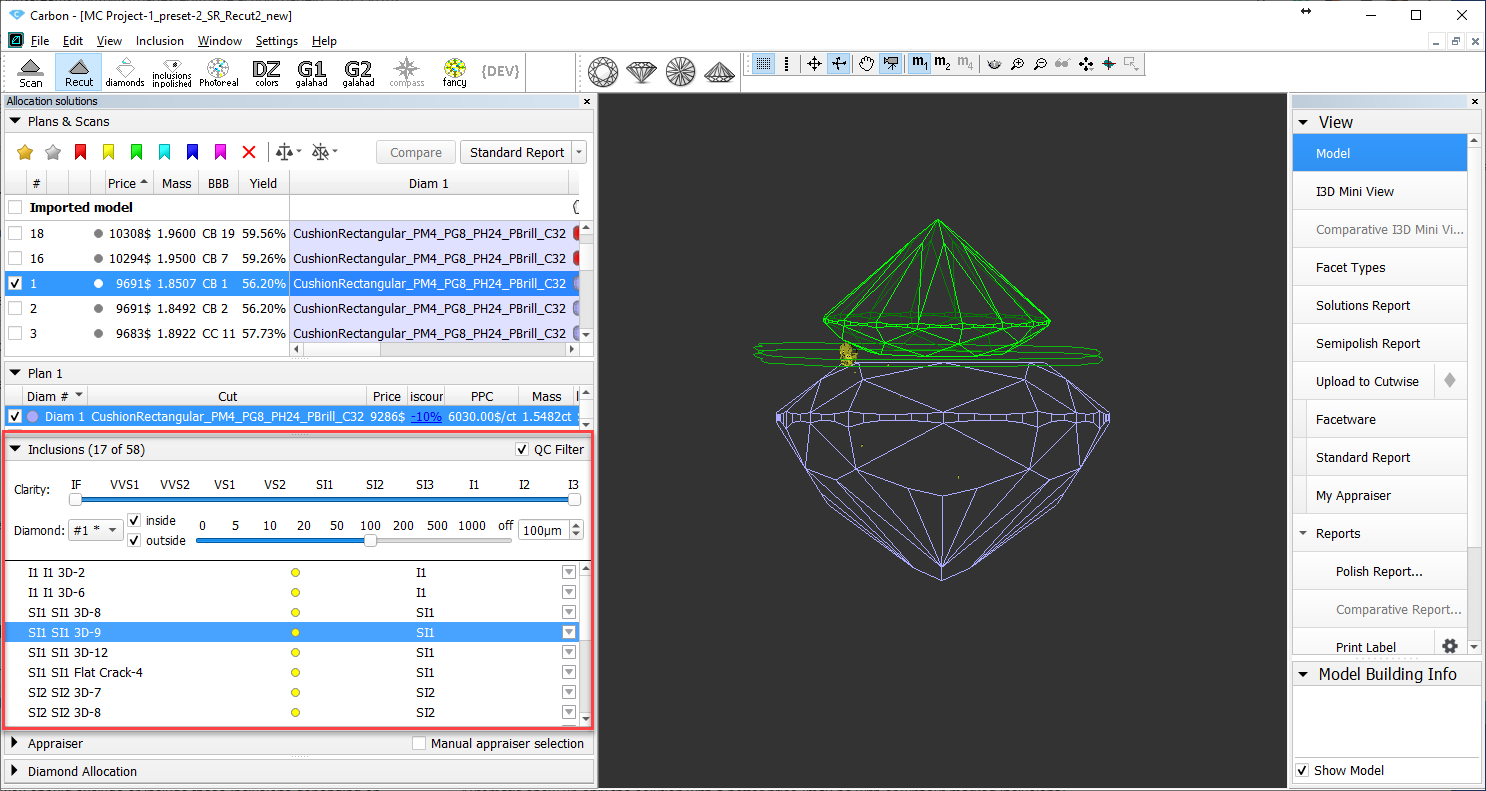

Filter inclusions with QC filter
You can filter inclusions visualization in Scene. This can be done via the Inclusions panel, its QC Filter (Quality Control Filter).

Activate the QC Mode button to start using specified filters. De-activate it - all solution inclusions will be displayed without filtering.
The QC Panel applies filters to the model inclusions, such as:
- Clarity select one or several clarity values from the list - only inclusions with the specified clarities will be displayed
- Diamond for multiple diamond solutions you can select only inclusions for the selected diamond will be displayed
- Inside/Outside check if to display inclusions inside, outside the diamond or both
- Depth of the area where to display the inclusions (works together with Inside/Outside ) - use the slider or type in the value in µm
Filters utilize the AND logic, for example, if "Diamond 1", VS1 clarity, "inside" and 90 µm are selected, then only VS1 inclusions within 90 µm area inside Diamond 1 will be displayed.
Notes
- For now, the diamond filter cannot work with nonconvex models.
- Rarely, some filter combinations may cause the filter to fail, the system shows notification - try other parameters if so.
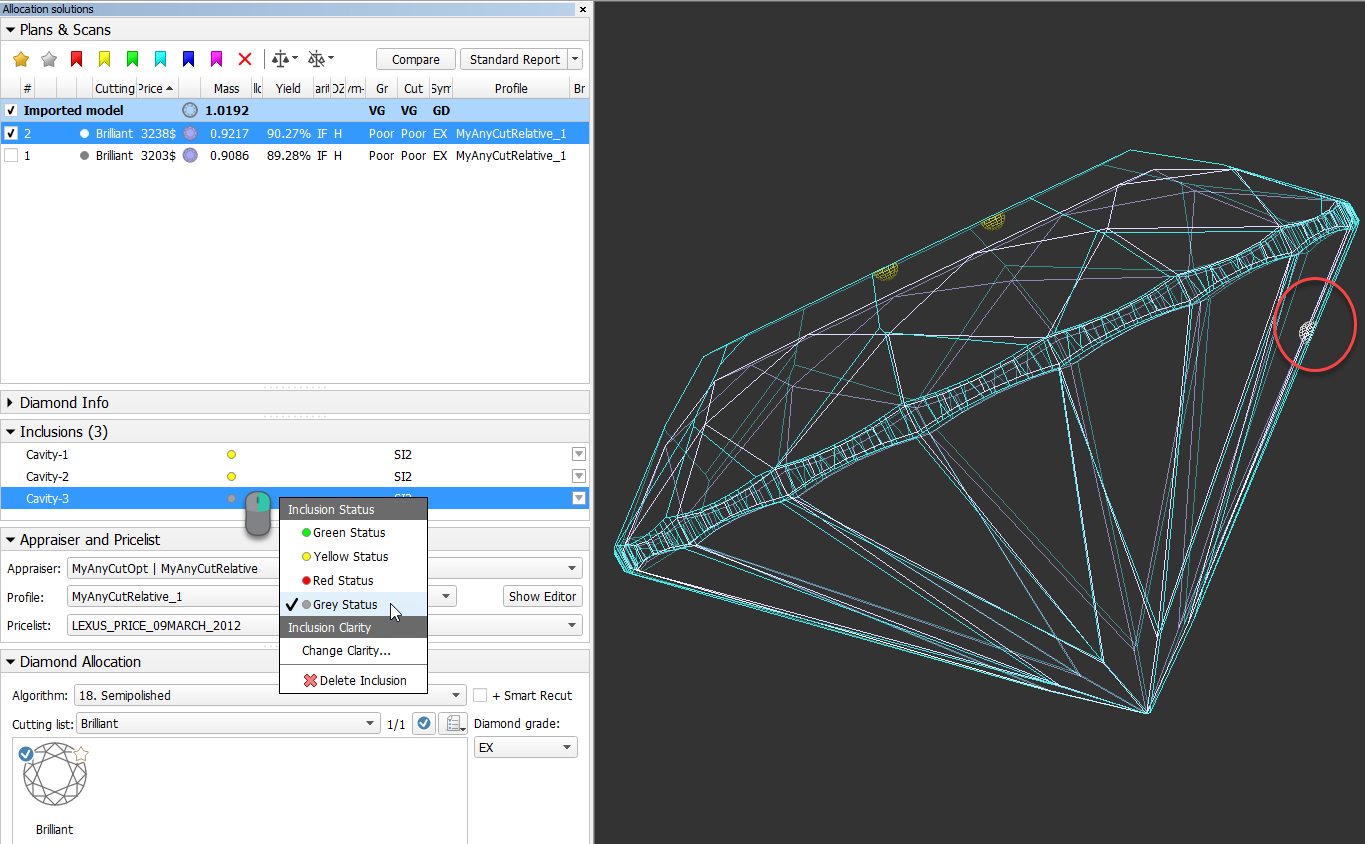
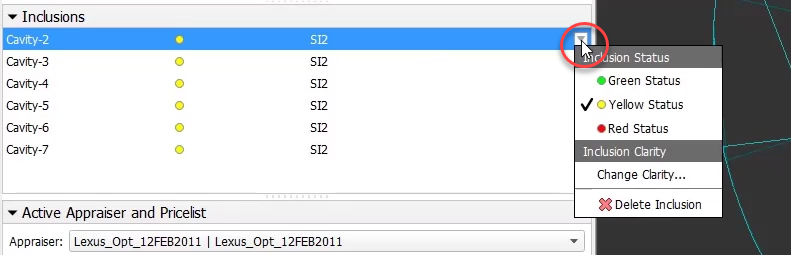
Use inclusions statuses
To change how inclusions affect algorithm work and produced solutions, you can change the statuses of the inclusions.
| Status | Instructs an algorithm... | May be used for... |
|---|---|---|
| Green Status | "You should not do anything to include or exclude these inclusions". | Speeding up an algorithm work by marking the inclusions that you are sure do not affect the result (definitely will be outside or inside potential diamonds). |
| Yellow Status | "You should exclude or include these inclusions depending on condition". | Automatic show up only the solution with a better price (may be with or without marked inclusions). |
| Red Status | "You should exclude these inclusions". | Getting better clarity. |
| Grey Statuses | "These inclusions do not exist". | Getting maximum mass. |
See the details in the sections below.
The default status of inclusion is set automatically due to its clarity group. The approximate correspondence is like following:
| Clarity Group | Default Status |
|---|---|
IF VVS1 | Green |
VVS2 VS1 VS2 SI1 SI2 | Yellow |
SI3 I1 I2 I3 | Red |
Green status
Specifying this status instructs the algorithm "You should not do anything to include or exclude these inclusions". May be used for speeding up an algorithm work by marking the inclusions that you are sure are not important.
Yellow status
Inclusions having this status may be included or not included in the solution.
The algorithm:
- takes all the yellow inclusions of the worst clarity group, marks them as red and builds the solution which does not include these inclusions, estimates its price;
- takes the same inclusions, marks them as green and builds the maximum mass solution that may have these inclusions inside, estimates its price;
- compares prices;
- selects only the solutions with a higher price;
- makes one step up in the hierarchy of clarity groups and repeats steps 1-4 for it;
- compares prices of previous and current clarity groups solutions;
- shows only the solutions with a higher price.
Red status
Specifying this status instructs the algorithm "You should exclude these inclusions". May be used for getting better clarity.
Grey status
Inclusions having this status will not be taken into account during allocation. The solutions are built as if these inclusions do not exist, they are still presented within the produced solutions and affect their price.
Clarity groups
The system automatically assigns the clarity group to every inclusion in accordance with the size of the inclusion. If necessary, you can change the clarity group of the inclusion manually.
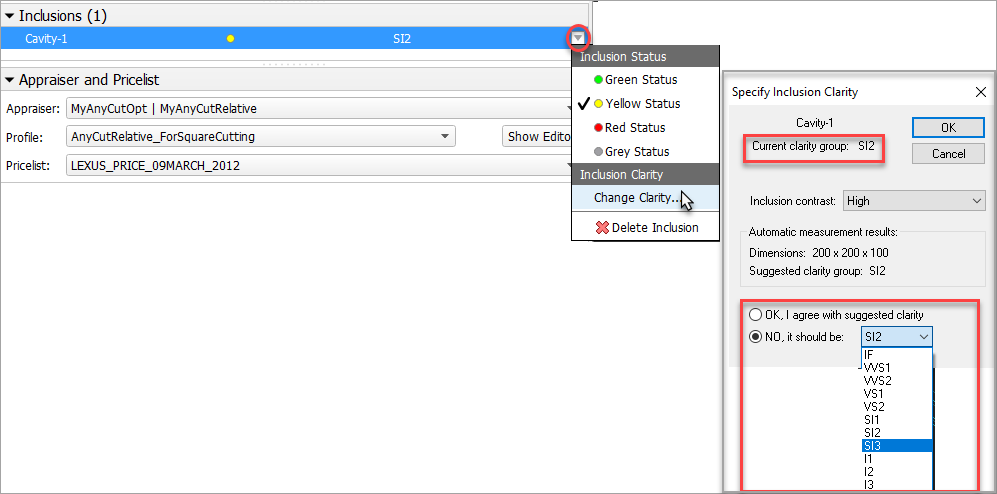
Clarity groups of the inclusions define the final clarity of a stone. Note that there is a default clarity setting in the system, which describes the accuracy of the current observing tool (lens, microscope). It means "the clarity is this because with this observing tool we cannot see anything smaller".
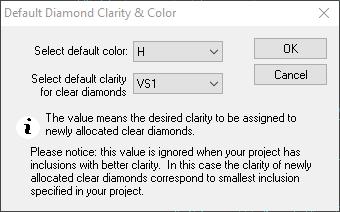
The setting is available from the main menu, Settings > Default diamond clarity and color.
Create inclusions manually
You can create inclusions manually in HPO:
- Use the Recut mode.
- In the Scene, right-click the model at the position where you want to place a new inclusion.
- From the context menu, select the appropriate inclusion option from the list.
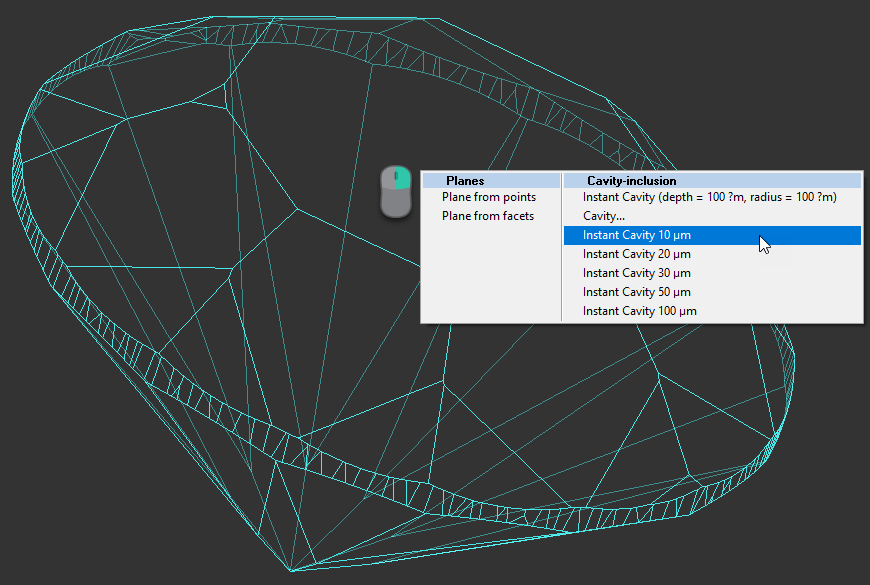
The inclusion will be created.
Create "sandwich" inclusions
For the stones with inclusions, the system now supports the ability to increase in some cases the mass of the solution by specifying that some part of inclusion can be included in the future solution. This can be done by marking an inclusion as multi-part ("sandwich").
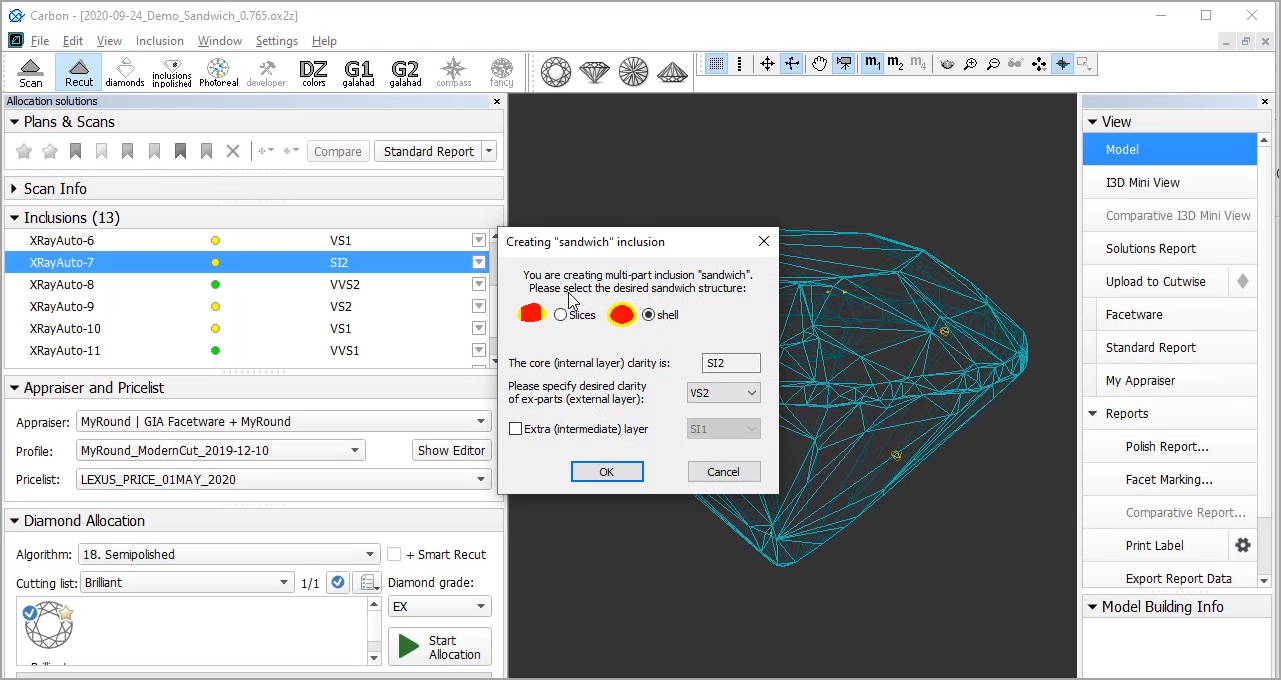
For a future "sandwich" inclusion you can specify:
- Desired structure: Slices (Recommended) or Shell.
- Desired clarity of the external layer compared to the internal layer clarity.
- Optionally - Extra (intermediate) layer presence and clarity.
To make an inclusion "sandwich":
- In the Recut mode, access the Inclusions panel.
- From the menu for your inclusion, select Make Sandwich. The Creating "Sandwich" Inclusion dialog is displayed.
- Specify the "sandwich" options and then click OK. In the Inclusions panel, your inclusion will be slit into the corresponding parts.
- Run optimization with your new inclusions.
You can find some details in the video below:
| Video | Increasing Mass - Using Sandwich Inclusions | ||||
| Published: | 2020, October 16 | Last Updated: | 2020, October 16 | v.2.0 |
| ||||
Video summary:
| ||||
Video keywords: clarity, inclusion, sandwich, QC panel | ||||
| Published in: | Release Notes | |||
| Documentation | Inclusions | |||
| Playlists | All Videos | YouTube: HP Carbon | |||
| Also | As Separate Page | On YouTube | Specification | |||
Deleting inclusions
You can delete existing inclusions. This can be useful if some caverns have been added by mistake.
To delete the inclusion:
- In the Plans & Scans mode, in the Inclusions section, right-click the inclusion you want to delete.
The context menu is displayed. - From the context menu, select Delete Inclusion.
Alternatively, you can delete inclusion using the pop-up menu.
You can delete several inclusions at once. To do so:
- Select inclusions clicking their names holding the CTRL or SHIFT keys
- Use the context or pop-up menu as described above.
Add Comment