Here you can find information about what is new in HP Carbon version 1.2.95.
This version is available for download from the Octonus official web site.
In-house cuts and hybrid appraisers overview
| Brief vocabulary | |
|---|---|
| In-house cut | = "your own", "created by you", "added to the system by you" |
| Hybrid appraiser | An appraiser that has both absolute and relative parts:
|
What can you do with version 1.2.95 that you could not do in the older versions?
The new version of the system provides a lot of new possibilities. They are described in the sections of these release notes. But the main changes in the release are related to in-house cuts and hybrid appraisers:
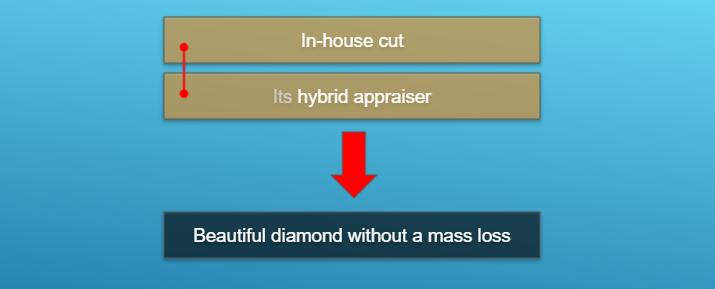
- For any number of your in-house (created by you) cuts, you can create its hybrid appraiser and thus get plans for beautiful and massy diamonds for these cuts.
- You can get excellent plans for both in-house and generic, including Brilliant via GIA Facetware, cuts in one run.
- You have the right appraiser at your fingertips - no need to manually select, no need to know or remember which one is needed.
Here is the brief abilities comparison:
| Ability | Previous Version | New Version | Provided by what? |
|---|---|---|---|
| Using absolute appraisers when working with multiple cuts. | Yes* | Yes | - |
| Using hybrid (absolute+relative) appraisers when working with multiple cuts. | No | Yes | Create hybrid appraiser for in-house cut + Automatic appraiser selection |
| Creating for each in-house cut its hybrid appraiser. | No | Yes | Create hybrid appraiser for in-house cut |
| Editing appraiser of in-house cut via the user interface. | No | Yes | Create hybrid appraiser for in-house cut |
| Automatic detection and presenting in the user interface of the link between cut and its appraiser/active profile. | No | Yes | Automatic appraiser selection |
| Using simultaneously RBC (including optimization by GIA Facetware) and in-house cuts when working with multiple cuts. | No | Yes | Create hybrid appraiser for in-house cut + Automatic appraiser selection |
| Getting Smart Recut solutions for multiple selected cuts simultaneously. | No | Yes | Automatic appraiser selection + +Smart Recut |
| Getting Smart Recut solutions for a larger diamond in the multi-diamond solutions. | Yes | Yes | - |
| Getting in one click Smart Recut solutions for both diamonds in the multi-diamond solutions. | No | Yes | Automatic appraiser selection + +Smart Recut + "gold stars" |
| Automatic switch to correct appraiser when selecting a solution with a different cut. | No | Yes | Automatic appraiser selection |
* Via adding in-house cut and then adding the corresponding section in one of the existing appraisers (by editing its text file).
Create hybrid appraiser for in-house cut
What is new?
Now for your in-house cut, you can create its hybrid appraiser.
What is it for?
To get plans with the best combination of mass and performance, add your in-house cuts to the system, populate them with forms, then allocate plans close to these forms with a hybrid appraiser.
How?
- Add what you consider beautiful as your in-house cut.
- Add variations of forms.
- Allocate future plans close to your forms by a hybrid appraiser.
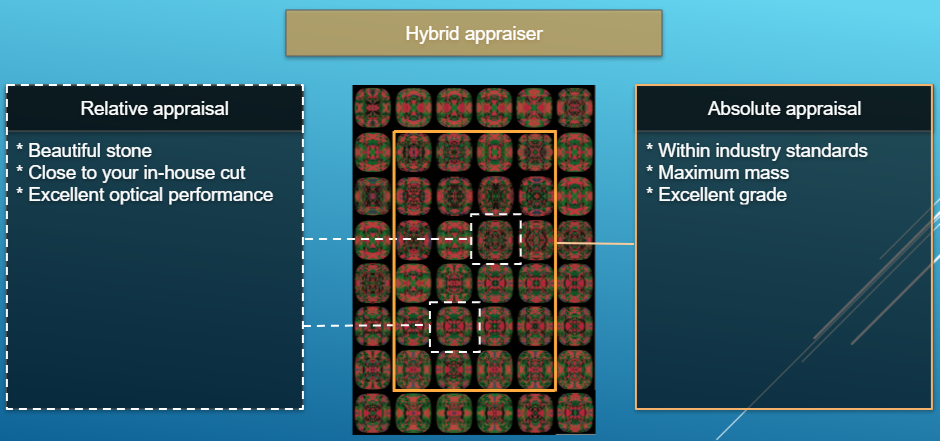
A hybrid appraiser has both absolute and relative parts:
- The absolute part will provide a maximum mass without a grade loss (industry-standard intervals).
- The relative part will bind plans to your own forms with the excellent optical performance.
And thus:
To create for in-house cut its hybrid appraiser:
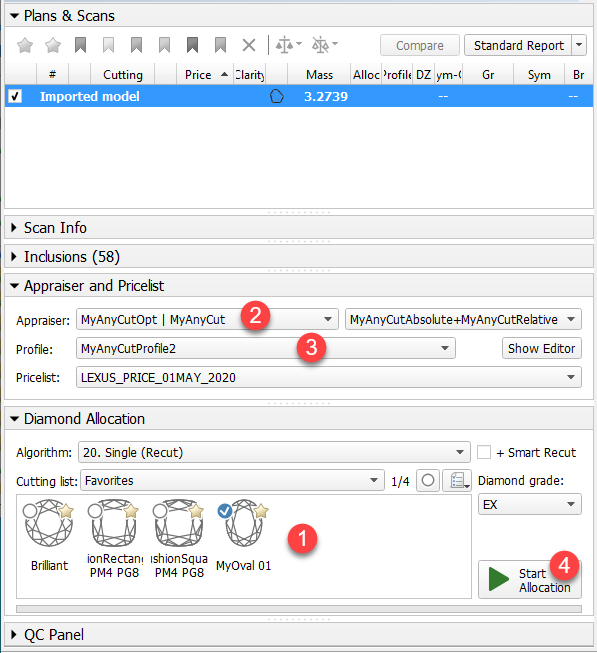
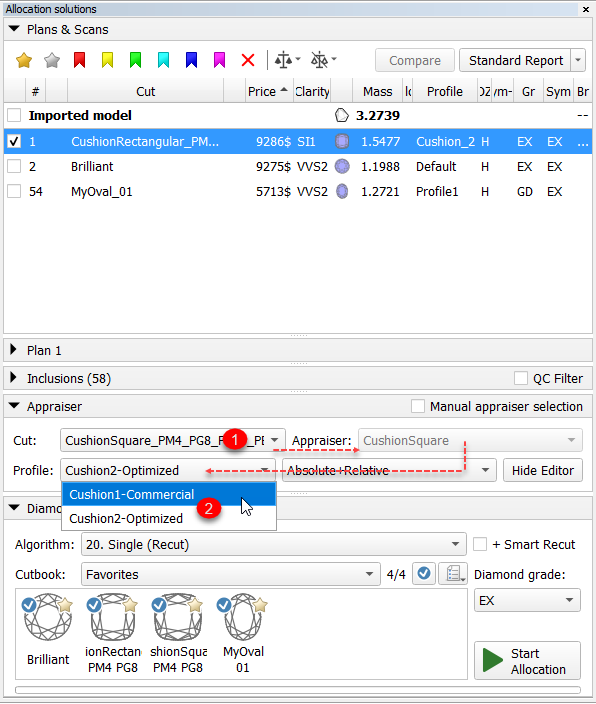
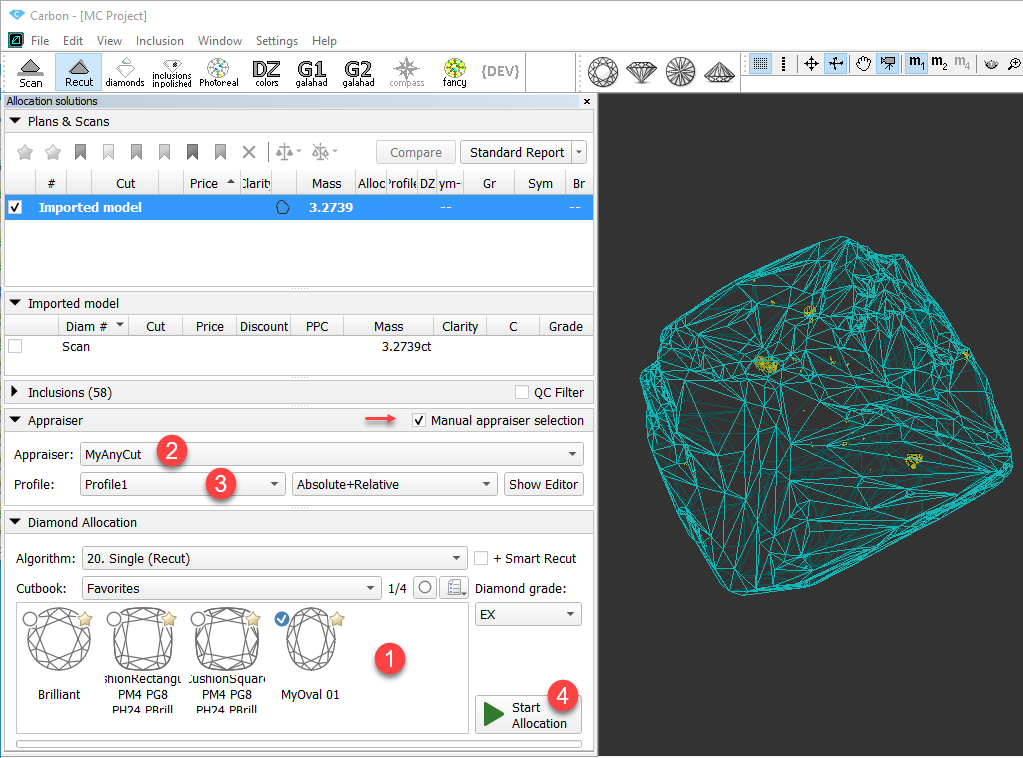
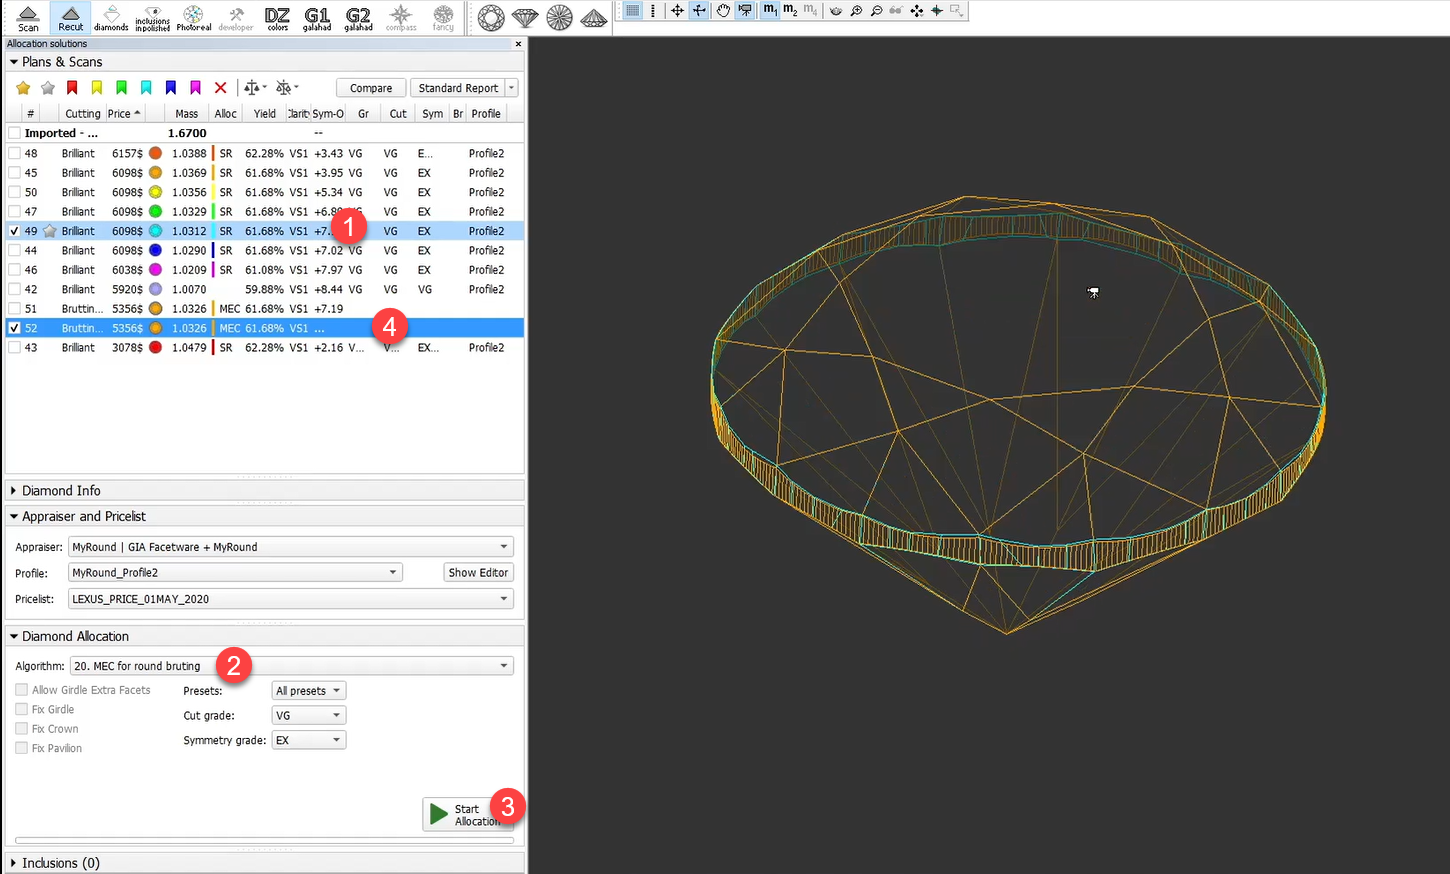
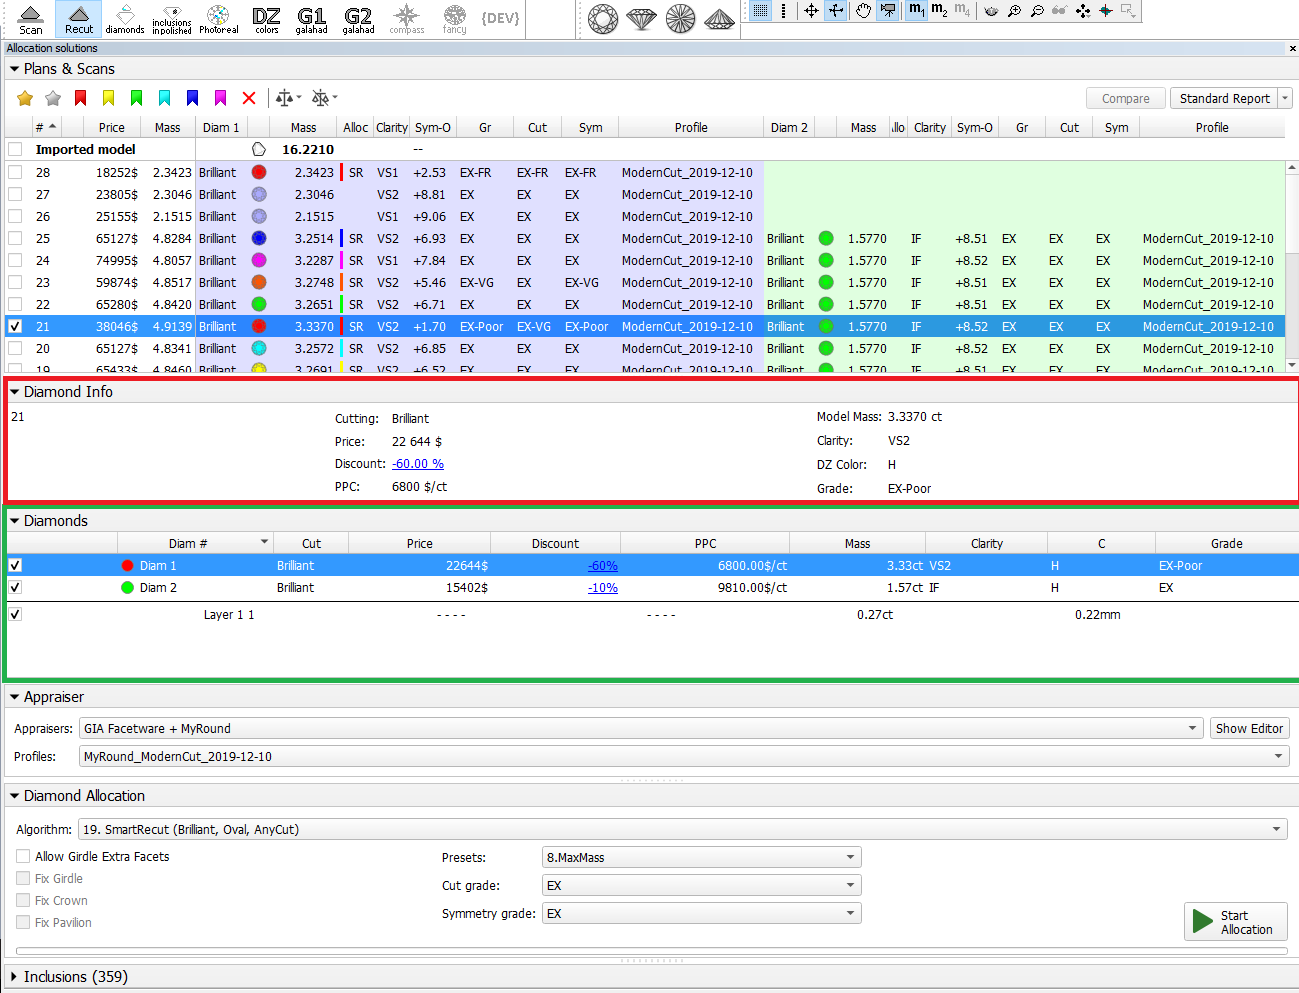
- In the Recut mode, in the left panel, in the Diamond Allocation section, from the Cutbook select "In-house Cuts".
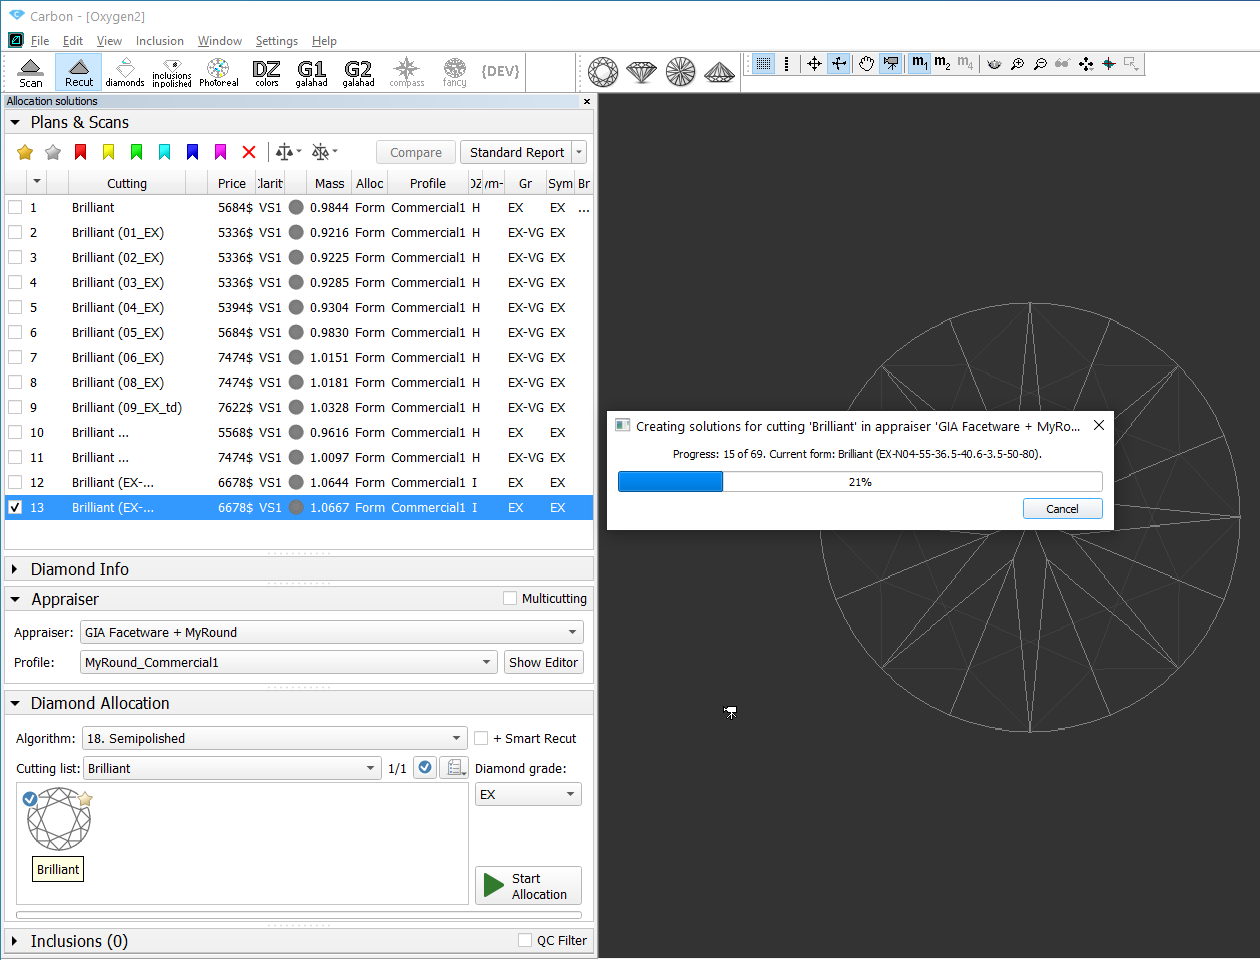
In the cut list, right-click your cut, and then from the context menu select Create Appraiser. The dialog is displayed.
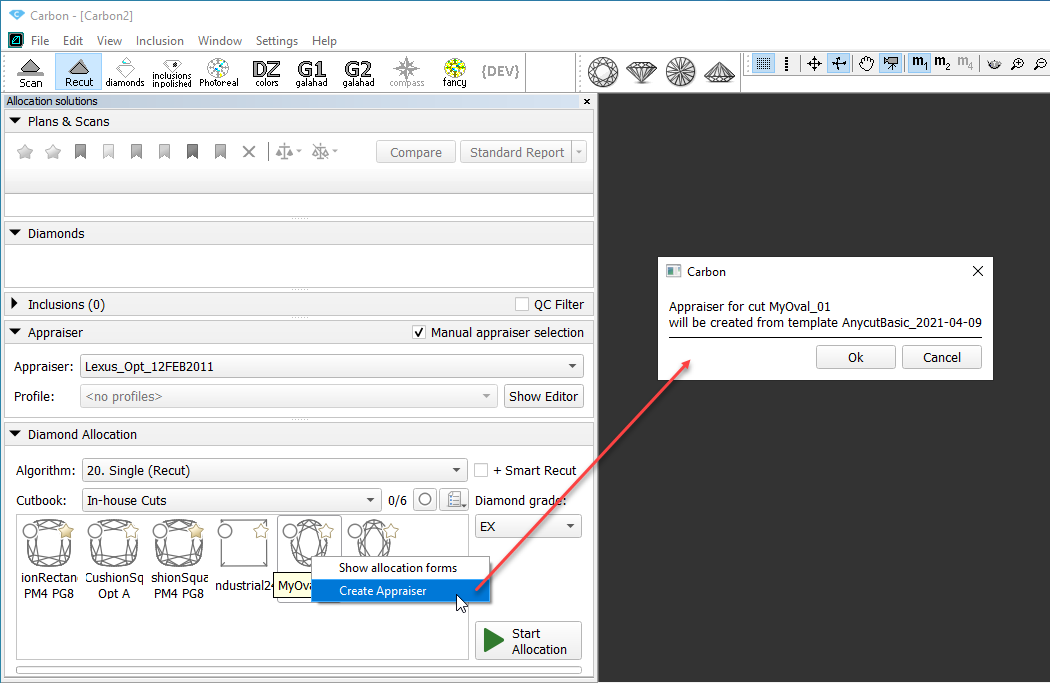
In the dialog, read the information about the template and then click OK. Your new appraiser is created, named the same as the cut. Two profiles are automatically created for it.
Notes
* The new appraiser is created by copying the template. As for now, the only available template is the "AnycutBasic_2020-12-09" which is identical to the "MyAnyCut".
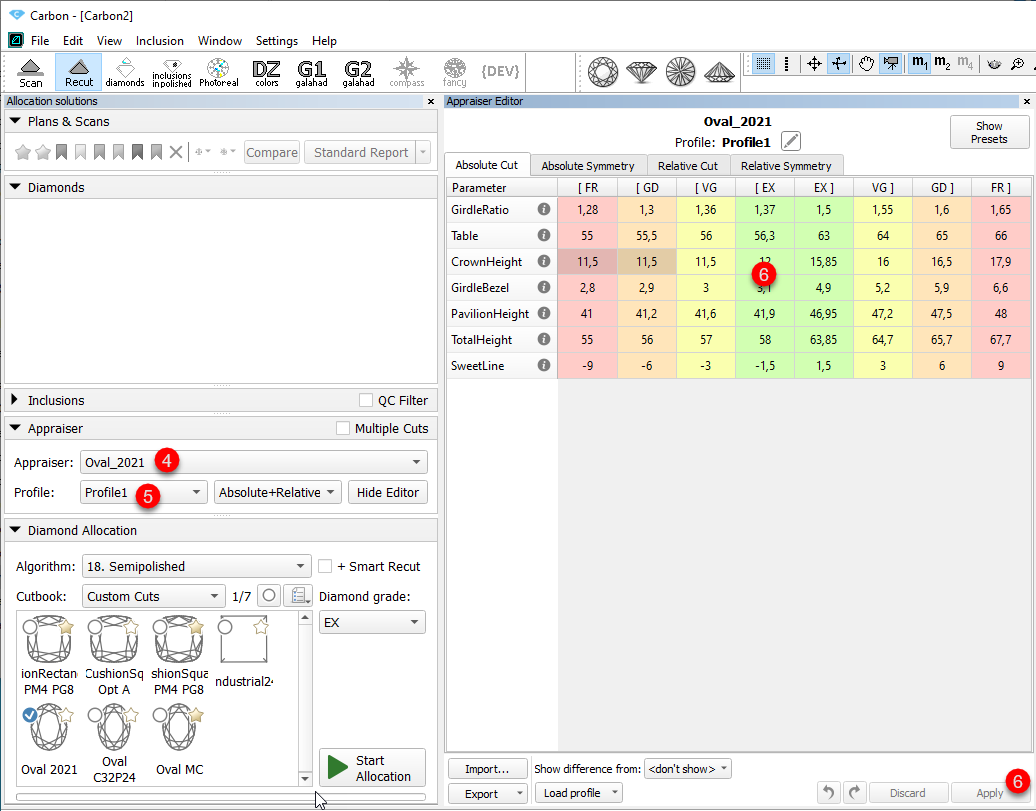
* If you previously already created the appraiser for this cut, the system will suggest rewriting it - for the cut, only one its appraiser can be presented in the system.- In the Appraiser section, from the Appraiser list, select your appraiser.
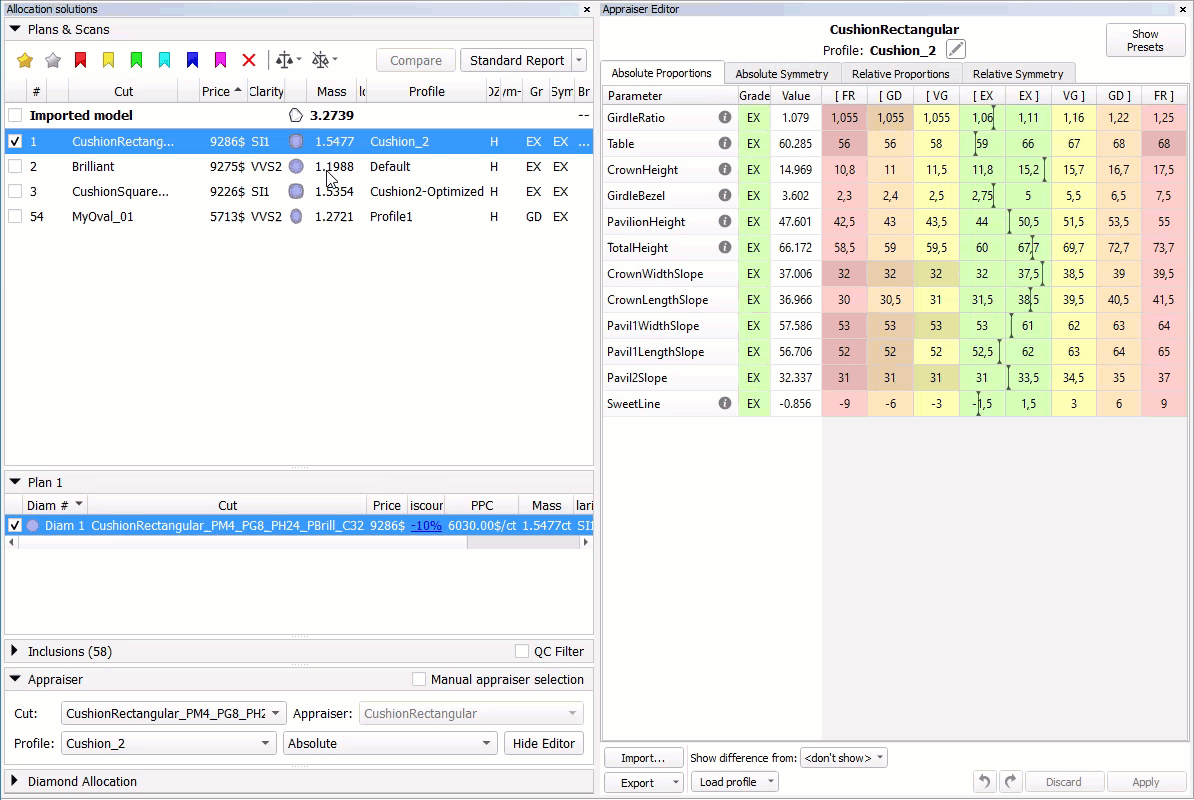
- Select the profile to be edited, then click Show Editor. The Appraiser Editor window is displayed.
In the Appraiser Editor set boundaries for your parameters and then click Apply. For hints on how to edit profiles, see Configuring Profiles here.
Pay special attention that the absolute part must be filled with the parameters corresponding to your cut.
- If necessary, set boundaries for the second profile as well.
- As a hybrid appraiser only works when the linked cut has a good set of allocation forms, do not forget to add these forms to the cut (see details at In-house cut registration > "Adding allocation forms" and some questions and answers on allocation forms below).
Some questions and answers on allocation forms:
How many and what forms should be added?
You need at least 20-30 forms. It is better to have more*. The quantity depends on the quality: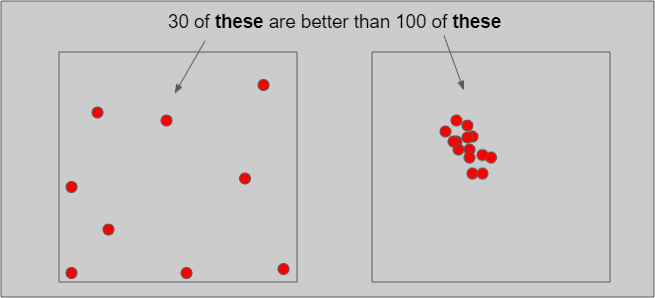
In a multidimensional array of diamond parameters**, the more these parameters differ, the better (array coverage). Also the greater the GirdleRatio of your cut is, the more allocation forms are recommended to achieve a better result.
NOTES
* But how much more? And may adding a form make hybrid appraiser worse? The answer is that the more forms it has, the slower the appraiser is, therefore it is not recommended to have more than 100. Also if the relative part allows getting A from B or vise versa during allocation (click Show Picture... below) then one of them is redundant and again - only slows down the appraiser.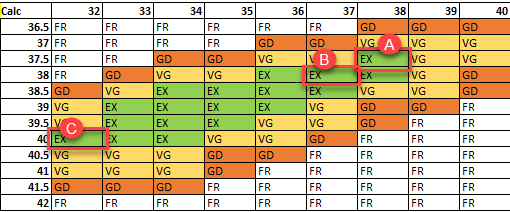
A can be obtained from B during allocation (close, a deviation is allowed by the relative part).
С cannot be obtained from B during allocation (far, a deviation is not allowed by the relative part)
Thus:
either A or B is redundant and only slows down the appraiser,
it is good to have С in addition to A or B.** When we say "parameters" we mean not only the ones presented in the appraiser but also the additional (for example, azimuths of non-main facets of crown and pavilion). Precisely, changing the additional parameters in many cases provides the best form distribution over the array.
- If no allocation forms, is it a hybrid appraiser?
A cut always has at least one form available immediately after cut registration (base form). That is why you need only 10 minutes to start using the new in-house cut (see "Ready for use" in this diagram). Does a linked hybrid appraiser stay hybrid in this situation? See next question. - If only one form was added, is it a hybrid appraiser?
If your cut has only one allocation form or few forms and the relative part of its hybrid appraiser is narrow enough, this creates a great risk of mass loss, as the solution will be searched not along all the array provided by the absolute part but only close to this form. On the other hand, if you significantly widen the relative part, it may become wider than the absolute which means the appraiser degenerates into a simple absolute. - How the SweetLine parameter should be specified in a hybrid appraiser?
The SweetLine slope is specified for an entire cut as described here. As forms belong to the same cut, the slopes of the SweetLines they belong to will be similar. But as good forms are distributed over the array, the position of their SweetLInes may be different: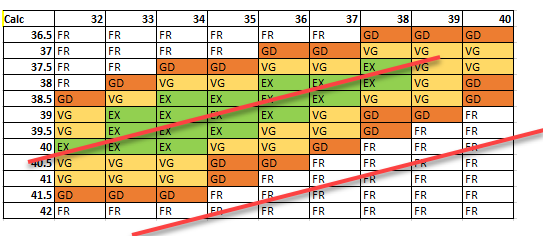
Therefore, for the absolute part of the hybrid appraiser, we should turn off the SweetLine (set all values to "100" which will remove the fixed green zone from the picture above) and only in the relative part set the possible deviation from the SweetLine of each particular allocation form.
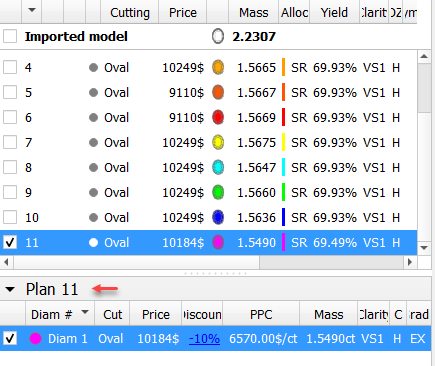
Automatic appraiser selection
There are two cases when you need to select an appraiser:
- For allocation (creating solutions)
- For appraisal (appraising of already existing solutions)
For appraiser selecting, the system behavior and thus what you need to do is changed now:
| Was | Now | ||
|---|---|---|---|
| System behavior | Allocation, 1 cut | Process: In Recut mode, in the Diamond Allocation section, you select the cut, then, in the Appraiser section, from the Appraiser list, manually select the appropriate appraiser and Profile, then click Start Allocation. Result: If you selected the wrong appraiser, there may be no results or they can be bad. | Process: you select the cut, then click Start Allocation. Result: The linked appraiser* will be used automatically (and the last selected Profile of it) |
| Allocation, more than 1 cut | Process: In Recut mode, in the Diamond Allocation section, you select your cuts, then manually select the "Lexus_Opt..." (must include selected cuts) appraiser and start allocation. The "Lexus_Opt..." should be pre-configured by an expert (no modifications via UI - only editing as file). Result: If your cut was not described in the "Lexus_Opt...", there may be no results or they can be bad. | Process: you select the cuts, then click Start Allocation. Result: The linked appraiser* will be used automatically (and the last selected Profile of it) for each included cut. | |
| Appraisal of already existing solutions | In the Plans & Scans section, you click the solution, then, in the Appraiser section, from the Appraiser list, manually select the appropriate appraiser and Profile, then click Show Editor. | In the Plans & Scans section, you click the solution, in the Appraiser section, the system automatically displays the linked appraiser. When your switch between the solutions of different cuts, the appraiser changes correspondingly. | |
|
|
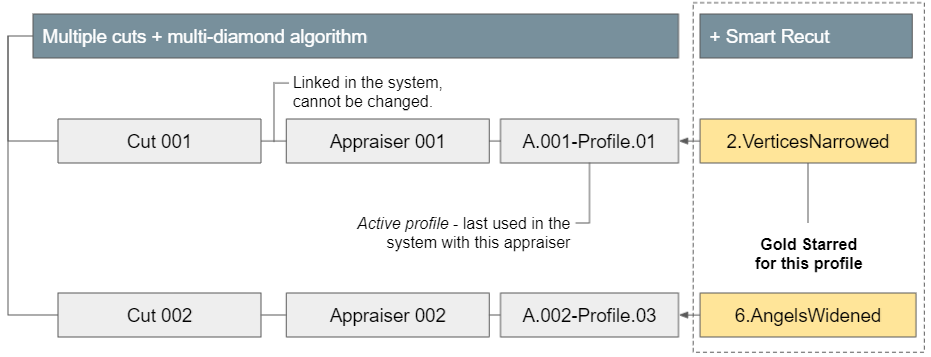
* In the system, cuts and appraisers are linked like this:
| Cut | Appraiser*** |
|---|---|
| In-house cut that has its** appraiser | Its appraiser |
| In-house cut without its appraiser | MyAnyCut |
| Brilliant | "GIA Facetware + MyRound" |
| CushionSquare_PM4_PG8_PH24_PBrill_C32 | CushionSquare |
| CushionRectangular_PM4_PG8_PH24_PBrill_C32 | CushionRectangular |
| Some oval cuts | MyOval |
| Other cuts | Lexus_Opt...**** |
** Its appraiser means created specifically for this particular cut
*** For each appraiser, its active profile will be used - the one that was last selected in the user interface Profile field.
**** Cuts linked to the "Lexus_Opt..." appraiser have limitations:
- The cut will not give the appropriate result if its description is not presented in the "Lexus_Opt..." appraiser.
- The + Smart Recut option will not work for them
- The cut will not give the appropriate result if its description is not presented in the "Lexus_Opt..." appraiser.
See details in the sections below.
When automatic appraiser selection is useful
The automatic appraiser selection eases your work with multiple cuts:
- Allocation cases:
- You want to try getting solutions of different cuts for your scanned model.
- You want to try getting diamonds of different cuts within your solutions for multi-diamonds algorithms.
- Other cases:
- In your solution list, you have solutions of different cuts and you want the appropriate appraiser to be selected automatically when you switch to this solution.
- You want to know which appraiser is linked to some cut and/or switch the active profile for it. The active profile is the last selected in the user interface Profile field for this appraiser. It is saved by the system automatically.
For single cut allocation
- Select cut and run allocation. No need to worry about the appraiser.
For multiple cut allocation
How to use:
- From the Cutbook, select several cuts.
- Run allocation.
|
Note that you do not need to do anything but selecting wished cuts and running allocation. Optionally: to view the linked appraiser and its current active profile in the Appraiser section, select Cut from the list. Change active Profile if needed. Note that the Profile field will be empty if the appraiser does not have any profiles. |
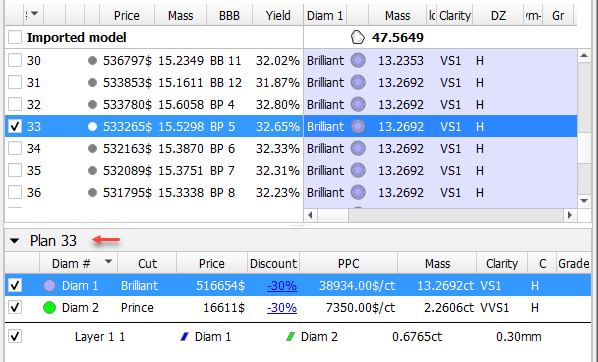
For multi-diamond algorithms
The automatic appraiser selection greatly eases getting excellent diamonds of different cuts within one solution (via the multi-diamond algorithms, such as 13. Cascade-2M and + Smart Recut option).
New: now you can get a combination of your in-house cut and one of standard (for example, Brilliant linked to "GIA Facetware + MyRound") cuts within one solution.
Running multi-diamond allocation with Smart Recut
(Prerequisites: gold stars will be used - see instruction on how to configure them in the section below)
- Use the Recut mode.
- Select several cuts.
- Set Algorithm to "13. Cascade-2M".
- Select the + Smart Recut option.
- Click Start Allocation. The multi-diamond solutions are displayed in the list.
To get "Smart Recut + Smart Recut" solutions with the different Smart Recut presets:
- In the Diamond Allocation section set Algorithm to smart recut one.
- In the solution list, select the "Recut + Recut" solution.
- In the diamonds section, select one of the solution diamonds. In the Appraiser section, the appraiser linked to the cut of the selected diamond is displayed automatically. Its active Profile is displayed as well.
- From the Presets list, select the preset you want to be used.
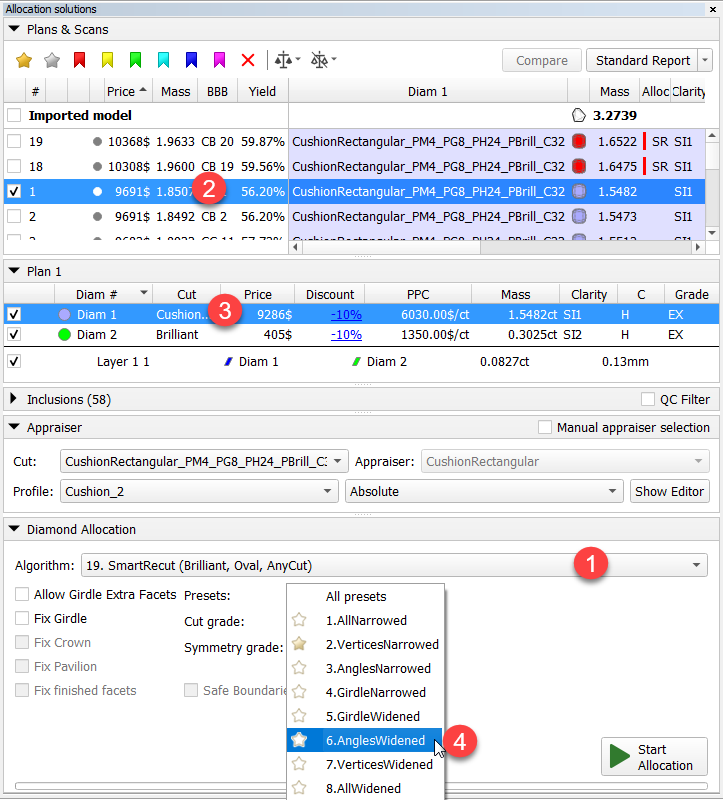
- Run allocation for the selected diamond. The new "Smart Recut + Recut" solution is added to the list, where Smart Recut is built with the selected preset.
- Repeat configuration for the diamond remaining Recut.
- Run allocation for the second diamond. Now you have a new "Smart Recut + Smart Recut" solution with each SR produced by the new preset.
"Gold stars" configuring
The "gold star" shows which Smart Recut preset will be used for the active profile of the linked appraiser when running allocation for multiple cuts with a multi-diamond algorithm with + Smart Recut option. There is a default gold star for each profile of each appraiser working with Smart Recut. Thus, you can skip configuring gold stars - in this case, the default will be used (for MyRound profiles - preset №4, for MyOval and MyOvalPerformanceWare - №6, for MyAnyCut and alike - №8).
|
Notes on structure:
Notes on usage:
|
The gold stars can be configured before running allocation as described below.
To configure gold stars:
- Use the Recut mode.
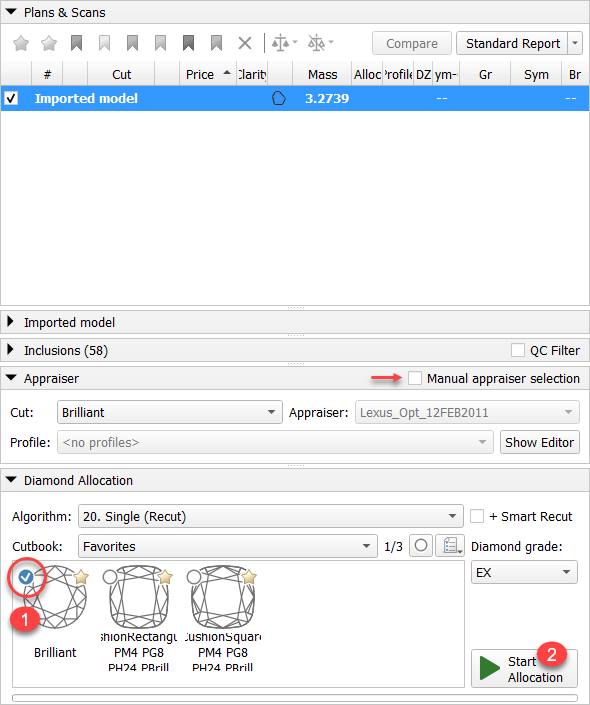
- in the Appraiser section, select Manual appraiser selection.
- Select Appraiser.
- Set active Profile.
- In the Diamond Allocation section set Algorithm to smart recut one.
- Expand the Presets list, then in the list, set the gold star to the right of the preset you want to be used during allocation for multiple cuts with a multi-diamond algorithm.
For viewing grades in Appraiser Editor
If, in your solution list, you have solutions of different cuts and you want the appropriate appraiser to be selected automatically when you switch to this solution:
- Click Show Editor. The Appraiser Editor window is displayed.
- In the Plans & Scans section, switch to the required solution. The Appraiser Editor window will automatically switch to the appraiser linked with the cut/active profile.
For switching active profile
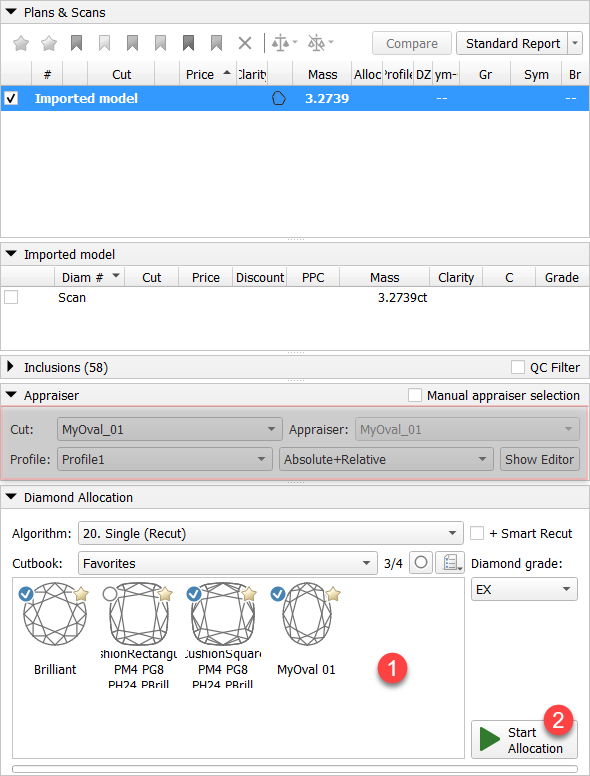
To know which appraiser is linked to some cut and/or switch the active profile:
- Do one of the following:
- If you have a solution of the appropriate cut in the list, click it. Its cut is displayed in the Appraiser section, Cut field.
- If you do not have a solution, select directly from the Appraiser section, Cut list.
- If necessary, change the Profile. Selected new active profile for this appraiser is saved in the system automatically.
| Option A: Solution of appropriate cut in the list | Option B: Not in the list |
|---|---|
|
|

Old mode - Manual appraiser selection
Sometimes it may be necessary to try appraisal or running allocation with the appraiser, different from the linked one.
You can switch to the old mode of working with the system where the manual selection was possible (and required). To do that, in the Appraiser section, select the Manual appraiser selection checkbox.
To switch back to the automatic appraiser selection, deselect the checkbox.
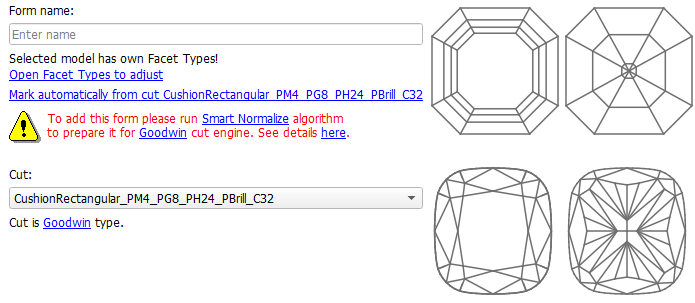
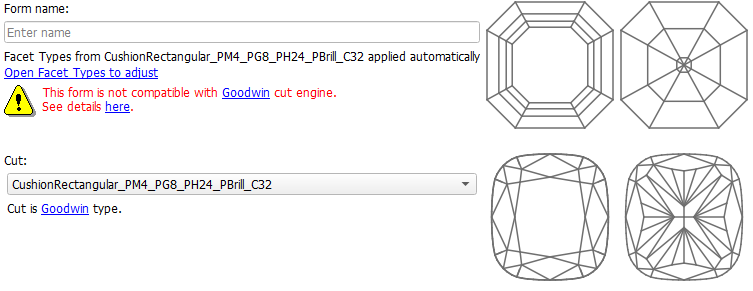
Cushion cuts of Goodwin type - check of allocation forms
For some cuts, the Goodwin cut engine is applied. At the moment they are the cushion appraisers:
- "CushionRectangular_PM4_PG8_PH24_PBrill_C32"
- "CushionSquare_PM4_PG8_PH24_PBrill_C32"
There are some limitations to allocation forms of such cuts:
"4+ facets" limitation:
"4+" facet is a facet with 4 or more vertexes (junctions are the most common reason for the triangle facets to become "4+").
Goodwin checks every vertex of the model.
At each vertex, only 3 or fewer "4+" facets should converge.
Table, culet, and facets of the girdle are not taken into account.

- A - before Smart Normalize
- B - after Smart Normilize
- Yellow facets have 4 vertexes
- Red facets have: 4 vertexes before SN, 3 vertexes after SN
Thus:
- before SN, at the center vertex, 4 facets with 4 vertexes converge - not good for Goodwin
- after SN, at the center vertex, 2 facets with 4 vertexes converge - good for Goodwin
- Facet types should not have serious errors (like some of the facets on the pavilion marked as the crown facets).
If these conditions are not met, the Show allocation forms in solution list command does not display the "wrong" forms in the list and such forms do not produce any solutions.
What's new?
Now the additional checks are added to the system when trying to add forms to Goodwin cuts. If these checks are not passed, the form is not added, the notification window is displayed:
Or (for already normalized forms):
New report - Semipolish
A new report is added to the system - the Semipolish Report. It allows controlling (both visually and via parameter values) a table polishing process.
To access the report:
- Select the solution.
- On the right panel, click Semipolish Report. The report is displayed in the Scene.
- If you select another solution, the report is updated to display information related to it.
The report includes:
- Main parameters of a solution.
- Table processing parameters.
- Safe line parameters.
- Image with the angles of the main facets on the pavilion.
- Image with the angles of the main facets on the crown.
- Image reflecting the process of polishing a table (angle 1).
- Image reflecting the process of polishing a table (angle 2).
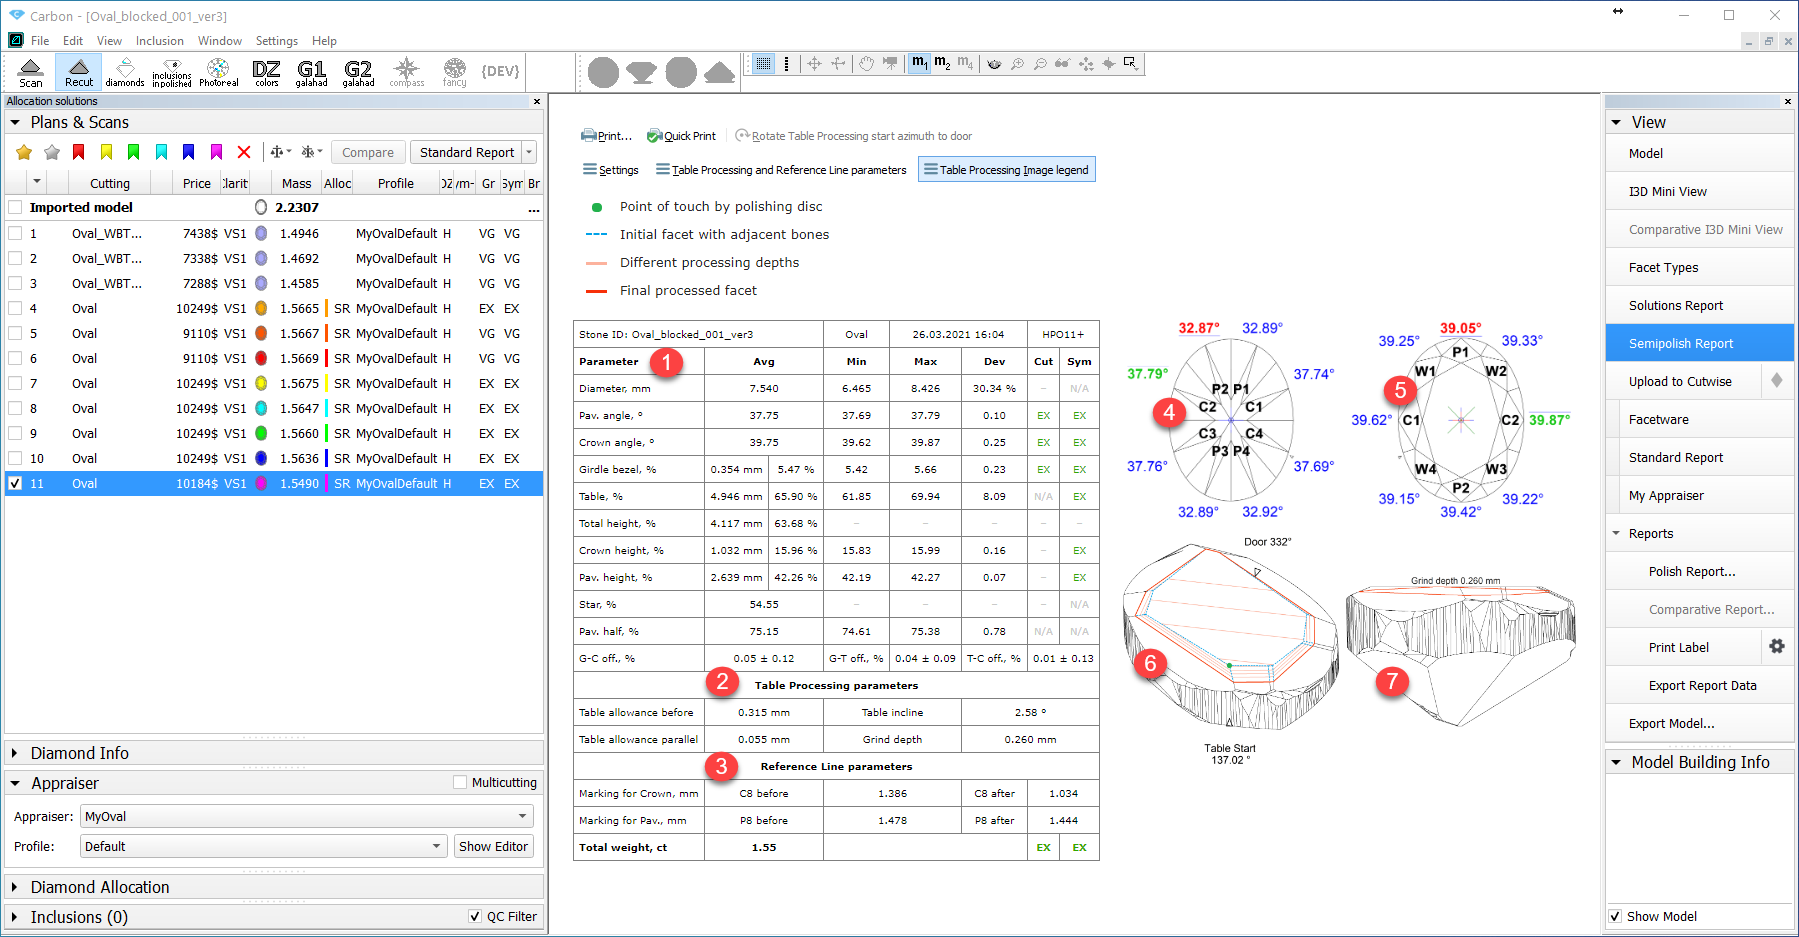
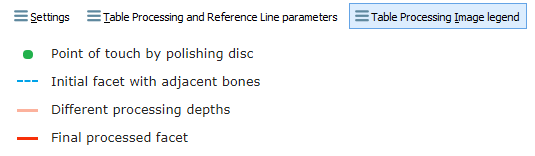
The images (6-7) reflecting the process of polishing a table includes information about:
- Poing of touch by polishing disc
- Positions of different planes related to polishing
- Door azimuth
- The azimuth of the table polishing start point.
- The Grind depth table processing parameter (see description here).

The report includes the Rotate Table processing start azimuth to door control (active if the hardware is connected).

To access report settings and reference information, at the top of the report, click Settings, Table Processing and Reference Line Parameters, Table Processing Image Legend. On click, the corresponding section is displayed
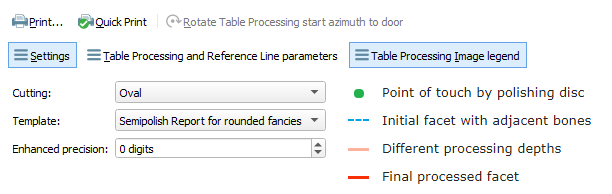
Also, click Table Processing and Reference Line parameters to view the brief description of parameters.
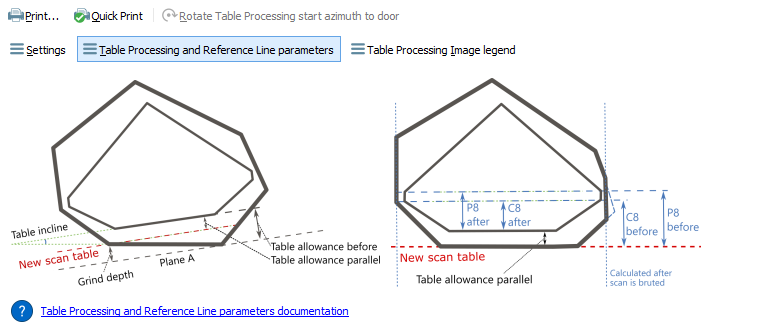
To hide the displayed information, click the corresponding button again.
Appraiser for Brilliant - Changes in Profiles and Presets
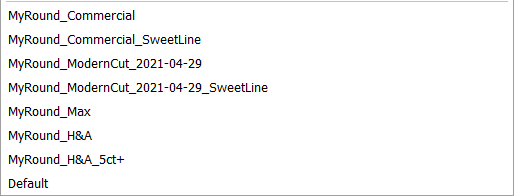
For the "GIA Facetware + MyRound" appraiser (linked to the Brilliant cut), some changes were made in profiles and presets.
Profiles General Description
The general idea of each profile is presented in the table:
| Profile | ||
|---|---|---|
| 1 | Max | Profile with as wide boundaries as possible (for Cut and Symmetry). Provides maximum mass within GIA EX. |
| 2 | ModernCut | Recommended profile. Provides solutions reflecting the current market preferences not reflected in GIA. Narrower than Max. |
| 3 | Commercial | In correspondence with solutions of large Indian companies. Narrower than ModernCut. |
| 4 | H&A | Creating Hearts & Arrows solutions. Narrow Symmetry and SweetLine, somewhat narrowed by Cut. Narrower than Commercial. |
| 5 | H&A 5ct+ | Hearts & Arrows solutions for large stones. Narrower than H&A. |
Purposes
For profiles:
Each next profile should be narrower than the previous (see table above). Previously, this logic was not fully supported.
- Scanned stones should not go outside the EX grade where possible. Previously this happened often.
For presets:
The widest preset of each next profile (see table above) should be approximately the same as the narrowest of the previous.
#2-3 (ModerCut and Commercial) have a specific place in this logic: both of them intersect with their ends with Max and H&A and in most aspects intersect with each other
ModernCut and Commercial should provide the maximum range: presets for presenting some from Max - presets for in-between - presets presenting some from H&A (see table below).

* General idea: presets with the same names give similar results.
* Where names repeat, highlighted shows correspondence.
Changes
For purposes "Profiles #1 - Each next profile should be narrower than the previous" and "Presets #1 - The widest profiles of each next profile (see table above) should be approximately the same as the narrowest of the previous":
- In ModernCut, all that was narrower than Commercial was widened.
- In H&A and H&A 5ct+, all that was wider than Commercial was narrowed.
For purpose "Profiles #2 - Scanned stones should not go outside the EX grade where possible:
- For ModernCut and H&A, Culet is widened to 0.5 (as in Commercial). Done because the real culet of scanned stones is in this range. Later narrowed by presets.
- For ModernCut and H&A, HeightGirdleExtraFacet is widened to 3 (as in Commercial). Done because the real girdle extra facets of scanned stone have heights in this range. Later narrowed by presets.
- GirdleBoneLocal, GirdleBezelLocal, GirdleValleyLocal are widened for the same reason. Later narrowed by presets.
- In the H&A, H&A 5ct+ for Symmetry the same values as for Commercial will be used.
- In all profiles, except Max, Roundness parameters (22_5, 45, 90) were widened to 0,7, 0,8, 0,9 which keeps scanned stones in EX grade, but still meets GIA requirements.
- Roundness 11_25 was added for large diamonds (see "New Parameter - Roundness at 11.25°" section of this documentation".
For purpose "Presets #2 - ModernCut and Commercial should provide the maximum range":
- In ModernCut, a new preset is added - "1M.H&A" (corresponds to "6.H&A", see table above). It replaced the "7.ExtendedLimits".
- In Commercial, 2 new presets are added - "1C.H&A" and "2C.H&A" (correspond to "6.H&A", "7.H&A", see table above). They replaced "5.Standard" and "7.ExtendedLimits".
Results
The table below describes changes and results.
| Profile | ||
|---|---|---|
| 1 | Max | There is no significant difference. |
| 2 | ModernCut | The range of masses provided by the profile is widened (the maximum mass increased due to parameters widening, the minimum mass decreased due to more symmetrical presets). |
| 3 | Commercial | The range of masses provided by the profile is widened (the maximum mass did not change, the minimum mass decreased due to more symmetrical presets). |
| 4 | H&A | The masses provided by the profile slightly decreased. The main input to the mass decrease is provided by the narrowing of Girdle Bezel and Valley parameters. Previously for Girdle Bezel, the boundaries were 2.25-4.75, Girdle Valley 0.75-2.94 (that is equal to Max profile). Now Girdle Bezel is 2.9-4.2, Girdle Valley is 1.35-2.4. These changes are considered reasonable as the profile is not going to be used to produce solutions too close to GIA boundaries. |
| 5 | H&A 5ct+ | The same as for H&A. |
Additional Minor Changes
Additionally, the order of profiles within the appraiser changed:
|
|

The new order is in accordance with the frequency of use in enterprises.
Work on the panel improvement is in progress.
Brilliant Cut - Viewing Allocation Forms
Viewing of the cut's allocation forms previously available only for in-house cuts (see the Show allocation forms in solution list command description in In-house cut registration), now is also available for the default Brilliant cut.
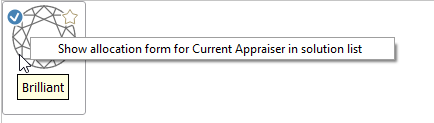
- Right-click the Brilliant cut and then select Show allocation form for Current Appraiser in solution list. Allocation forms will be displayed in the solution list.
Note that for the Brilliant cut this command considers the current appraiser - before using the command, the appropriate appraiser should be selected. The reason is that several appraisers may be able to work with default cuts - each with its own set of allocation forms. Therefore the allocation forms for the default cuts (including Brilliant) are stored within the appraisers. If you do not select the correct appraiser (the one containing the allocation forms for this cut, the command will be unavailable:
|
| Command unavailable - "greyed out" and not clickable |

The displayed forms are copies. If you make some changes to them, this will not affect the initial copies actually assigned to the cut.
Still, via the context menu you are able to:
- Add as allocation form to another cut...
- Register as new cut...
It is impossible to remove allocation forms from the Brilliant cut.
New Algorithm - MEC for Round Bruting
This functionality is designed to work with the Brilliant cut.
A diamond bruting machine used in a round Brilliant cutting process is only able to produce a vertical girdle of a round shape. For calculation of the correct position of a stone in a bruting machine and a bruting radius, HP Carbon needs to find a cylinder circumscribed around a selected solution. This is now can be done by a new algorithm - "20. MEC for round bruting".
To use the algorithm, first allocate your solutions via Recut > Smart Recut, then:
- Select the solution.
- Set Algorithm to "20. MEC for round bruting".
- Run allocation. As allocation is finished, in the solution list, the new model representing a bruting radius is displayed.
- In the solution list, select this solution.
- From the main menu, select File > Export > MME for EOS bruting... Set name and location for your MME model file.
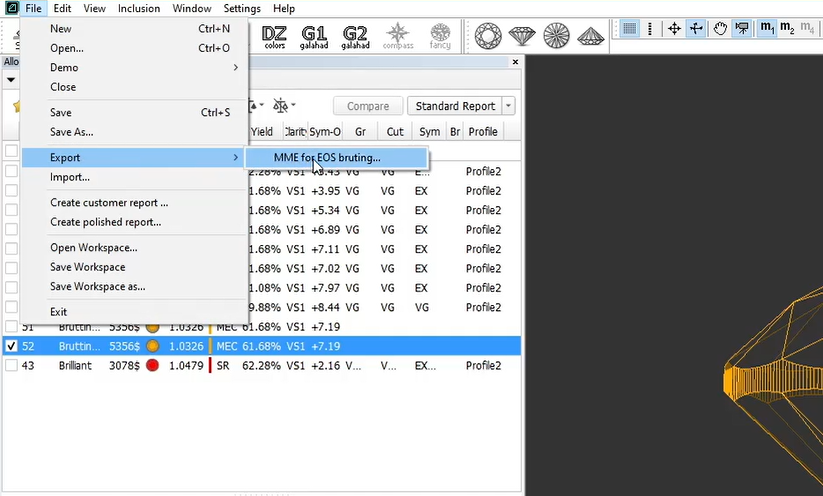
- In your bruting software, use the created MME model.
User interface - changes in element names and behavior
General name changes
To better match modern brilliant processing, some elements of the user interface were renamed:
| Old Term | New Term | Old Name in User Interface | New Name in User Interface |
|---|---|---|---|
| Cutting | Cut | All elements containing "Cutting" | Now contain "Cut" |
| Cutting list | Cutbook | ||
| Scan mode > Cutting & Method | Scan mode > Cut & Method | ||
| Client cutting, user cutting | In-house cut | Cutting list = "Client Cuttings" | Cutbook = "In-house Cuts" |
| Facet marking | Facet types | Right panel > Facet Marking | Right panel > Facet Types |
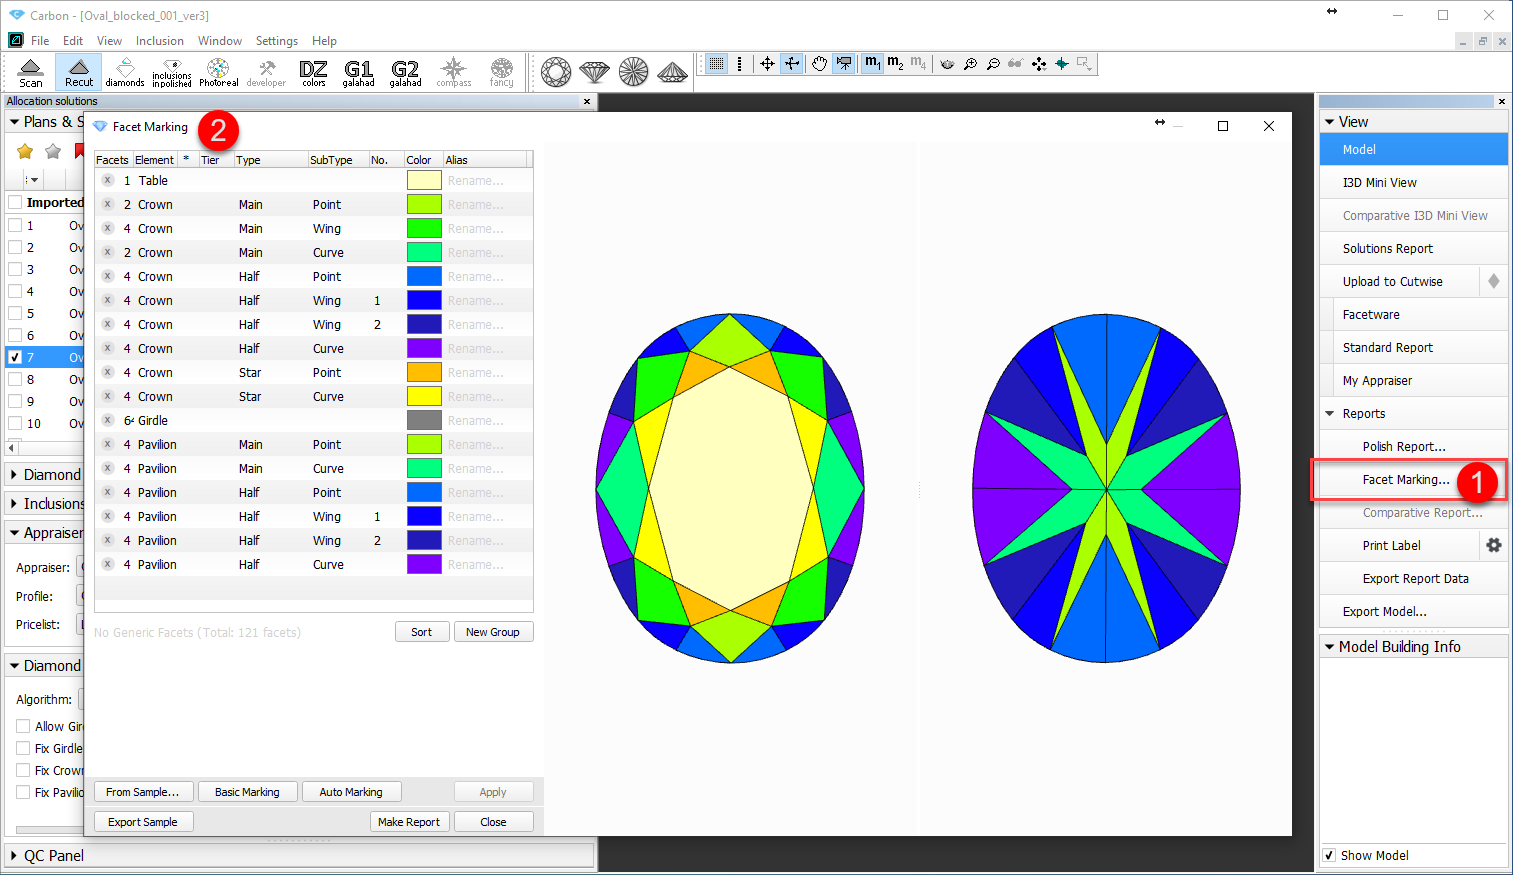
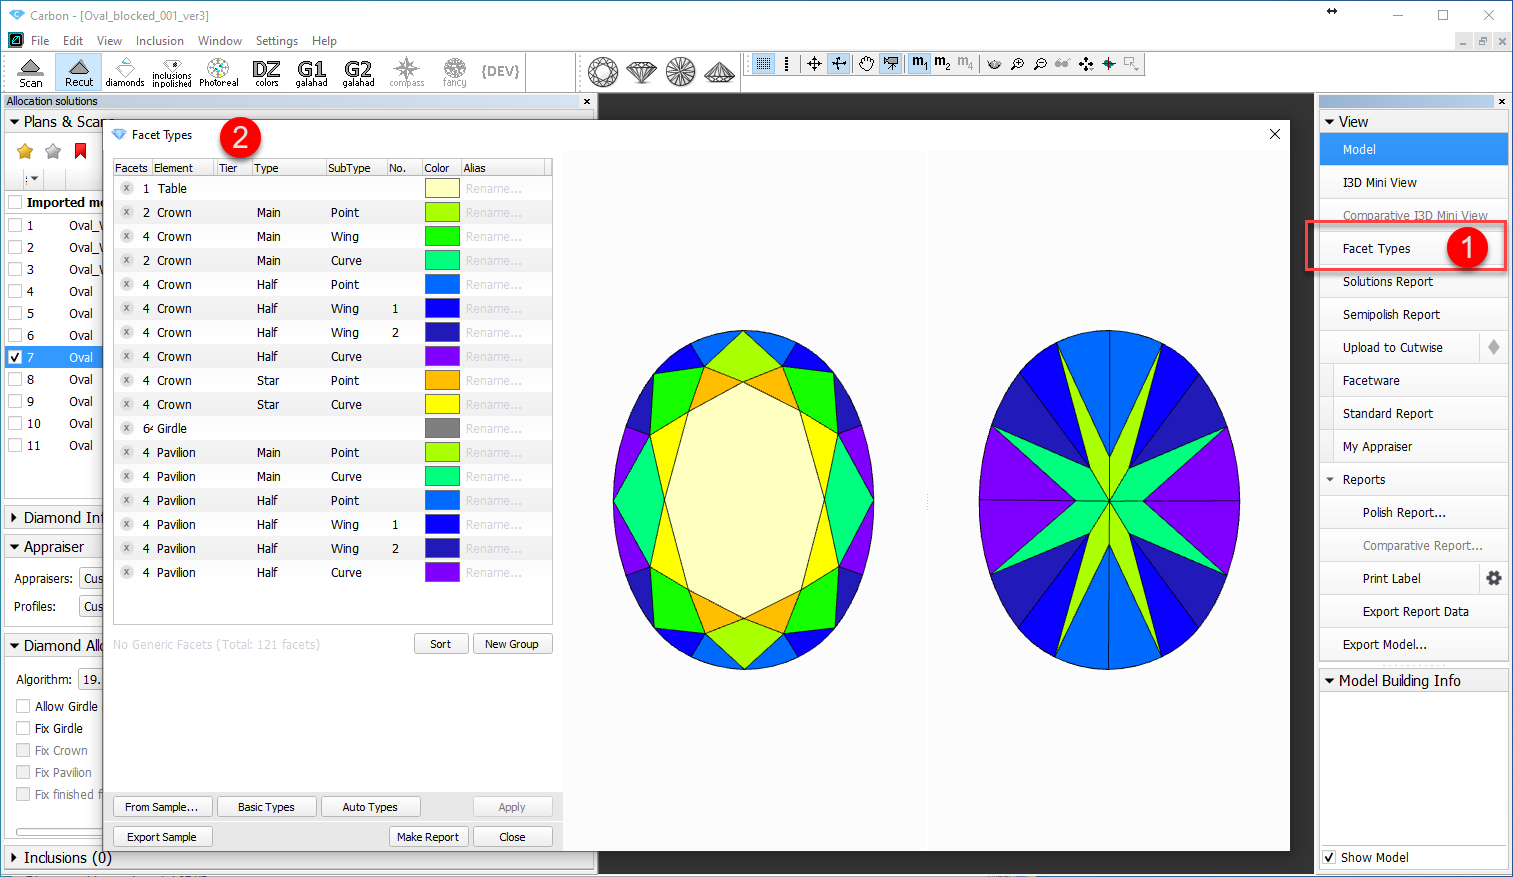
Facet Marking Rename to Facet Types
For more compliance with the system usage practices, the Facet Marking feature is renamed to Facet Types.
| Was | Now |
|---|---|
|
|
Allocation Solution Panel - Behavior and Order of Sections
For the Recut mode, the order of sections on the left panel was changed:
| Was | Now |
|---|---|
|
|
What was changed:
| |
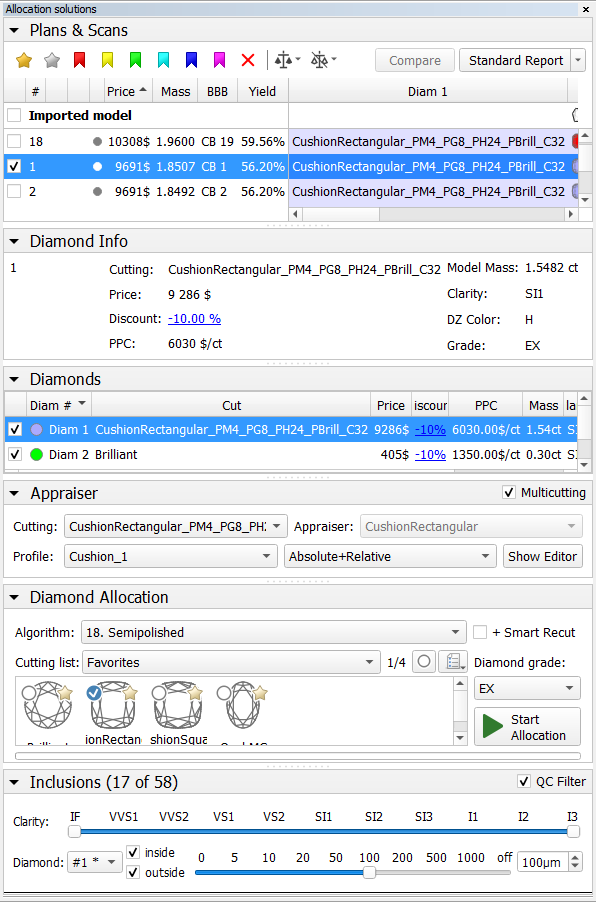
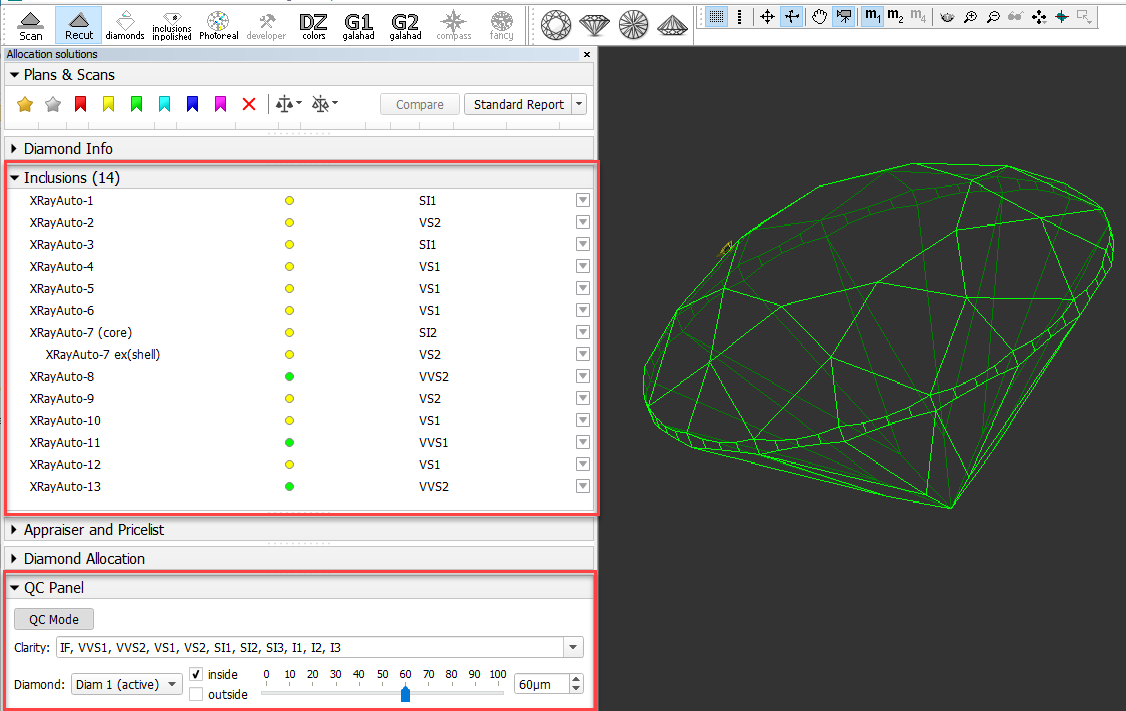
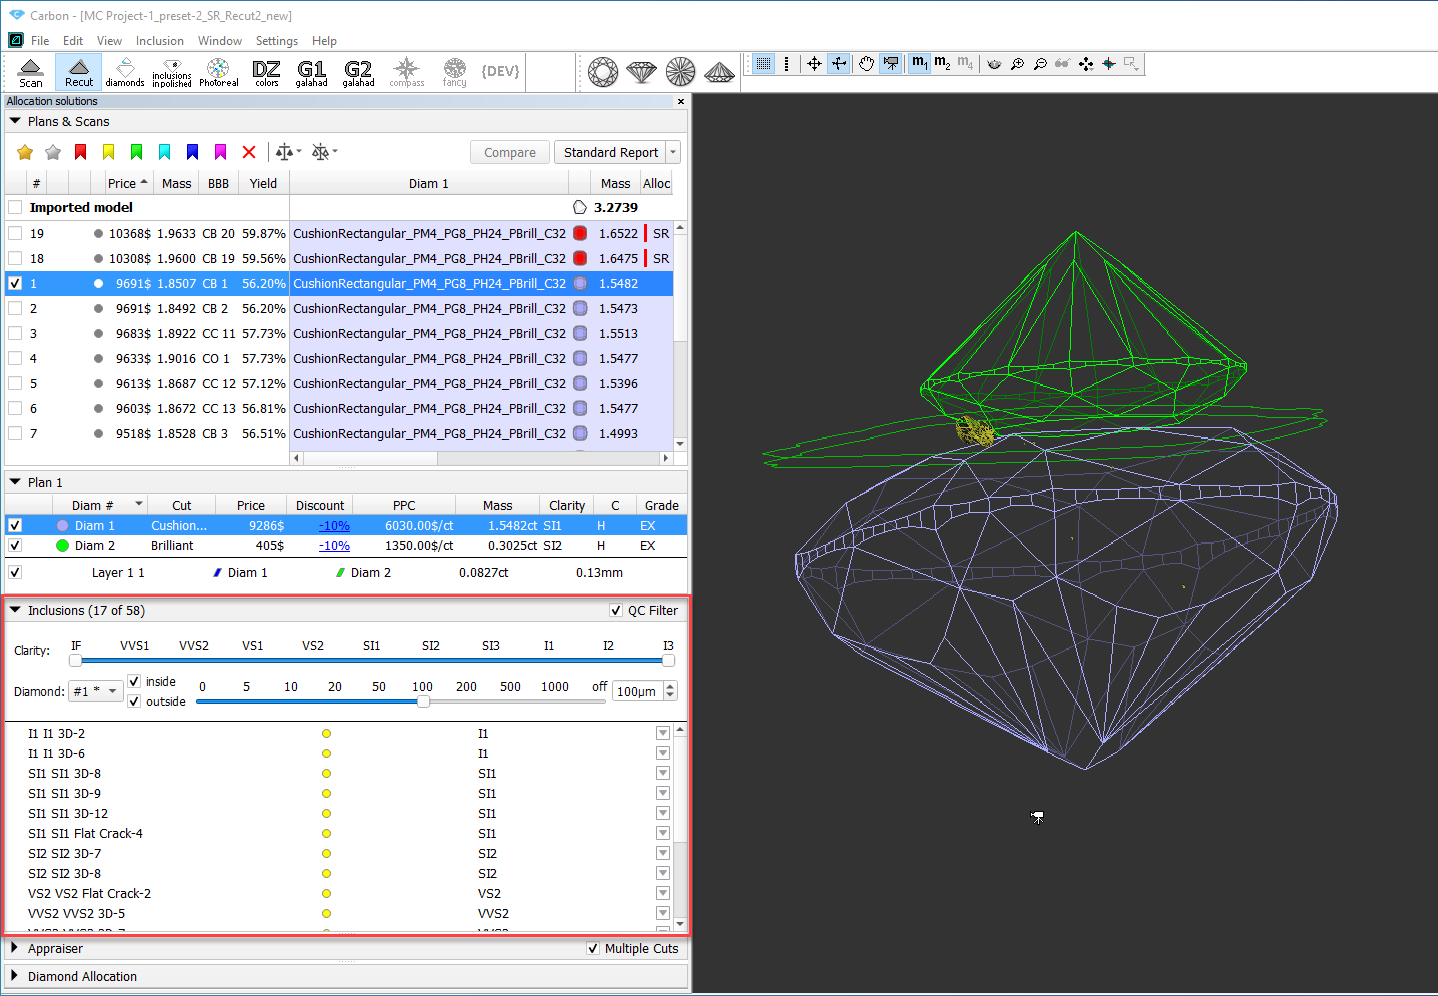
Inclusions Panel with QC Filter
The Inclusions panel lists diamond inclusions and allows users to manage them. Previously, the system also included a separate QC Panel used for inclusions filtering. To provide a more comfortable way of working with inclusions, these two panels are combined - the QC filter is included in the Inclusions panel and, if activated, affects the list of displayed inclusions.
| Was | Now |
|---|---|
|
|
| Applying filter in the QC Panel affected what was displayed in the Scene, but did not affect the Inclusions panel. | Panels are combined. When activating the QC filter, the inclusions are filtered both in the Scene and in the Inclusions panel itself which makes it easier to locate and select the required inclusions. |
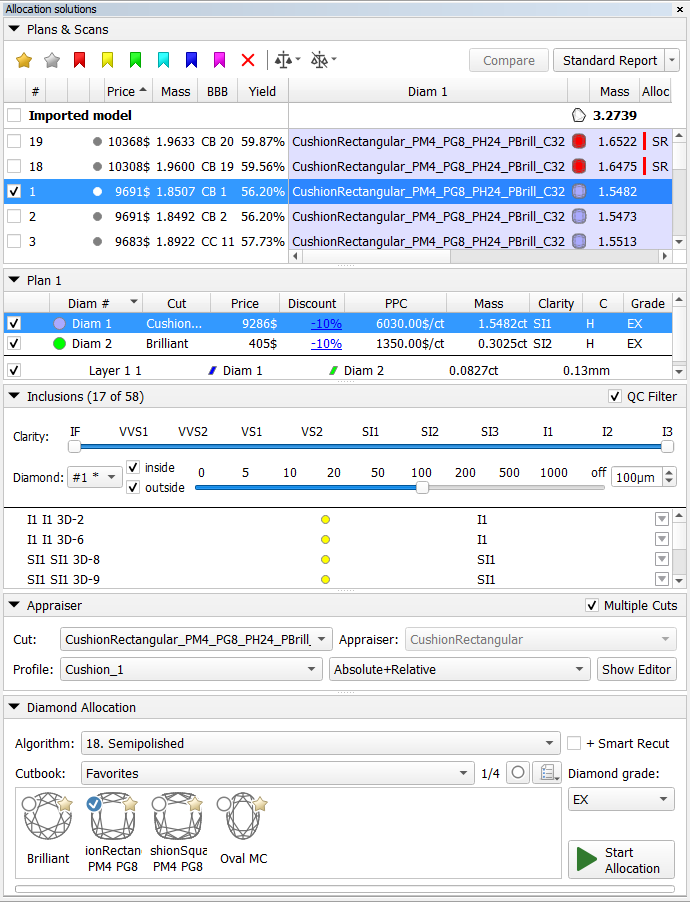
Diamond Info Panel Unification
To avoid duplication of information, the Diamond Info panel information was merged into the Diamonds panel:
Now all the detailed information about the selected scan/solution you can find in a unified detailed information section. The section name dynamically changes to Scan Name/Solution Nuber (like "Imported Model", "Plan 1", "Plan 2"):
| Single-diamond Solution | Multi-diamond Solution |
|---|---|
|
|
Applying Facet Types from Sample - Improved
The apply facet types from sample functionality introduced in the previous release have been improved. The major changes are:
- Facet Marking is renamed to Facet Types
- Grades are added to the solution list
- Grades are added to reports
The overview of how to work with the updated facet types apply from sample functionality is presented in the video below:
| Video | Facet Types - Applying from Sample | ||||
| Published: | 2021, April 16 | Last Updated: | 2021, March 29 | v.2.1 |
Video summary:
| ||||
Video keywords: cut grade, facet types, sample | ||||
| Published in: | Release Notes | |||
| Documentation | NA | |||
| Playlists | NA | |||
| Also | As Separate Page | Specification | |||
Angle between Neighboring Facets
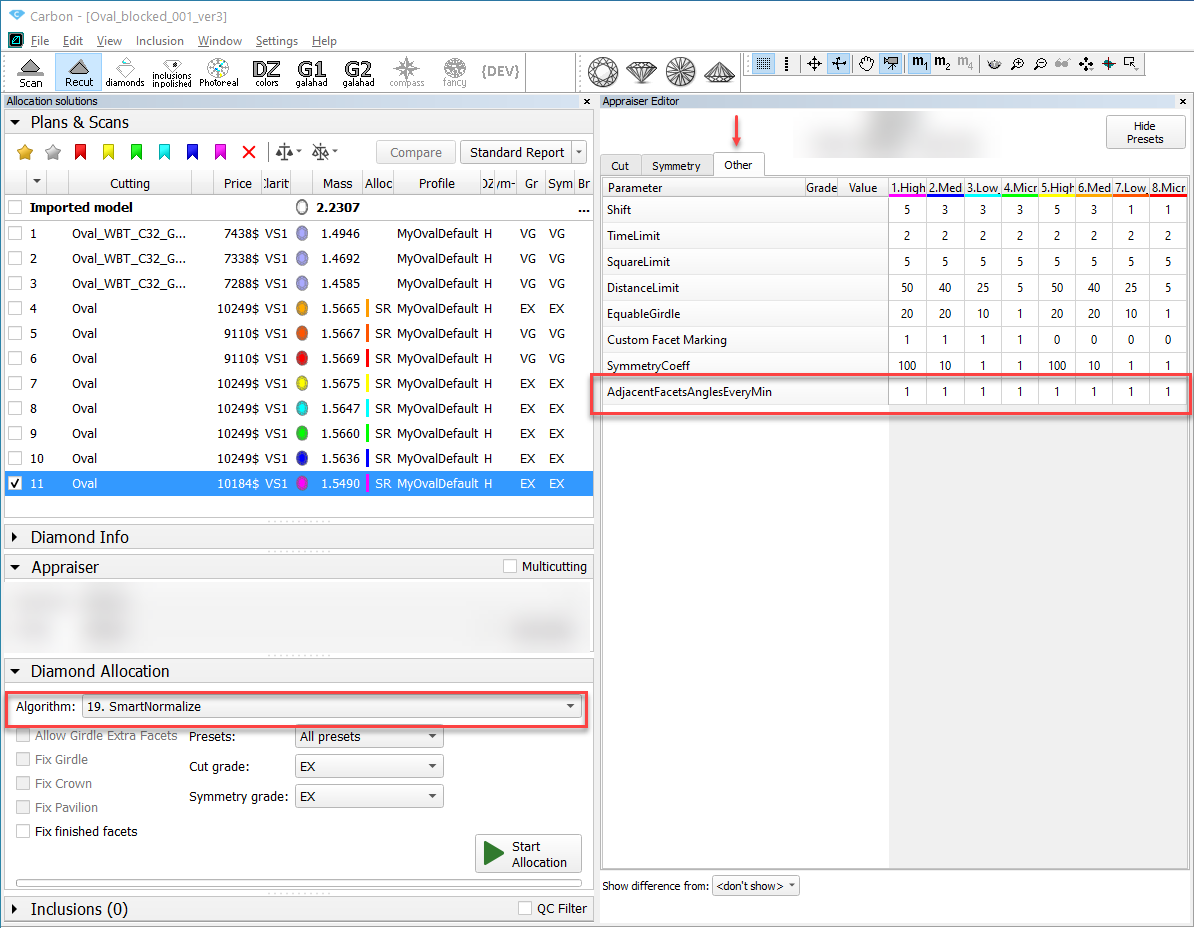
Some changes were made for the AdjacentFacetsAnglesEveryMin parameter, allowing Smart Recut to set limitations for the angles between neighboring facets.
Adjusted Default Values
To provide better results by default, the initial values for the AdjacentFacetsAnglesEveryMin parameter were adjusted for the "MyAnyCut" appraiser.
| |
| Was |
|
| Now |
|


Adding to MyOval Appraiser
The AdjacentFacetsAnglesEveryMin parameter previously was available only within the "MyAnyCut" appraiser - now it is also available in the presets of "MyOval" and "MyOvalPerformanceWare" appraisers.

Adding to SmartNormalize
The AdjacentFacetsAnglesEveryMin parameter is also added to the presets of the "19. SmartNormalize" and "19. SmartNormalizeLite" algorithms.
Polish Report Templates
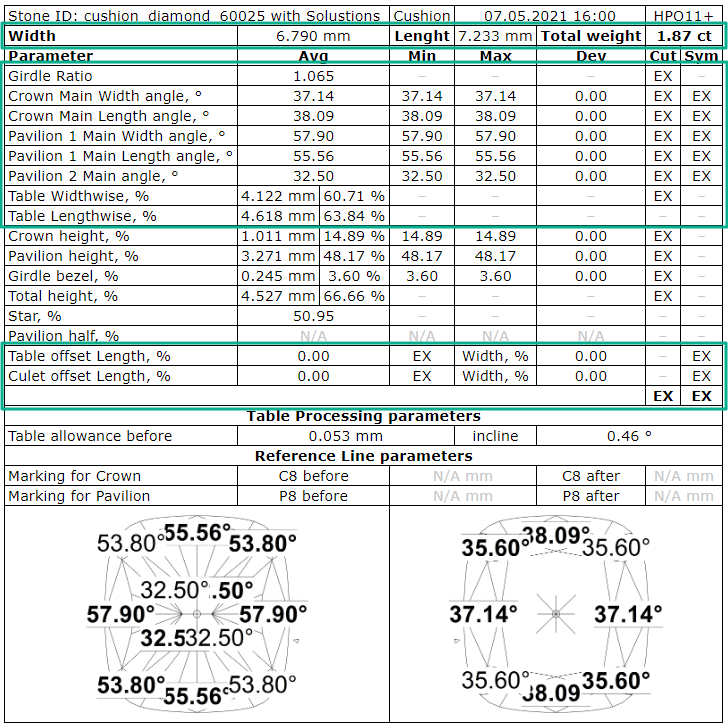
Cushion Reports - Tier Information
For the Cushion reports, the "Tier" information is added:
| Was | Now |
|---|---|
|
|
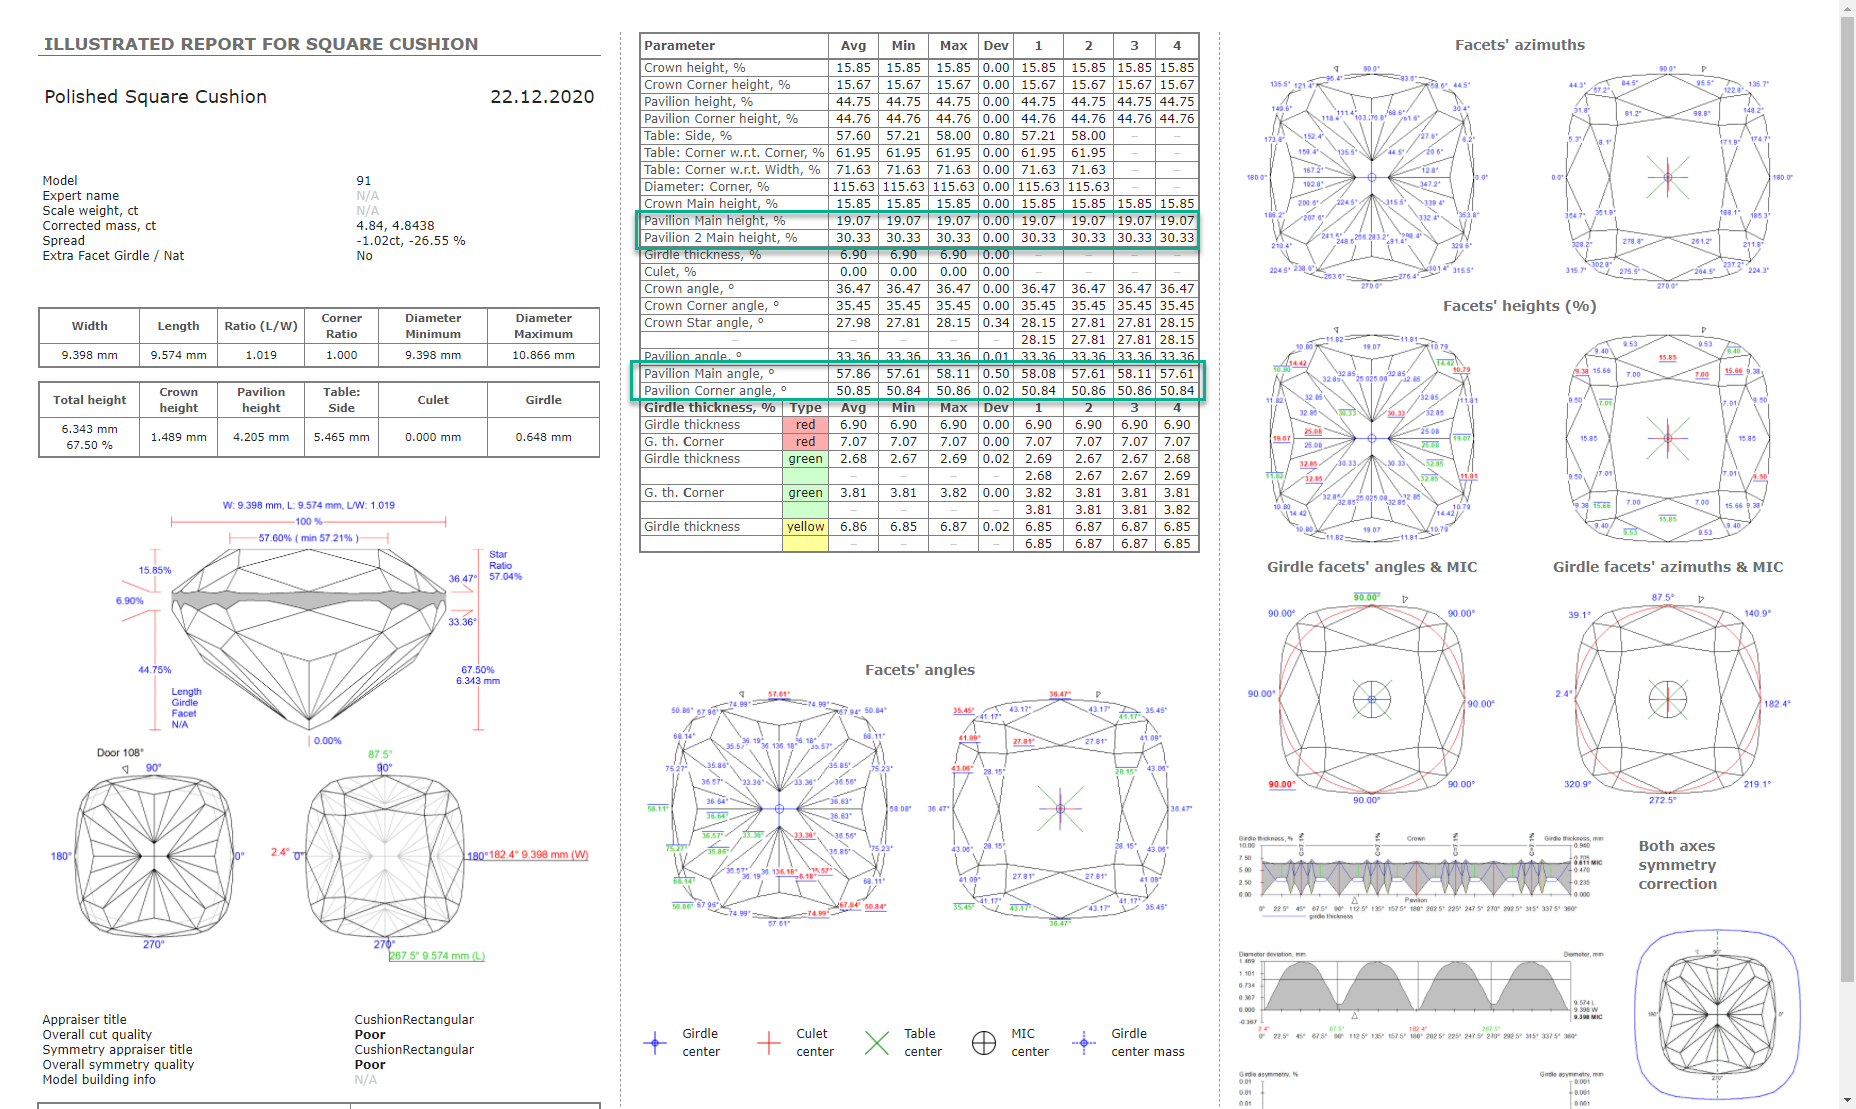
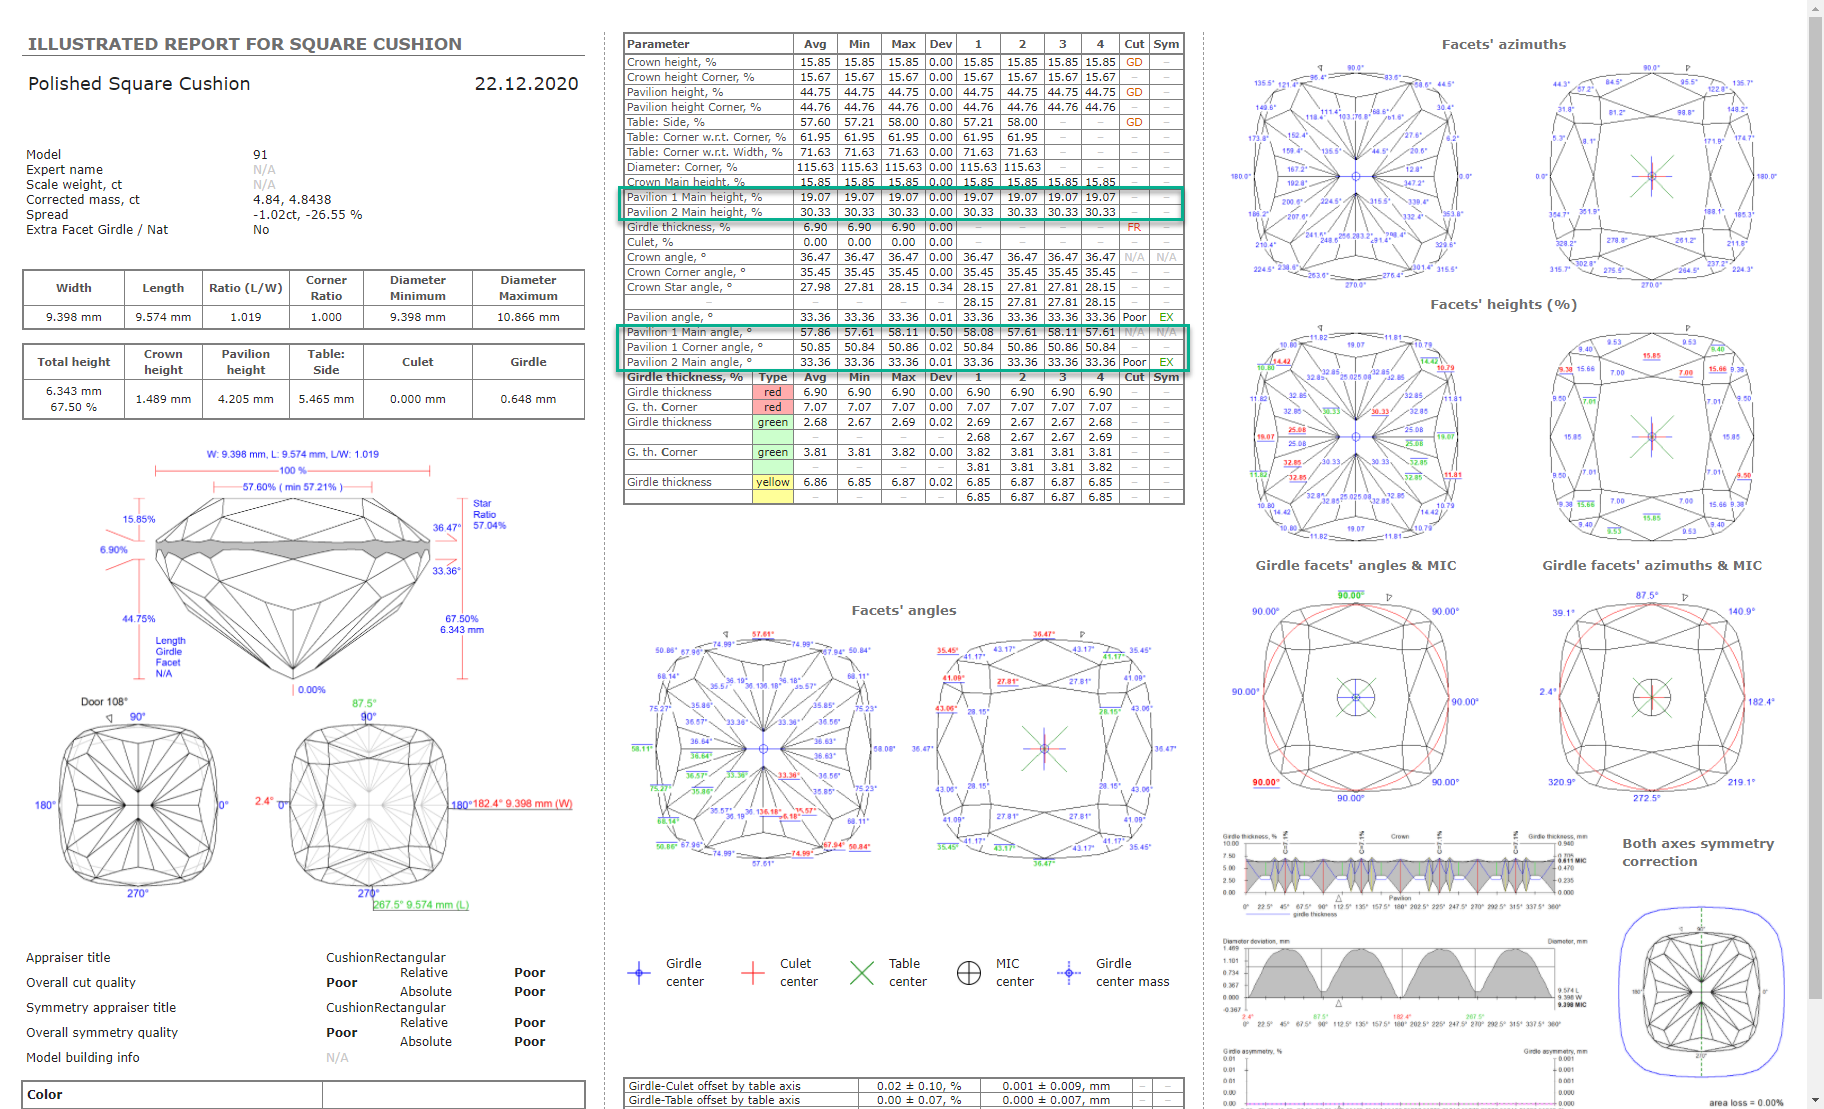
The Polish Illustrated HTML, RTF, and Standard Report templates for Cushion and Square Cushion are affected.
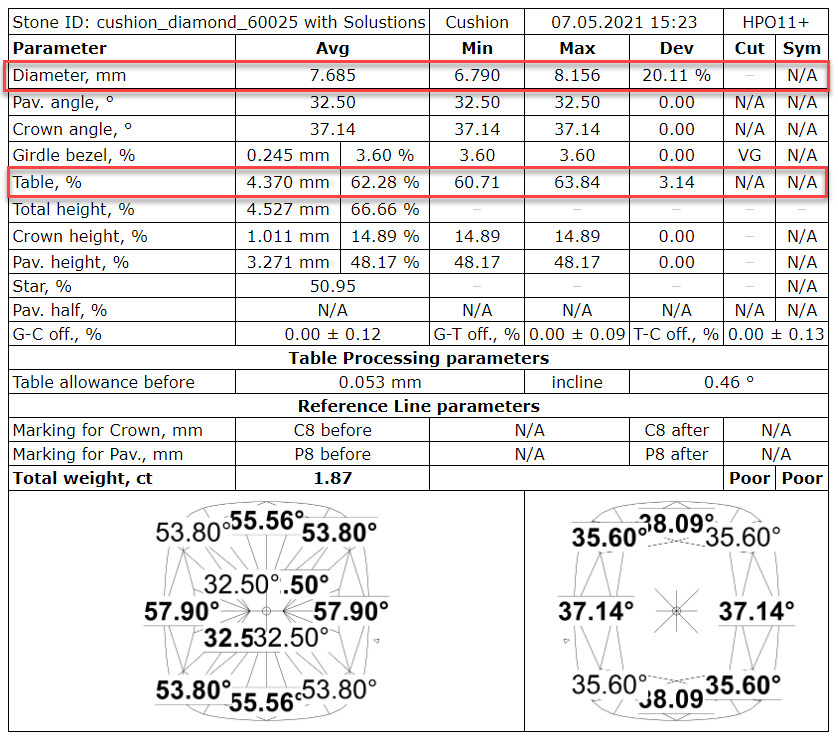
Cushion Reports - Grade Information
For the Cushion reports, the grades information is added:
| Was | Now |
|---|---|
|
|
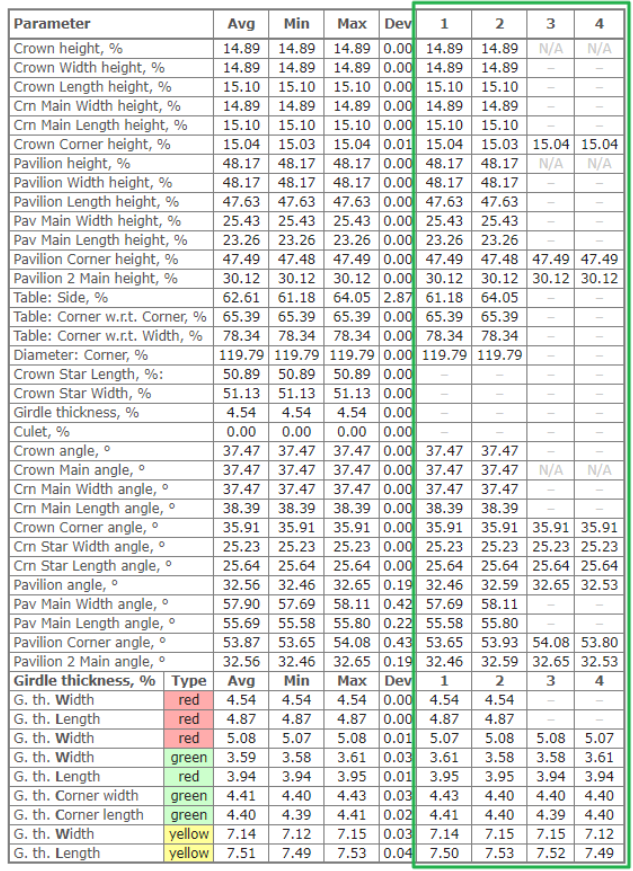
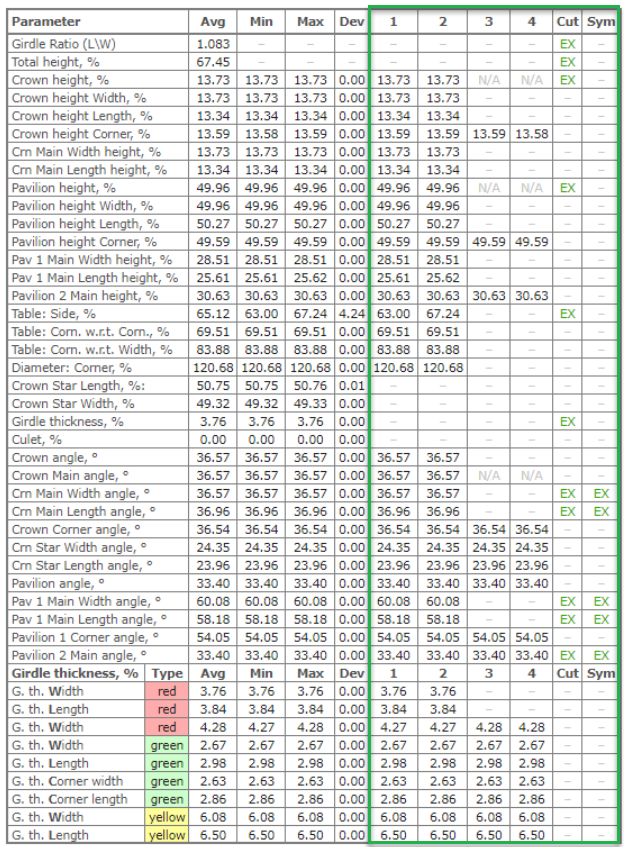
The Polish Illustrated HTML and Standard Report for Cushion and Square Cushion are affected.
Appraiser for Trapezoid-Like Objects
You can now quickly estimate the trapezoid-like objects of the "Industrial24" standard. To do this, use the new "Industrial24" appraiser.
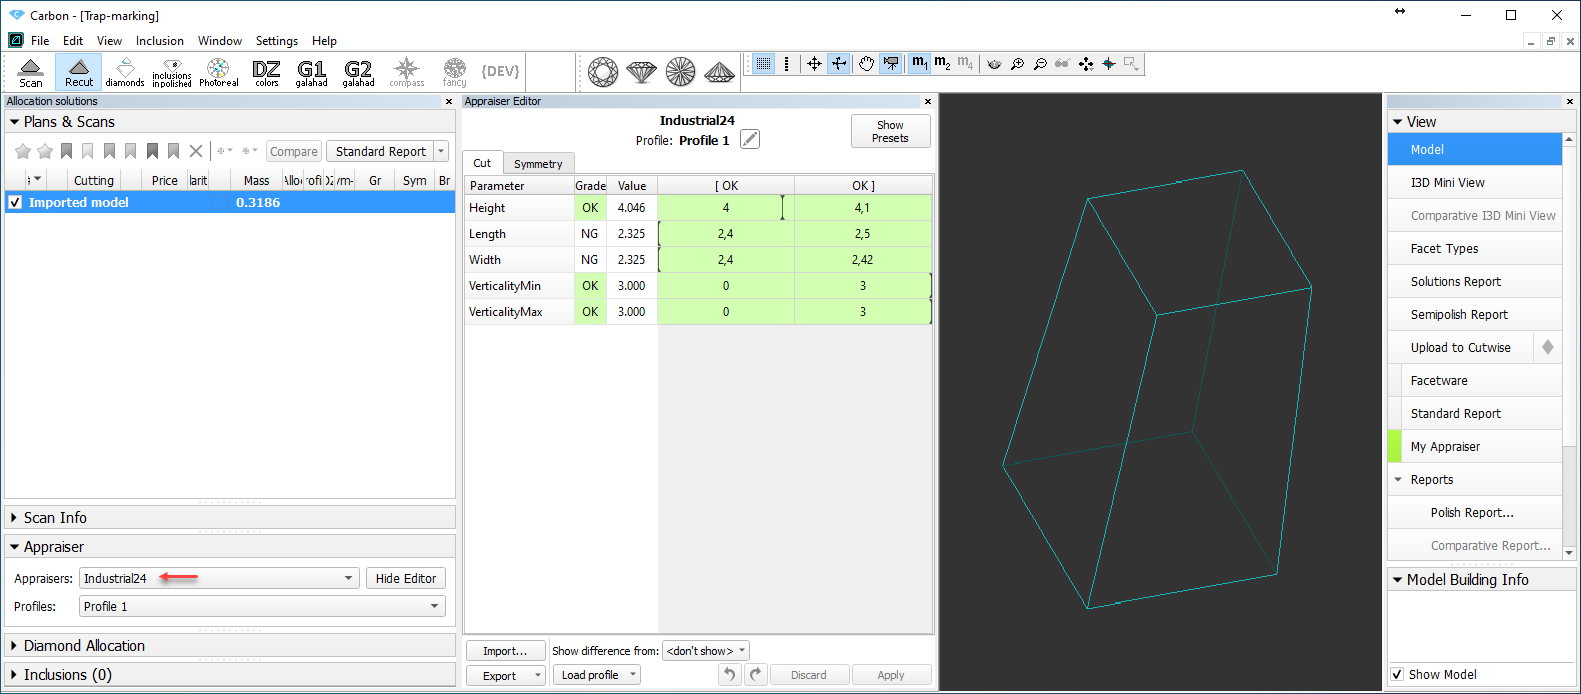
The "Industrial24" standard is aimed to produce:
- Width-Length of bigger facet close to 2.4 mm
- Height close to 4 mm
- Max and Min incline angles no more than 3°
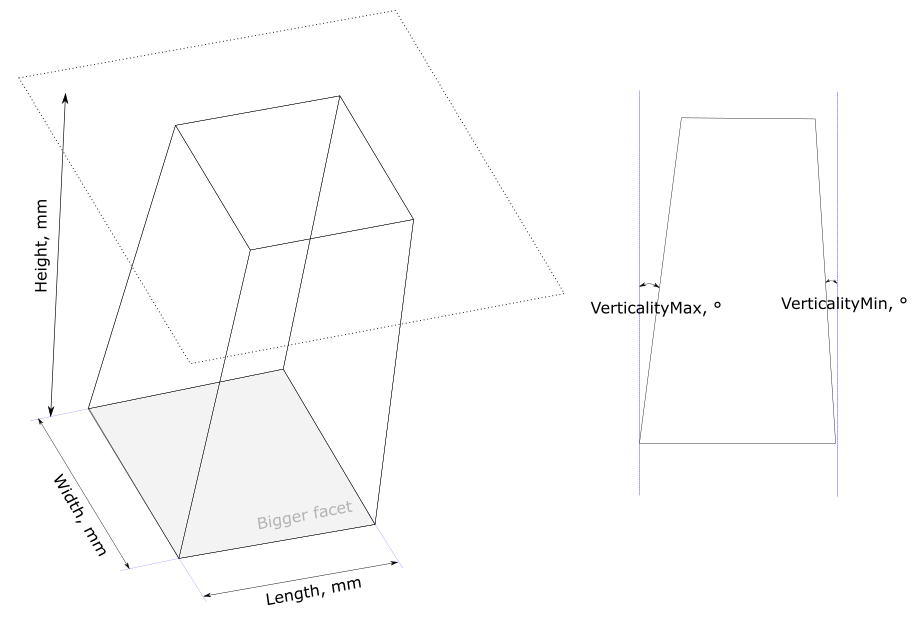
Currently, the following grades are available for important parameters:
- OK - parameter is within boundaries
- NG ("NEGATIVE") - outside the boundaries
Smart Recut - Running for Both Diamonds in Multi-Diamond Solutions
Previously, when using the 13. Cascade-2M algorithm with the + Smart Recut option, you obtained a smart recut solution only for the larger of two diamonds - the smaller diamond was a recut solution. Now you automatically obtain the smart recut solutions for both diamonds.
|
| Was - Now |
|---|
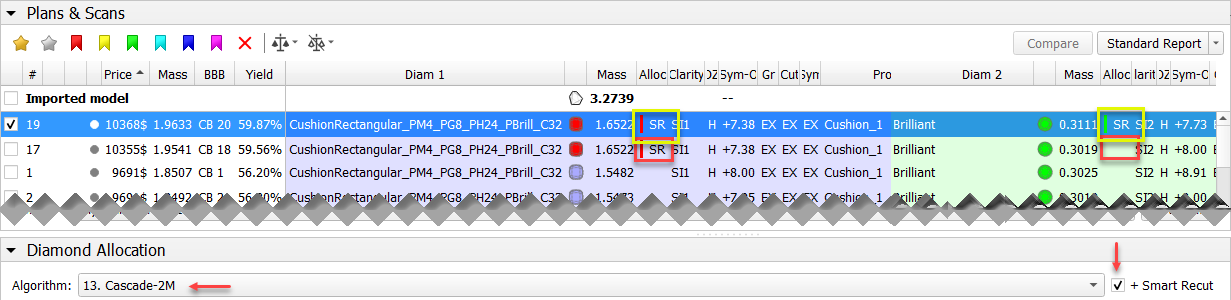
Smart Recut will be launched only for two best (by price) Recut solutions and only for "gold star" SR presets. Thus, there will be 2 solutions with SR. For details about gold stars, refer to the "Gold Stars" Configuring section of this release notes.
New Parameter - Roundness at 11.25°
On large diamonds, the difference in radius is especially noticeable within a small segment. To put this difference under the additional control, the new Roundness parameter is added - now it is additionally estimated at any selected 11.25° sector (previously the smallest segment was 15°).
Note
Unlike the other Roundness parameters measured in %(diameter), this parameter is measured in millimeters (mm).
| Appraiser | GIA Facetware + MyRound |
|---|---|
| Tab | Symmetry |
| Parameter Name | 2RRoundnessMM11_25 |
| Units | mm |
Automatic Actions - Post-Scan STL Export
Now you can configure the system so that after the stone scan the obtained model will be automatically exported to STL format:
- Select Settings > General Settings.
- In the Automatic Actions section, click the Post-Scan Export tab.
- Enable STL text, STL binary, or both, and set save locations for them.
- Click OK.

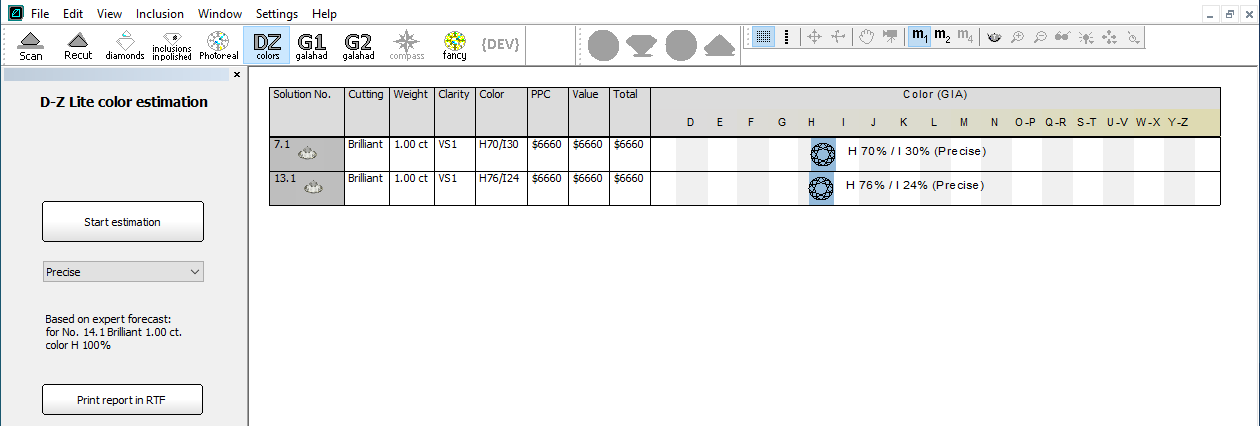
DZ Color Estimate
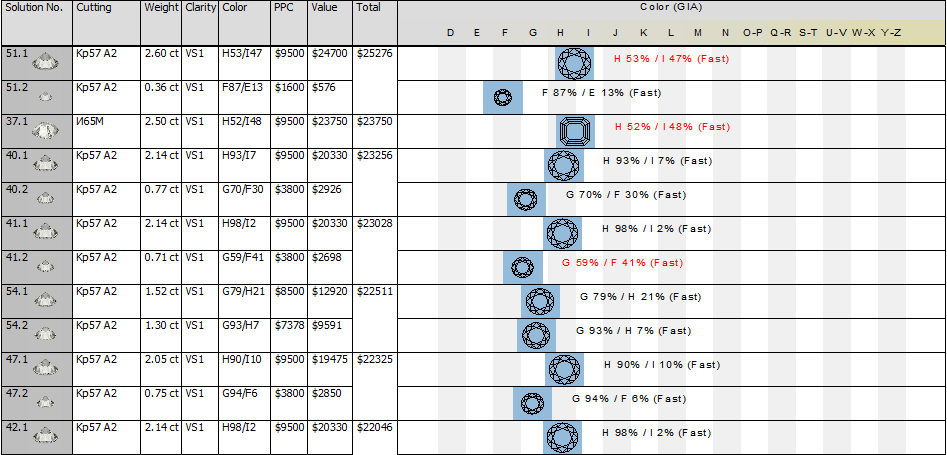
Solution Sorting
Previously, after running the DZ Color Estimate feature, in the estimation result window, the solutions were sorted in the same way as they were sorted in the solution list before running estimation. Because of that, this could be difficult to find solutions with the best prices: even if before color estimation your solutions were sorted by price, these prices changed after estimation, and keeping the previous ordering did not reflect this change.
Now after the color estimation, in the estimation result window, the solutions are re-sorted to put the best prices at the top of the list.
| Before Estimation | After Estimation, WAS | After Estimation, NOW |
|---|---|---|
|
|
|
| Sorted by price. | The prices have changed, but this is not reflected. | The prices have changed, and this is reflected - solutions are sorted by the new price. |
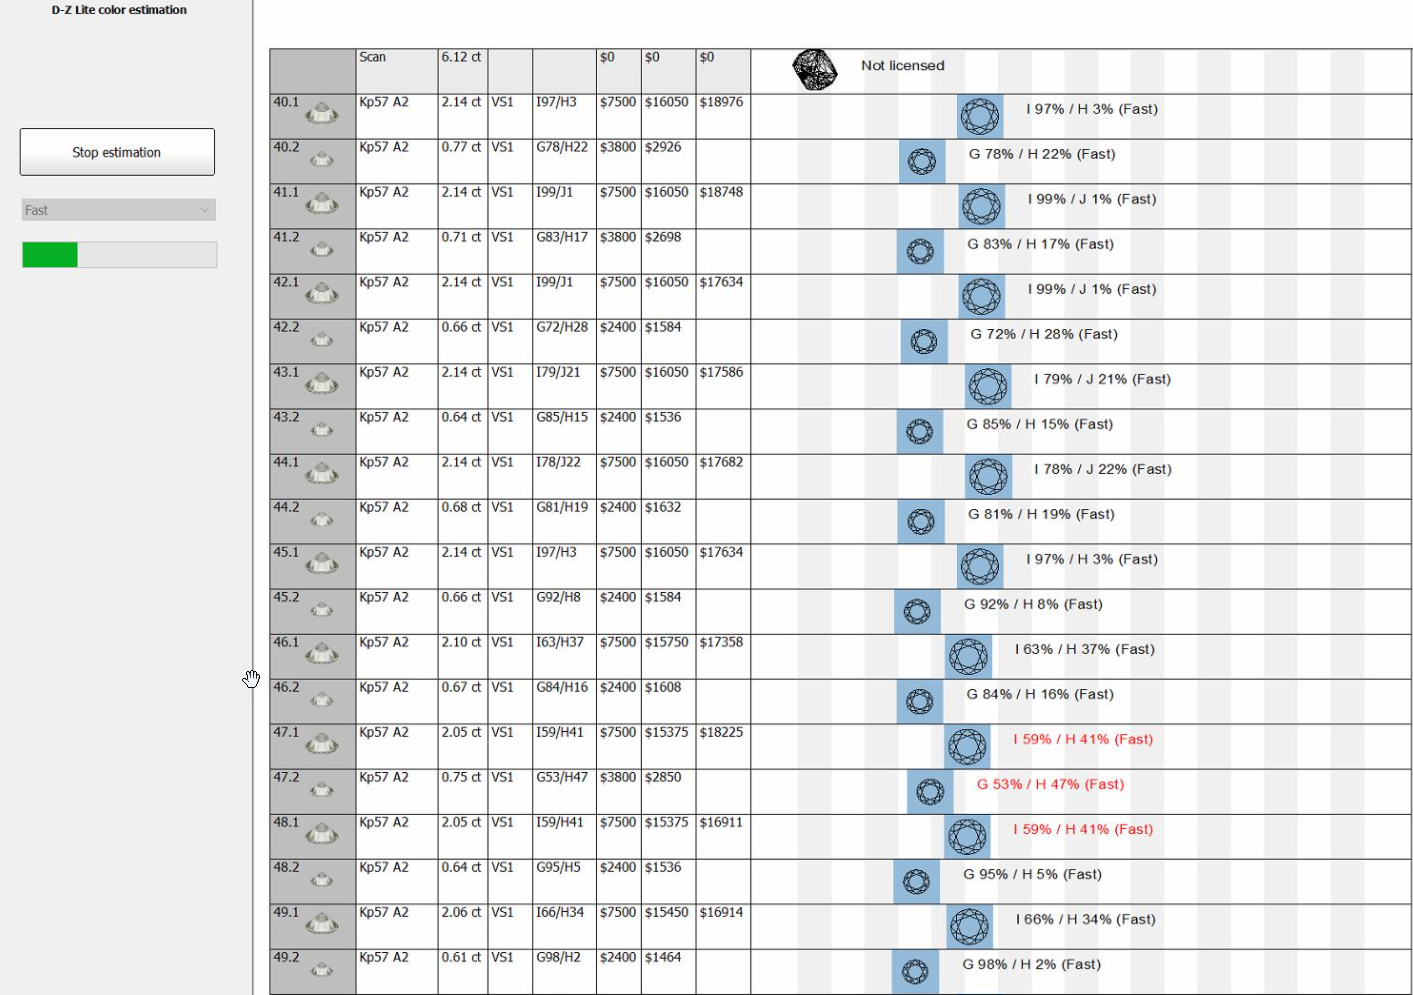
Running Estimation Only for Selected Solutions
Now you are able to obtain the DZ color estimation only for the selected solutions.
To do that:
- In the solution list, select the checkboxes to the right of the solutions you want to get an estimation for.
- On the toolbar of the Plans & Scans section, click the
 Add solution(s) to Solutions Report button. The solutions are marked with .
 - In the solution list, right-click the solutions you want to start estimation from and then select Estimate color grade for ...
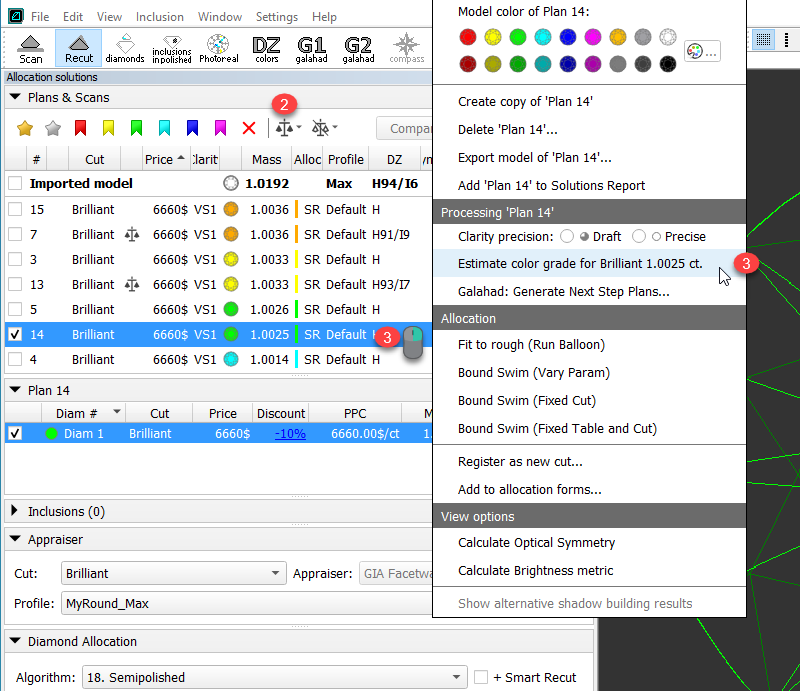
The estimate dialog is displayed. - In the estimate dialog, set color estimation for your starting solution and the Estimation Mode.
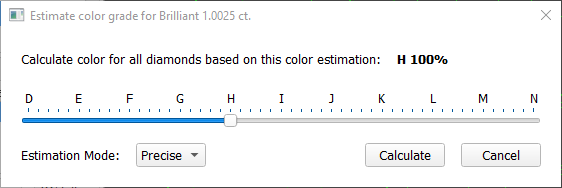
- Click Calculate. The system switches to the DZ colors mode and displays the progress. As soon as the calculation for the selected solutions is finished, their results are displayed in the table.
Grades for Scans
In many cases, it is important to quickly estimate scans. To provide this possibility, the grades information is presented in:
- Solution list (was before)
- The Appraiser editor
- Reports (Standard and Polish)
Report Actualization
To be in correspondence with the modern diamond processing, some reports were updated.
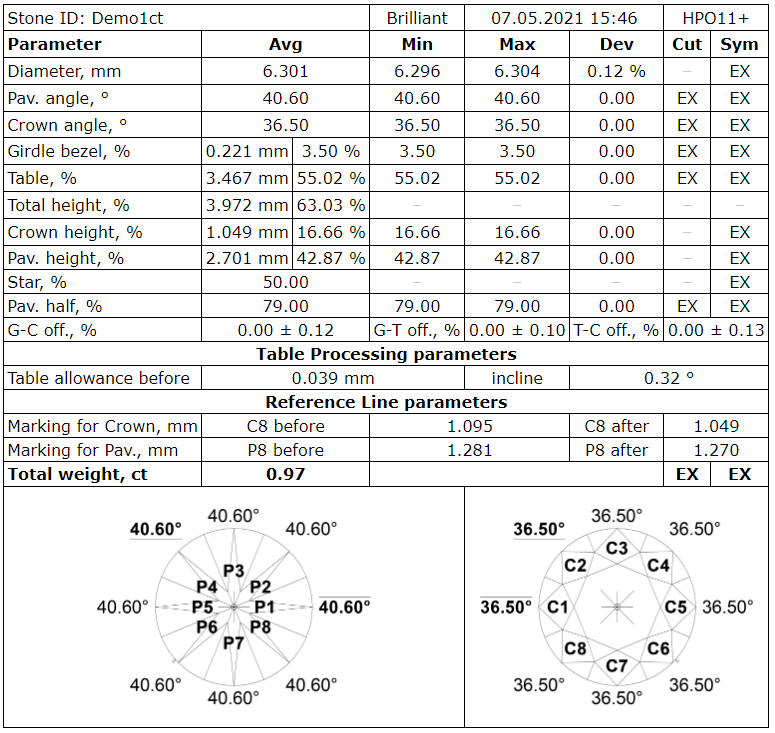
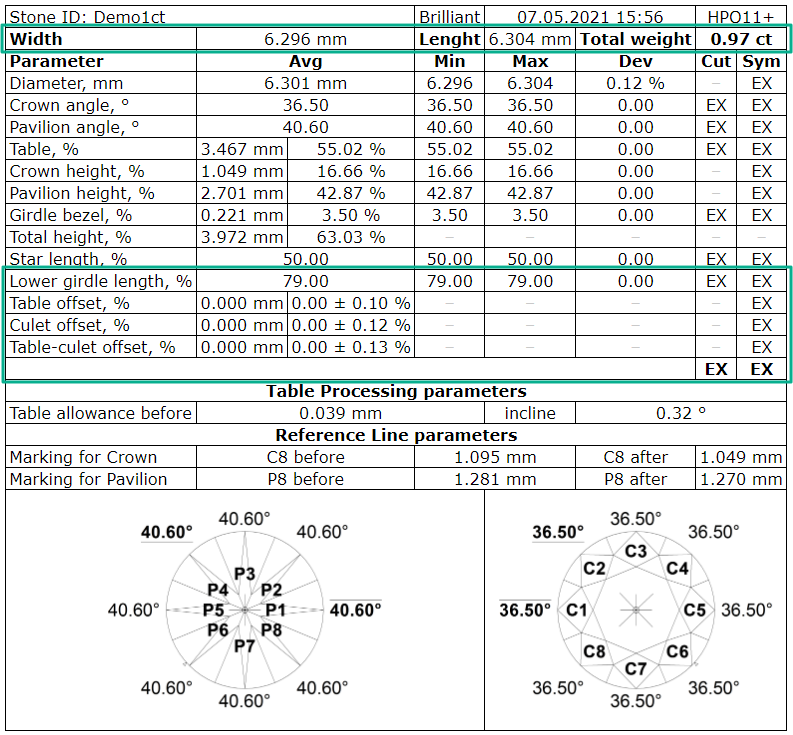
Label Report
In Label Report, for a more informative representation of cuts (parameters and grades), the templates were changed. Some parameters were added, some were removed. Below are examples of Cushion, Brilliant and AnyCut Label Reports:
| Was | Now | |
|---|---|---|
| Brilliant |
|
|
| Cushion |
|
|
| AnyCut |
|
|
| Removed, Added | ||
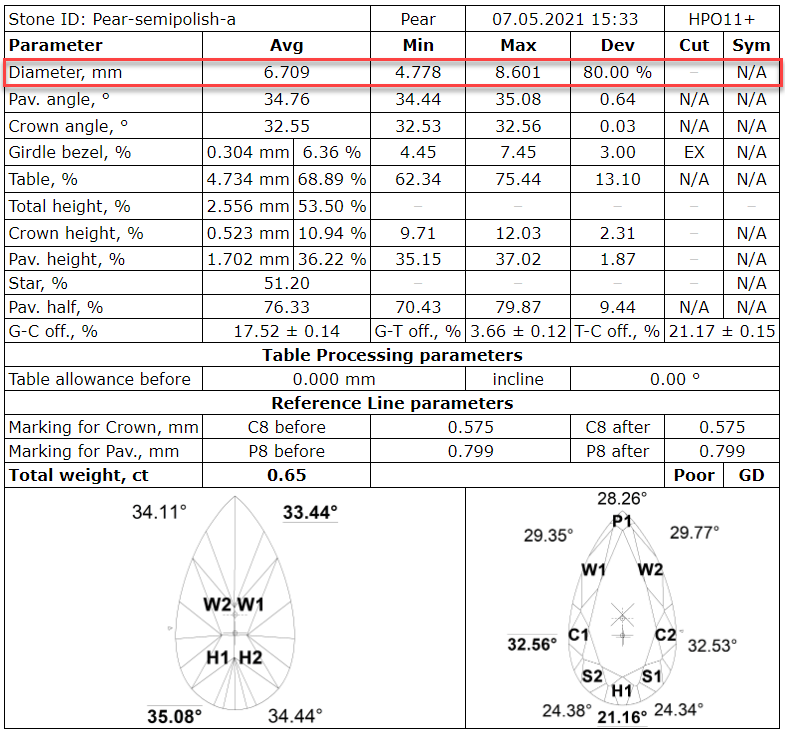
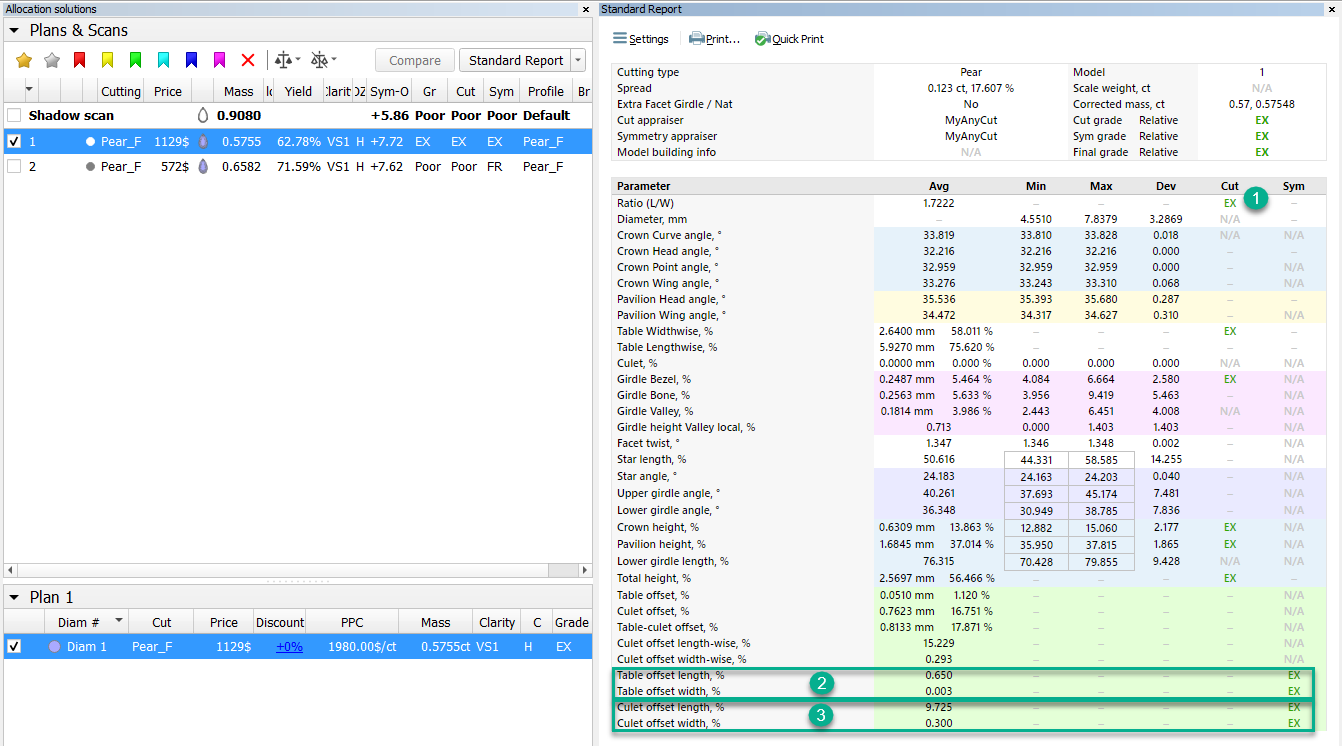
Standard Report for Rounded Fancies
The Standard Report was updated for rounded fancies:
- Ratio (L/W) - Cut grade is added.
- Table offset length, Table offset width parameters, and their Sym grades are added.
- Culet offset length, Culet offset width parameters, and their Sym grades are added.
Facet Types - Octonus Cuts Library
Currently, the system includes over 50 cuts you can use as samples to get facet types from. Now the  OctoNus Cuts Library button is added to quickly access them:
- Click Facet Types. The Facet Types dialog is displayed.
- In the Facet Types dialog, click From Sample...
- In this was not done before, click OctoNus Cuts Library
Samples from the library folder are added to the list.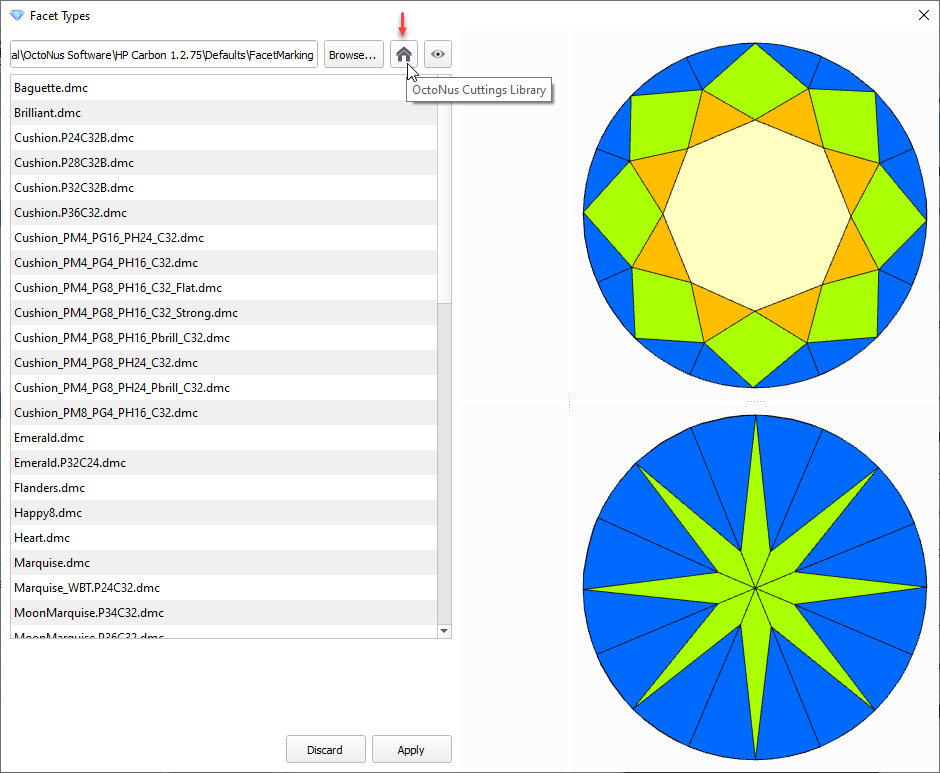
- If you want to access the library folder, click Browse.
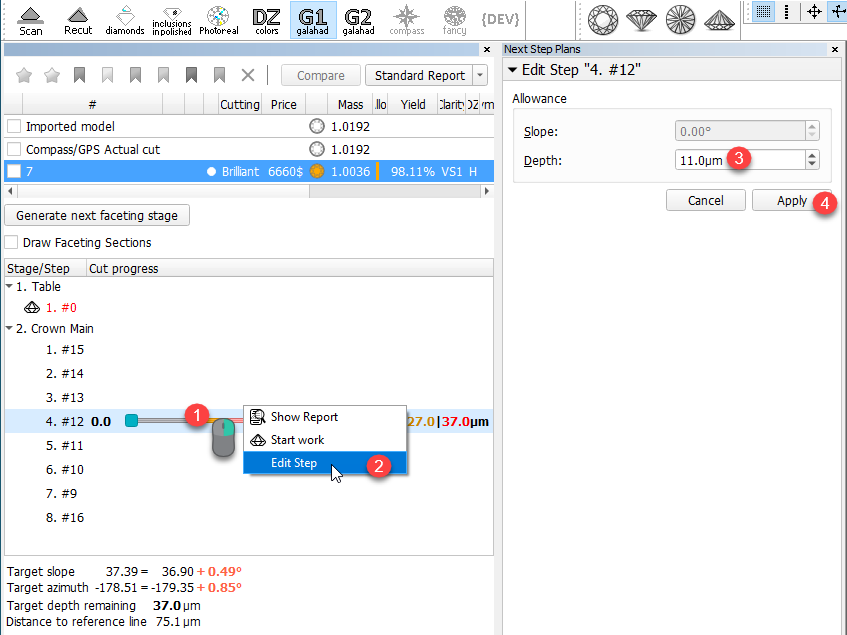
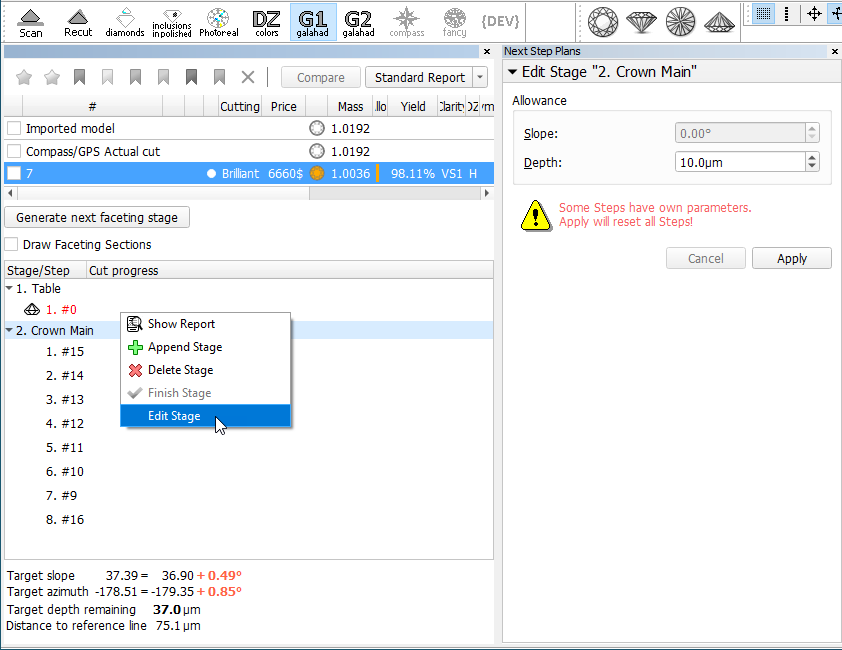
G1 Galahad - Allowance Editing
For the G1 Galahad mode, it is now possible to edit the Allowance defined during stage generation. The Allowance can be edited both for stages and for separate steps.
To edit allowance for a step:
- Right-click the step.
- From the context menu select Edit Step. The edit panel is displayed.
- In the edit panel, set the new Depth.
- Click Apply. The new allowance depth is set for the step.
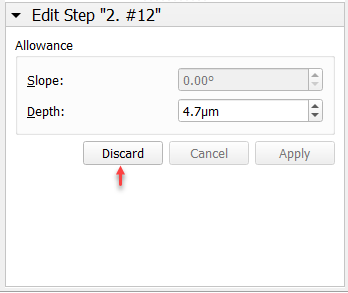
If you have a modified allowance for the step, you can Discard this difference and revert this step to the stage standard value.
Allowance can also be edited for the stage. Note that if some steps of the stage have their own changed allowance, applying a new value for the stage will reset all steps, the corresponding warning is displayed:
Ximea Firmware Automatic Update
Ximea MC023MG-SY-UB cameras firmware update is now included in the HP Carbon installation procedure - on the system installation, the firmware will be updated automatically.
After the firmware update, the camera will not work with the old software - to work with this old software, the camera firmware downgrade will be required. Refer to your HP Carbon distributor for help with this downgrade.
Fixed Problems and Improvements
The following fixes for the known problems and improvements are implemented:
- The periodic low scanning speed caused by the sync cable detection problem is fixed.
- Facet types transfer to Smart Normalize solutions was broken - now it is fixed.
- For Smart Recut, the Fix Girdle option is improved to work with non-convex models.
- For Scan mode, in the Cut & Method section, now the last used cut stays selected after the system restart (previously "Brilliant" was always selected after restart).
- Previously, in Polish Report, the cut type was based only on parameter values - now it additionally takes into account the Facet Types specified for the model.
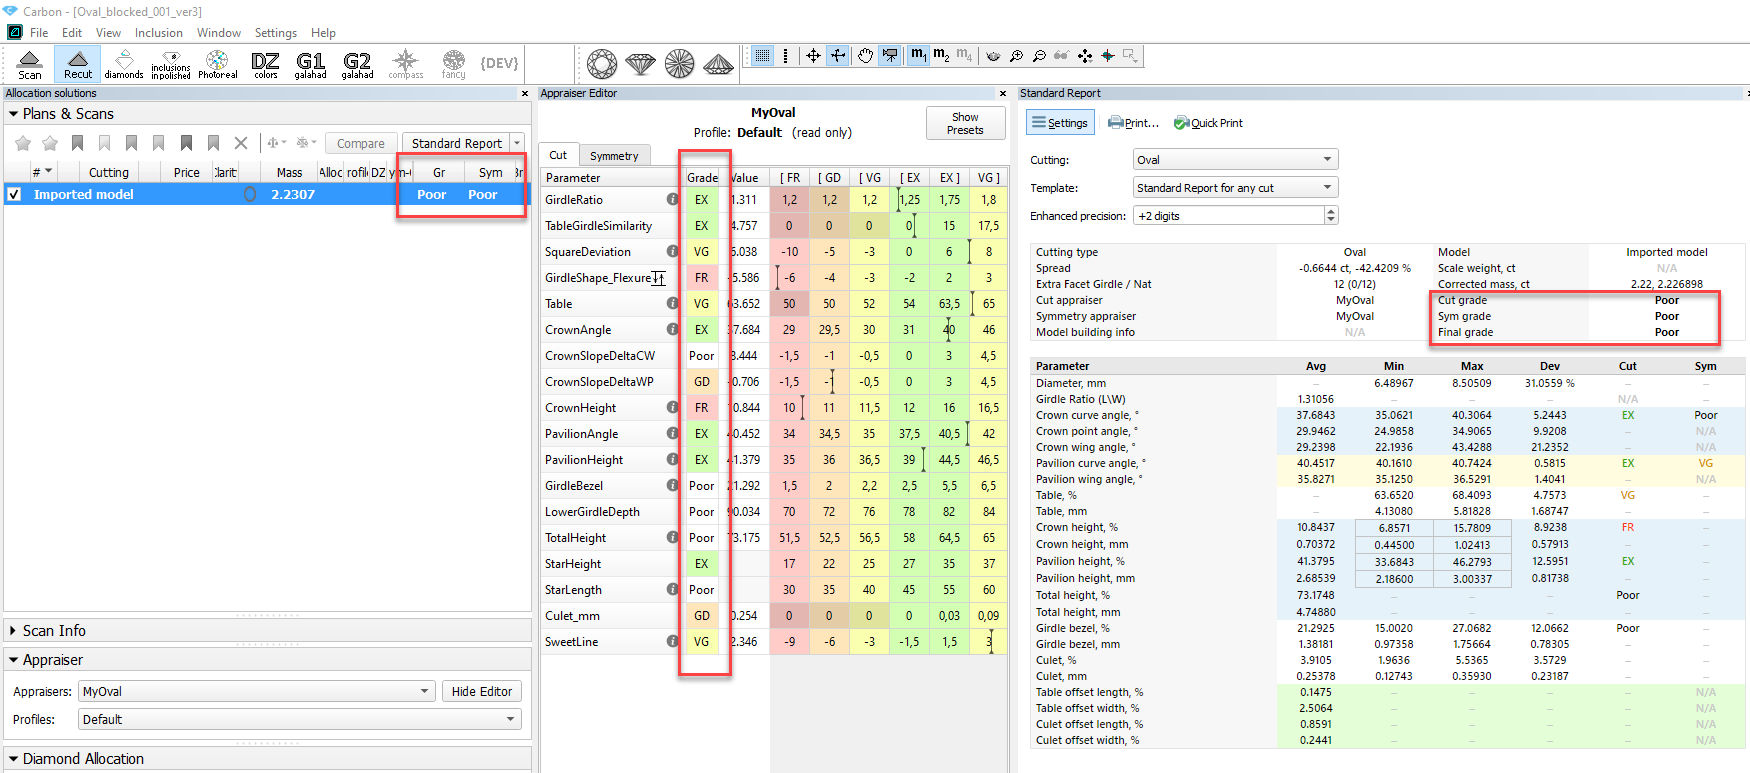
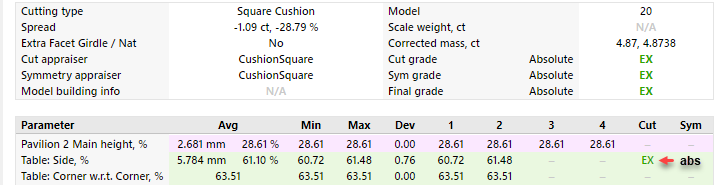
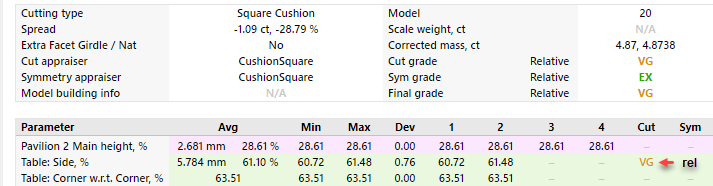
Standard and Polish Illustrated HTML reports when working with composite appraisers (CushionRectangular, CushionSquare, MyAnyCut) now show grades only for the selected component: "Absolute", "Relative" or both of them.


- Appraiser profiles "Show difference from" function did not work - now it is fixed.
- The Smart Normalize and Smart Normalize Lite algorithms are improved to work better with short edges in the culet area.
- For the "GIA Facetware + MyRound" appraiser, the StarLength EX boundaries were updated to [42,5 - 57,5] for the following profiles:
- "MyRound_ModernCut_2021-04-29"
- "MyRound_ModernCut_2021-04-29_SweetLine"
- Incorrect estimation for Pear cut caused by the Cullet offset length parameter wrong grade is fixed.
Add Comment